(A very) Quick start
Checkvist is an online outliner, a task manager and a list-making tool.
If you are familiar with this type of software, the only big difference here is keyboard-centric design.
Write down, edit, structure and re-structure lists from the keyboard, without touching the mouse.
There are two modes.
- When you write, you can use smart syntax to add due dates, tags, other attributes or text formatting.
- After you've done writing, in the 'command' mode, select list items and use keyboard shortcuts to apply actions.
To edit, press ee or F2
To finish editing, press Enter
Go into the command mode with ESC
Somewhat uncommon in online apps, this two-mode work gives you extreme flexibility, efficiency, and focus.
The shortcuts are mainly memorable two-letter acronyms for the actions. Like dd for the due date, ll for lists, or pc for progress counter.
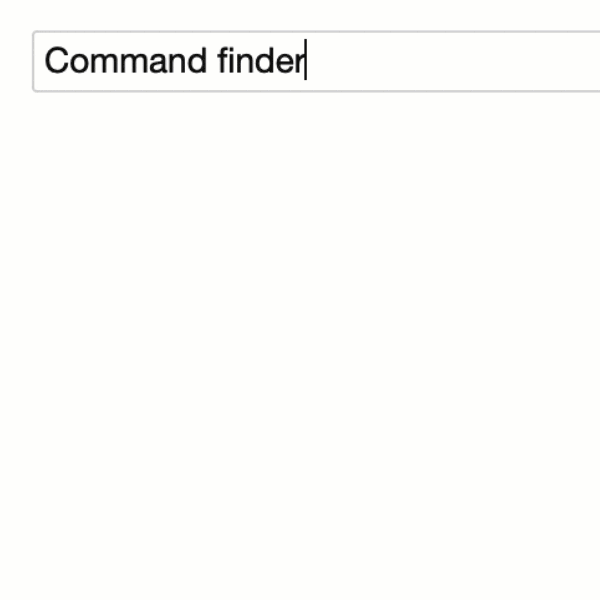
You don't have to learn all shortcuts at once - press Shift Shift to find and apply a command, anywhere.
Besides keyboard support, Checkvist is packed with power features
- Distraction-free writing mode
- Search
- Email integration
- Public and private list sharing
- and all the rest, listed below
Checkvist is an open online tool, with export, import, and a fully documented Open API with Zapier integration.
On mobile, please use the Checkvist's progressive web app 📲 https://m.checkvist.com
Lists
Navigate
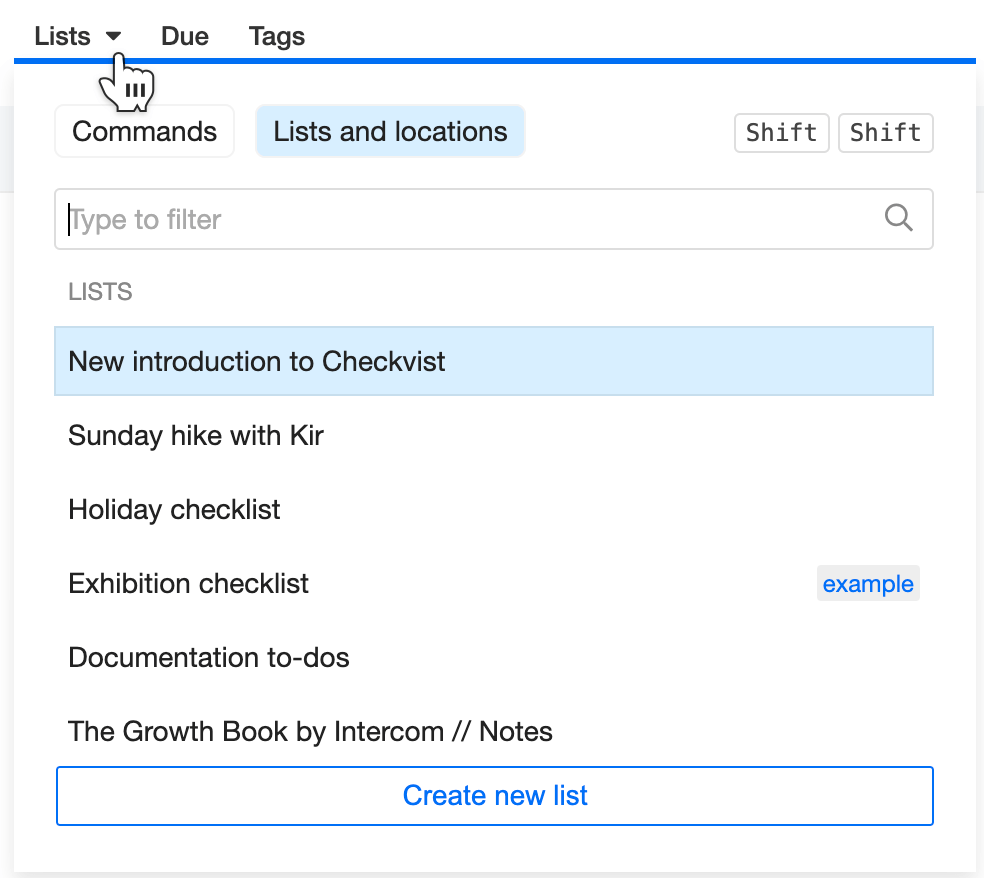
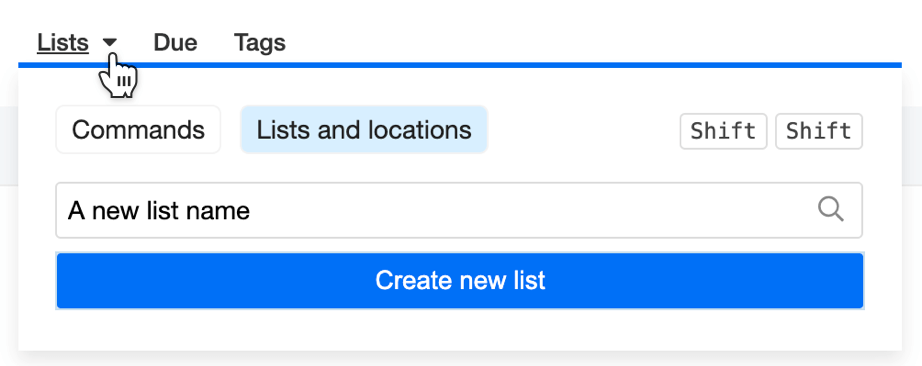
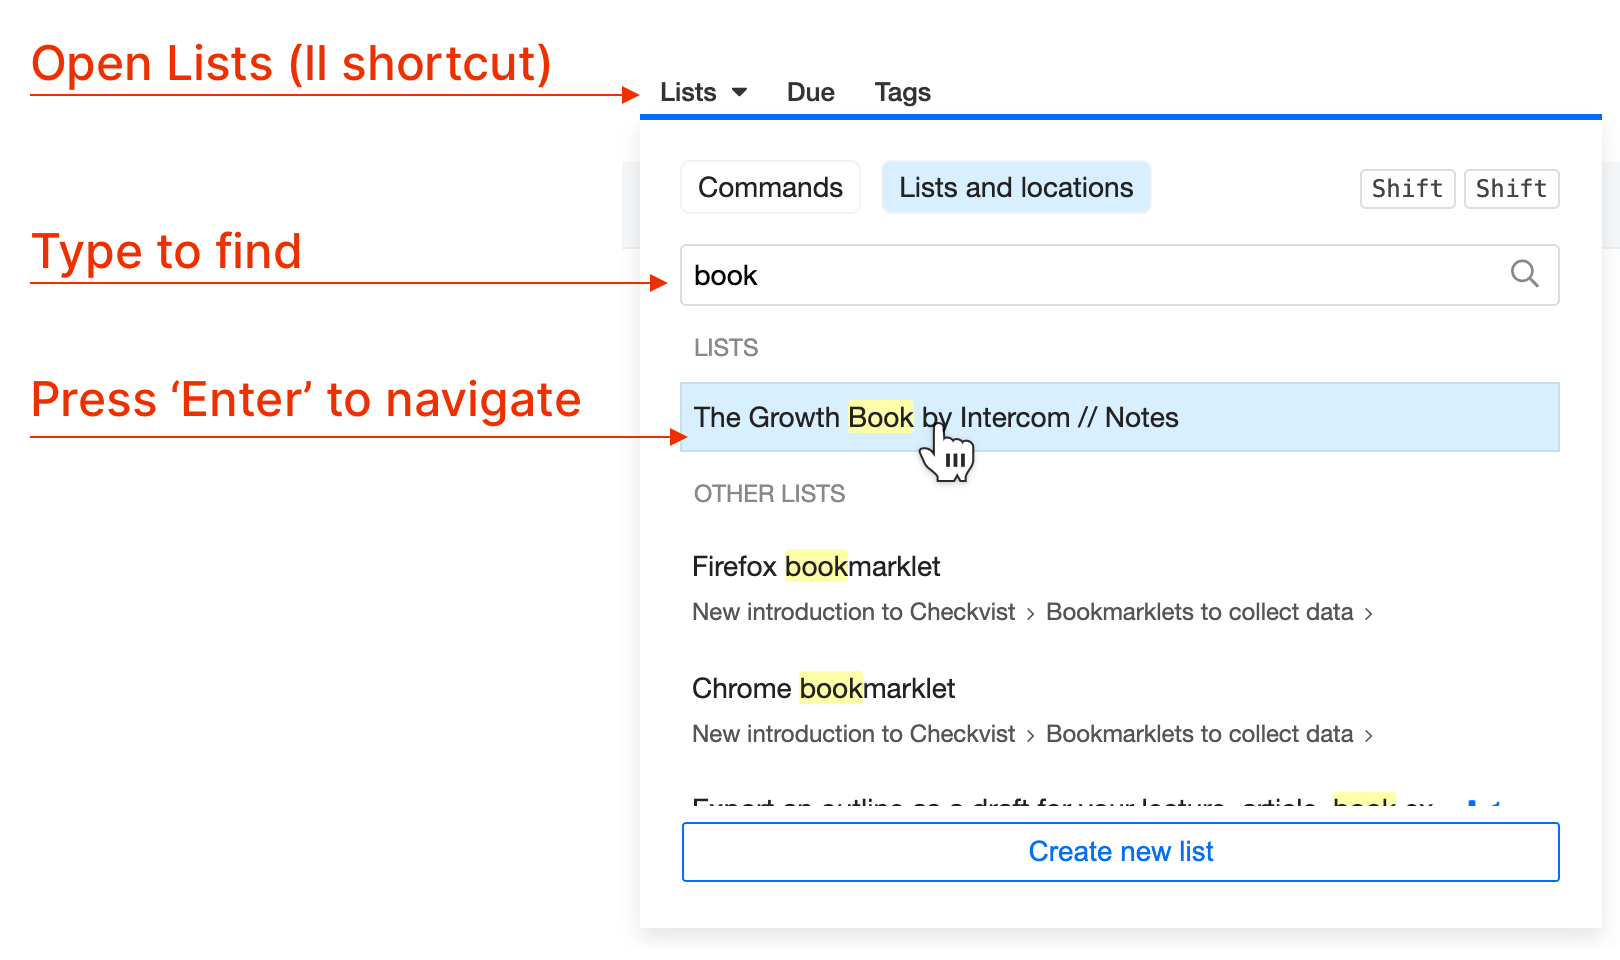
To switch between the lists and go to any list or any list item, press ll or use the Lists and locations tab in the command palette, Shift Shift.
Create
You can create any number of lists. All lists are private by default, but you can share them with other people, or make them public and indexable.
Click the Lists link in the top navigation, or use the keyboard and type ll. The Lists and list items menu is a part of the command palette, so you can use Shift Shift shortcuts too.
Type the new list's name in the search field and then press Enter. Or click the Create a new list link.
You can also extract a branch into a separate list.
Archive, Delete
You can find archived lists in the Archived section on the homepage. Such lists are not shown under the Lists popup window.
List archiving is a personal decision and does not affect other people in the team. If one person archives the list, others can continue working on it, as if nothing happened.
By default, Checkvist doesn't send notifications about changes in the archived lists. You can change that in the Notifications section of your profile page (that's a PRO feature).
To archive or delete a list, look at the bottom of the 'list actions' menu, in the toolbar.
On the Lists homepage, select a list and click Archive or Delete in the bottom bar.
☝️ You can delete only a list you own otherwise, you can only un-share it.
Edit list title
On the list page, double-click the list title and edit it. Press Save or hit Enter. To cancel editing press ESC.
Tag a list
Tag lists to group them on the lists page, or to filter them via search field or in the Lists menu.
On the list page, double-click the list title and tag it via smart syntax (#tag). On the homepage, select one or several lists with checkboxes, and then click Tag Lists in the bottom bar.
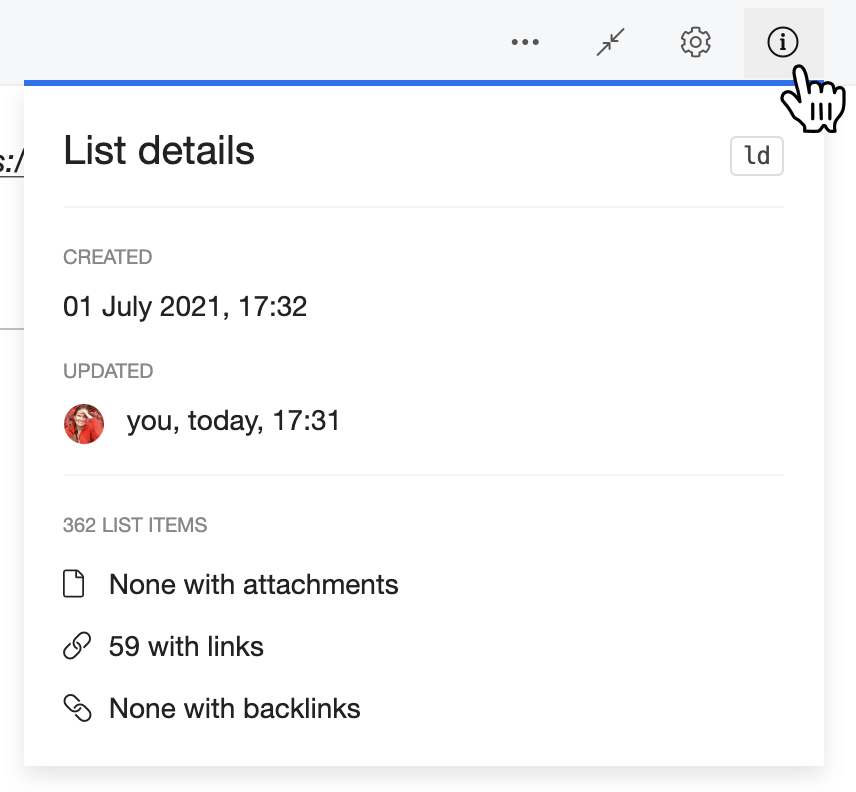
Permalinks
With list permalinks, you can save the current list view and pass it to other people. Permalinks preserve the state of filter, expand/collapse nodes, other view options. You can get a permalink from the menu after the list title.
Every list item also has a permalink. Type sd to 'show details' of each list item. The date and time of the last update is a permalink. If you navigate that permalink, the list will open in the focused mode.
Security
☝️ All Checkvist users use secure SSL channels for all data exchange with Checkvist.
List view options
Hide and show completed tasks
Hide completed or invalidated list items, and you won't need to delete them. Press hc to 'hide completed', and all completed tasks will disappear from the list.
If completed items are not visible in the list, you'll see a small icon in the toolbar.

Select the Move completed down option, and completed items will appear at the bottom of their branches.
Hide tasks with future due dates
To keep your list focused on what's due now, you can hide tasks that are due after tomorrow. These tasks will reappear automatically when their due date gets closer.
Press hf (short for “hide future”) to hide all due tasks except:
- tasks due today
- due tomorrow
- tasks marked ASAP
- and any that are overdue
You’ll still see all tasks—including future ones—on the Due and Search pages.
Show and hide details
Details are the list item's creation or the last modification type, time, and author.
The timestamp is the list item's permalink. You can copy and send it to your peers. The permalink will not change even if you move the list item to another list.
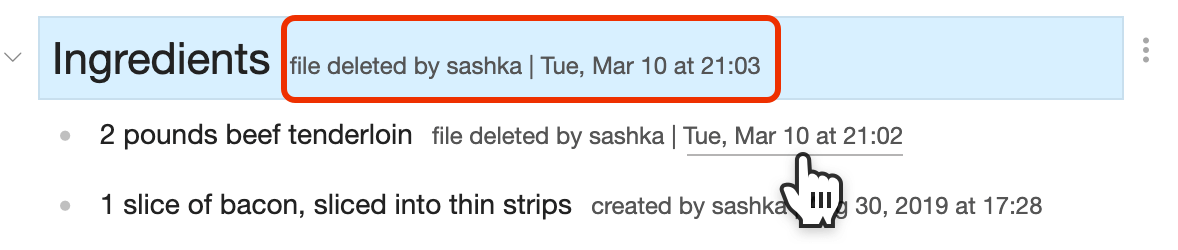
After the list item has been updated, its creation time is shown on hover.

To toggle details on and off, press sd ('show details') or select the Show details in the Options menu in the toolbar.
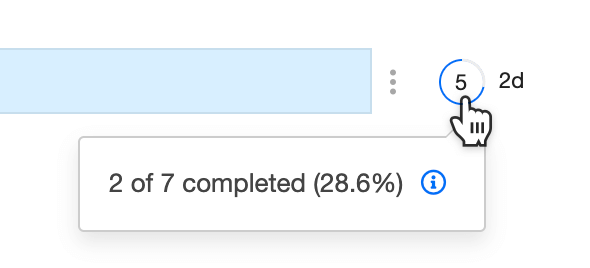
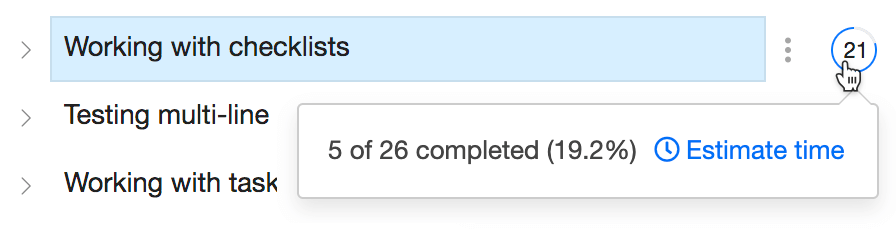
Progress counter
To track tasks completion with the Progress counter, check the Show progress counter option in the Options menu. Now you see how many open tasks are there in your list.
Hover the progress icon to see how many tasks have been closed.
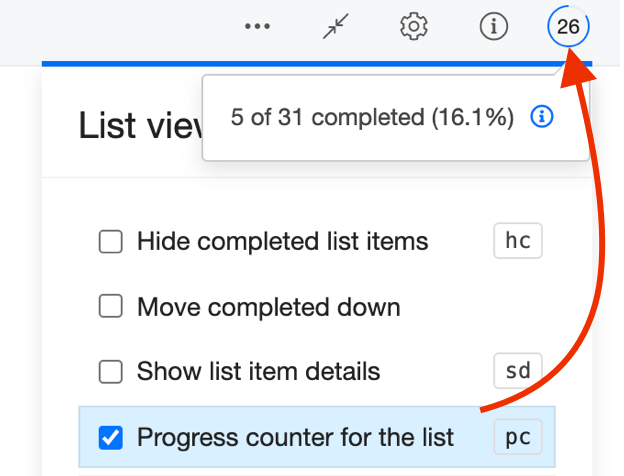
If a list contains not only tasks but mixed content, you can track the progress of specific nodes that have tasks, not the whole lists.
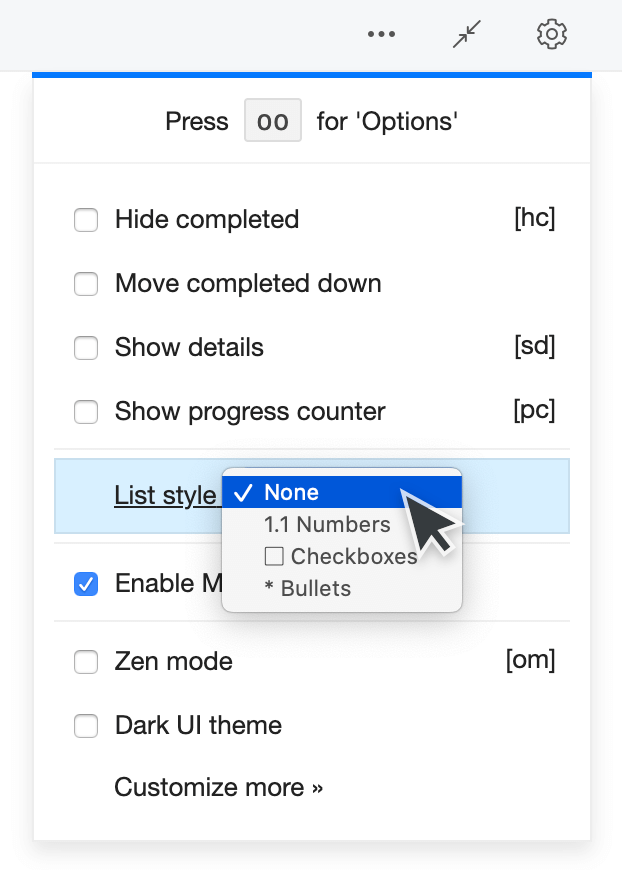
List style
Select a list style for the whole list:
- None—the default list option.
- Numbered—ordered list, adds a numeric prefix to a list item.
- Boxes—with a checkbox before every list item, ideal for checklists.
- Bullets—bulleted lists.
You can combine checkboxes, bullets and numbers in the same list—with smart syntax.
Zen mode for distraction-free writing
Press om when you want to work in a distraction-free mode. All navigation and search controls disappear, but you can use keyboard shortcuts or Shift Shift, the command finder window.
With a PRO account, you can select between different Zen backgrounds, for the light or dark UI scheme.

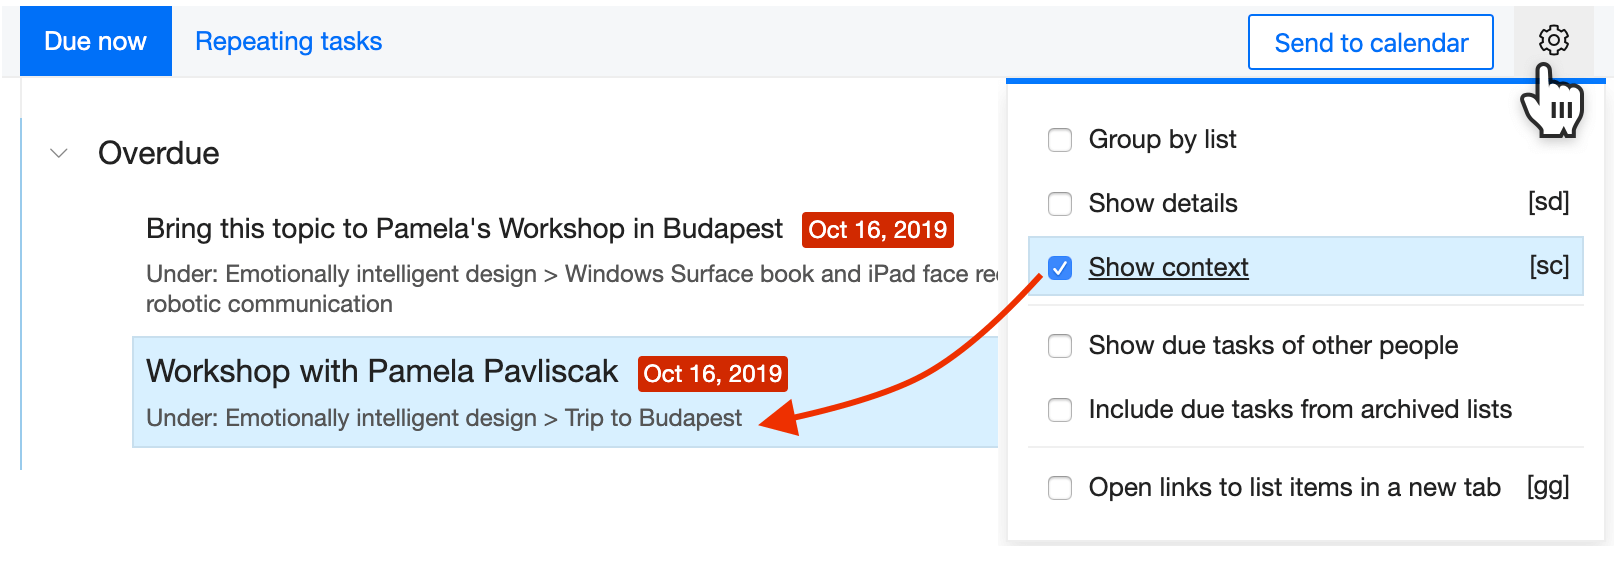
Show and hide context
On the Due and Search pages, Checkvist shows a plain list, without parent list items. If you need to see them, press the sc shortcut for 'show context'. You'll see the parent list items on a separate line, like breadcrumbs.
You can also select Show context in the View options menu in the toolbar.
List items
We optimized Checkvist for working with the keyboard. Thus you can keep focus, concentrate on what you do.
And you can do pretty much any kind of structured writing:
- Writing down meeting notes,
- Collecting and organizing research materials,
- Running a planning session.
Add list items
Press Enter to add a list item below, and Alt-Enter - above the selected one. Shift-Enter to add a sub-item.
Use Tab and Shift-Tab keys to change the indentation.
Web Clipper
Install Checkvist Web Clipper for
![]() Chrome,
or for
Chrome,
or for
![]() Firefox
to
capture, organize and share browser bookmarks and websites' content.
Firefox
to
capture, organize and share browser bookmarks and websites' content.
The Web Clipper is integrated with Gmail, issue trackers JetBrains YouTrack and Atlassian Jira, and GitHub.
👉 Read on: how to use and how to install Checkvist Web Clipper
Email integration - Email tasks to lists
Every list has a unique email address. Create an email Contact with this address, and any email you send to it will appear on top of that list.
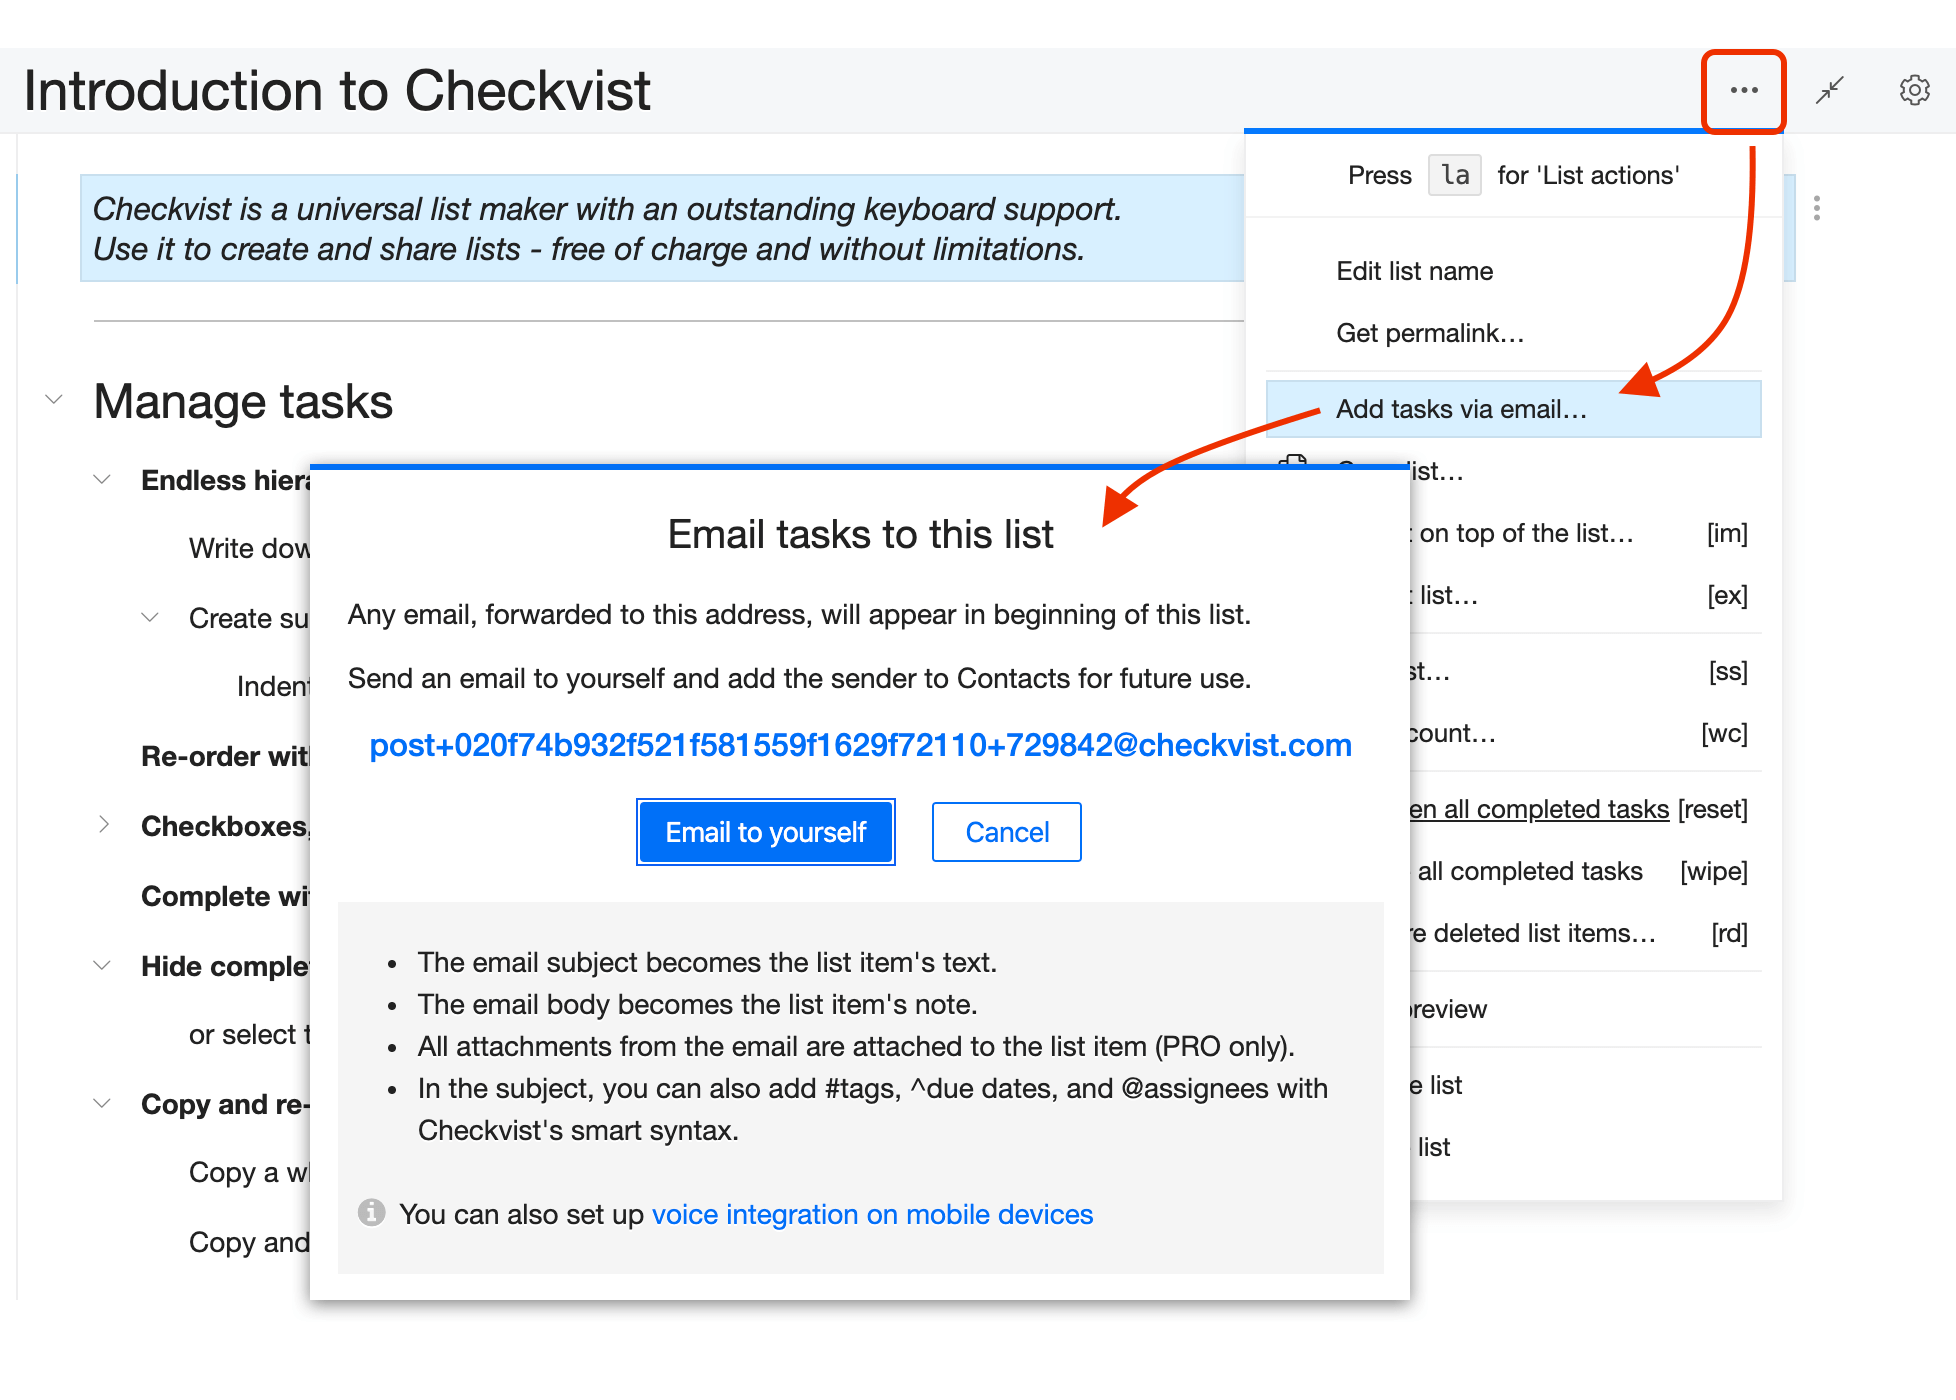
- The email subject becomes the list item's text.
- The email body becomes the list item's note.
- All attachments from the email are attached to the list item (PRO only).
- In the subject, you can also add #tags, ^due dates, and @assignees with Checkvist's smart syntax.
If you need several 'inbox' lists, create several email contacts with the lists' addresses.
Voice integration on mobile devices
The same email integration can be used to send voice notes to Checkvist from your mobile device.
'Note to self' to Checkvist (Android)
1. Configure G-now to send emails for the note-to-self action
This is the default behavior, but other options may exist (like creating a Keep note), so update this, if needed. For every new note, G-now will send an email to your Gmail account with the subject "Note to self" and the email's body containing the note itself.
2. In Gmail, add the email address of the Checkvist list as an allowed forwarding address
Check Gmail > Settings > Forwarding > "Add a fwd address". For validation, Gmail will send a message to the Checkvist list's address and it will create a dummy task on Checkvist. Follow the instructions to allow the forward. That dummy task can be erased when done.
3. Create a new filter in Gmail to forward the "Note to self" messages to the Checkvist list address
Create the filter as follows:
Matches -> from:****@gmail.com to:****@gmail.com subject:("Note to self")
Do this -> Forward to post+*******@checkvist.com, Delete it
When set up as described, the filter will delete the message that is forwarded so the notes skip the user's Gmail inbox.
4. Test it!
Say "Ok Google, note to self, buy milk". It sends an email with subject "Note to self" and body "buy milk" to Gmail. The Gmail filter forwards it to the Checkvist list's email, which then becomes a shiny new Checkvist task:

Edit list items
To edit a list item, double-click it or press ee or F2.
Use smart syntax to set due dates, tags, or assignees while you're writing.
You can also use Markdown for rich text formatting. Press the ellipsis icon to see the hints:
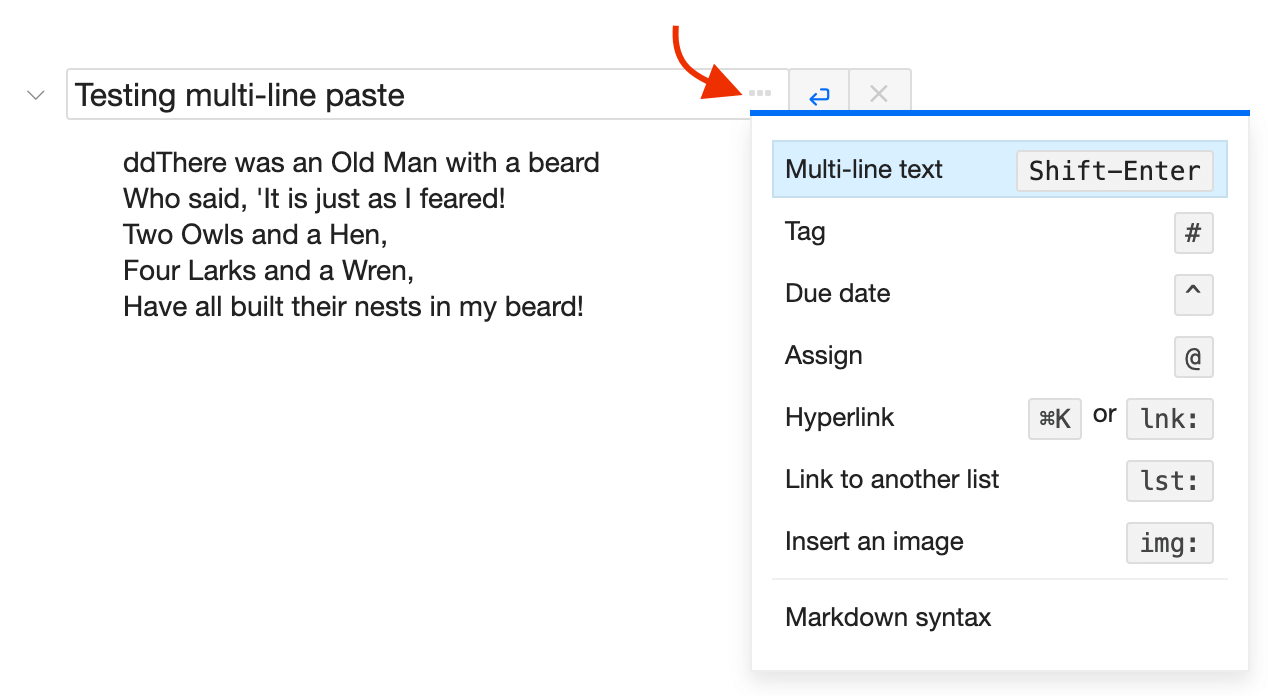
Multi-line text
When editing a list item, use Shift-Enter to set the first line-break. After that, you can use Enter. Finish editing and submit changes with Ctrl-Enter.
Delete
Delete a list item with the Del key. If you're on a laptop without the Del key, use fn-Backspace.
The list item gets deleted with all its sub-items.
✅
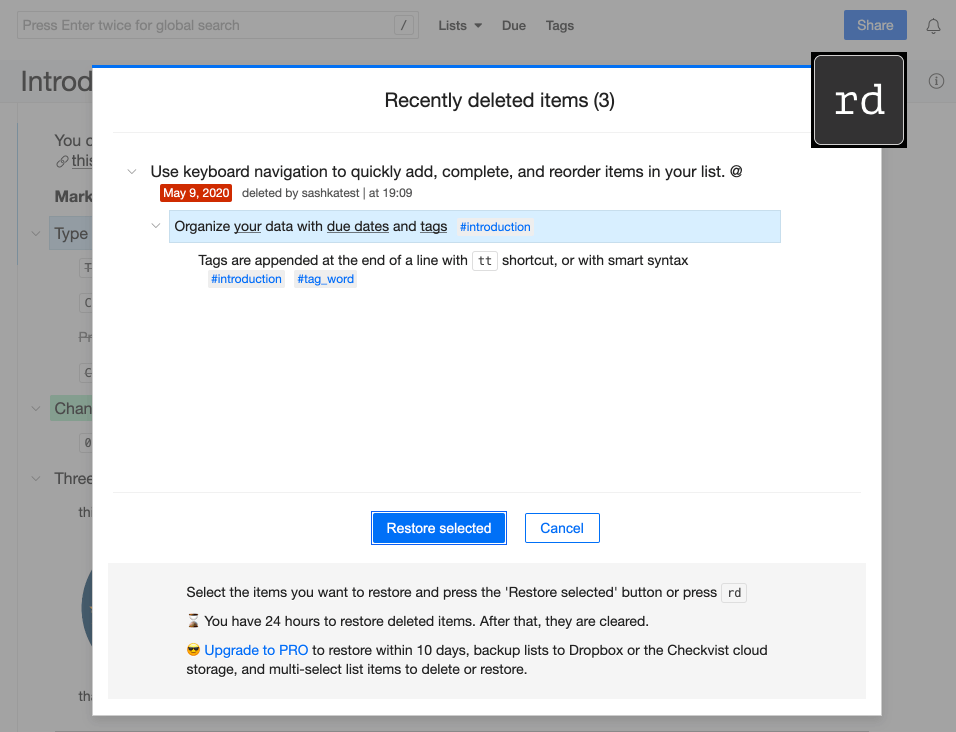
Restore deleted items
Right after the deletion, you can restore the last deleted item with a one-step Undo action, Ctrl+Z.
To restore deleted items later, use the Restore deleted function.
Press rd to view all recently deleted items or open the List actions menu in the toolbar and click 'Restore deleted'. Free account users can restore list items within the 24 hour period.
😎 PRO customers have 10 days to do that.
Select the items you want to restore, and press the Restore selected button. The restored list items will appear on top of the list. Use the bulk and the 'sticky' selection to restore several items in one go.
Navigate
Navigate the list with arrow keys. ← and → arrows will collapse or expand nodes in hierarchical lists.
Find and go to a list item
Find any list item in any list fast and completely from keyboard.
- Press ll for Lists and locations
- Type to find a list item or a list
- Enter to navigate there
Jump between recent locations
Use the g ← and g → shortcuts to navigate back and forward between your recent locations in the list.
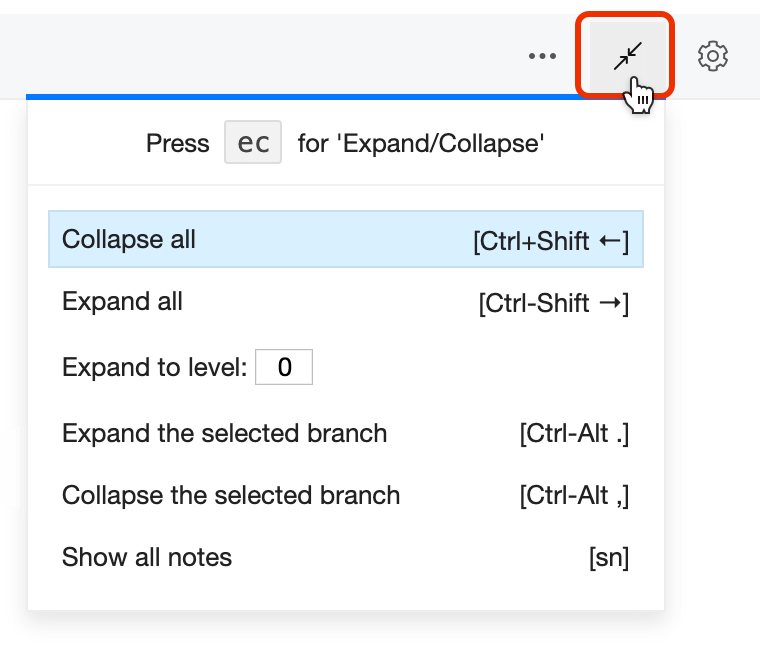
Expand and collapse branches
When you work with large hierarchical lists, fast and convenient navigation is a must. Press ec or click the icon in the toolbar to see Expand/collapse options. Choose to Expand all or Collapse all, show all notes or even select a level to which all list items expand.
If you open expand/collapse window with ec and press a number after that, 1..9 - Checkvist will collapse the list to the corresponding level. Similarly, ec0 will collapse the list + will remove the current focus, if the list is focused.
Indent, un-indent and reorder list items
Use Tab or Shift+Tab to indent and un-indent.
Move the list items up and down with Ctrl+↑ and Ctrl+↓ keys.
Hold down the Shift key to drag-and-drop list items.
✅ Works with multi-selected list items (read more on bulk operations)
Hoist (focus)
When a list becomes too long, use the Hoist (Focus) to hide all hierarchy, except one node.
To hoist, press Shift → on a selected list item, or click the pin icon in the Actions menu.
PressShift ← to un-focus.
The parent items of the hoisted node become breadcrumbs. Navigate breadcrumbs from the keyboard with arrow keys, and press Enter to hoist a parent node.
Click or press Enter on the first >> icon to hide breadcrumbs completely.
When you send out a permalink or when you share a list with the selected Keep the list's current state option, the list opens in the hoisted (focused) mode.
Task status: completed, open, or invalidated
A list item can be open, closed (completed), or invalidated. Use Spacebar to toggle open/closed status, and Shift+Spacebar to invalidate.
By default, a parent list item is closed when all its sub-items are closed or invalidated. You can change this on the Profile → Settings page. To do that, un-select the option "Close parent task when the last child is closed".
Hide all closed and invalidated tasks with the hc (hide completed) shortcut. Or choose to Move completed tasks down from the Options menu.
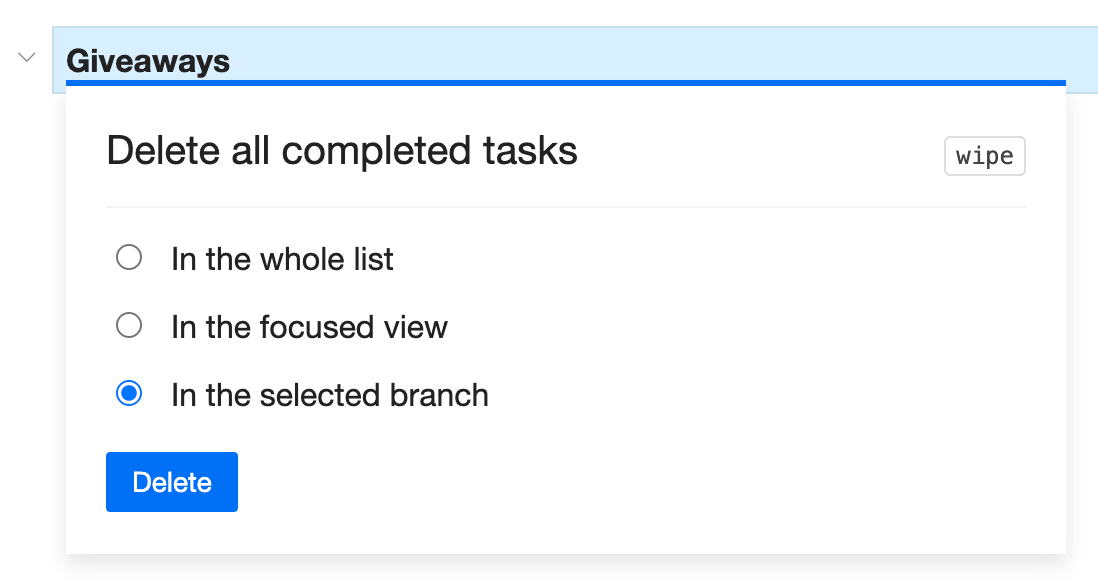
'Wipe' completed tasks
If you hide completed tasks with hc, you won't see them. But if you want to clean the list of all completed tasks, you can do it with one keyboard shortcut. Type wipe or select the action from the Actions menus.
You can always define the operation's scope -
'Reset' completed tasks
To re-use a list with completed tasks, you can copy the list with 'Clear all statuses' option. or you can 're-open' all completed tasks with a single shortcut reset
Select where you want to re-open completed tasks -

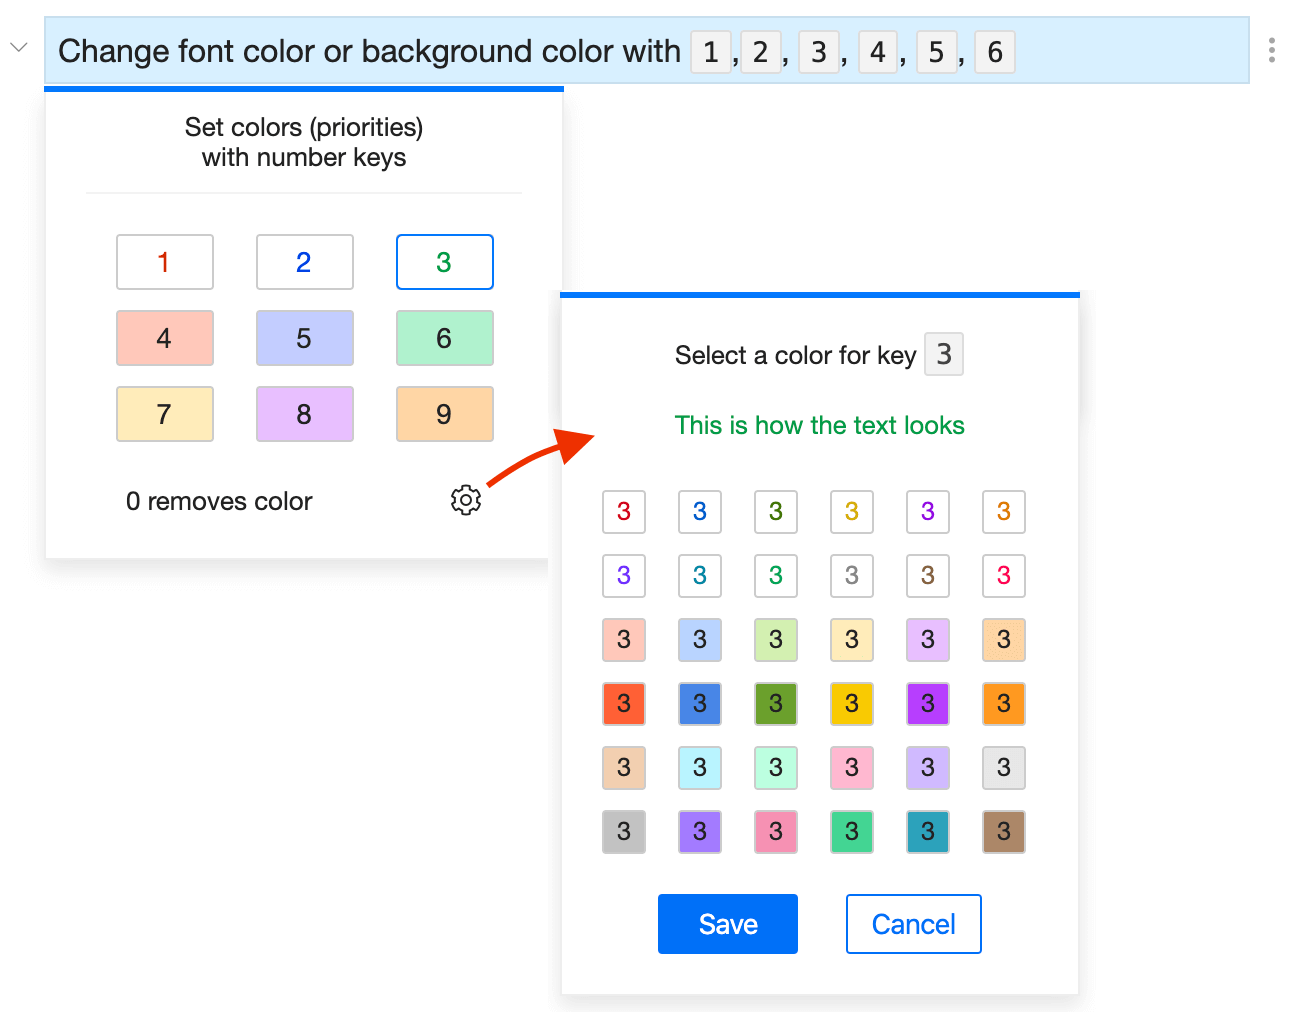
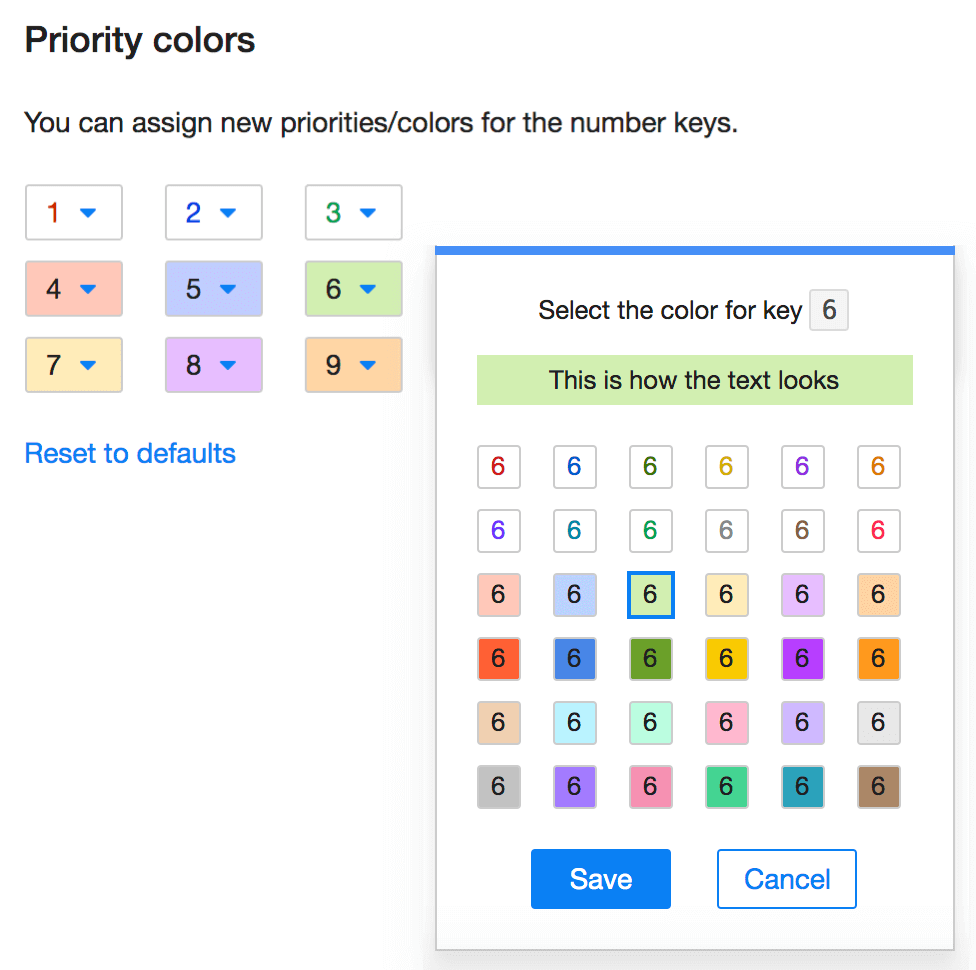
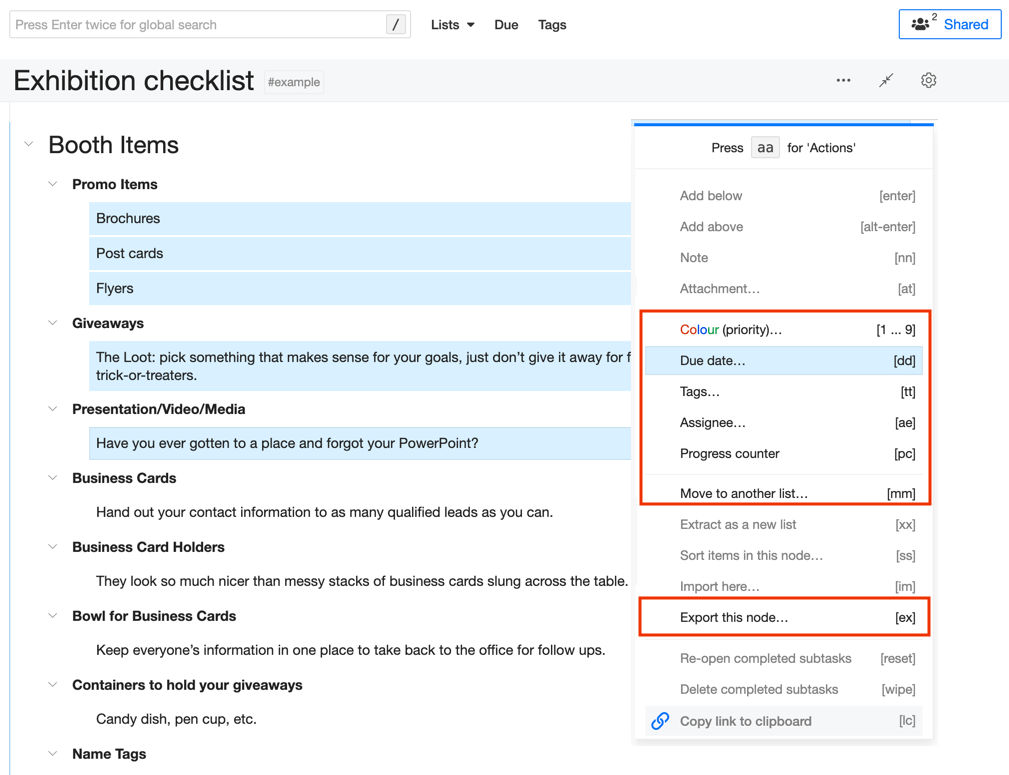
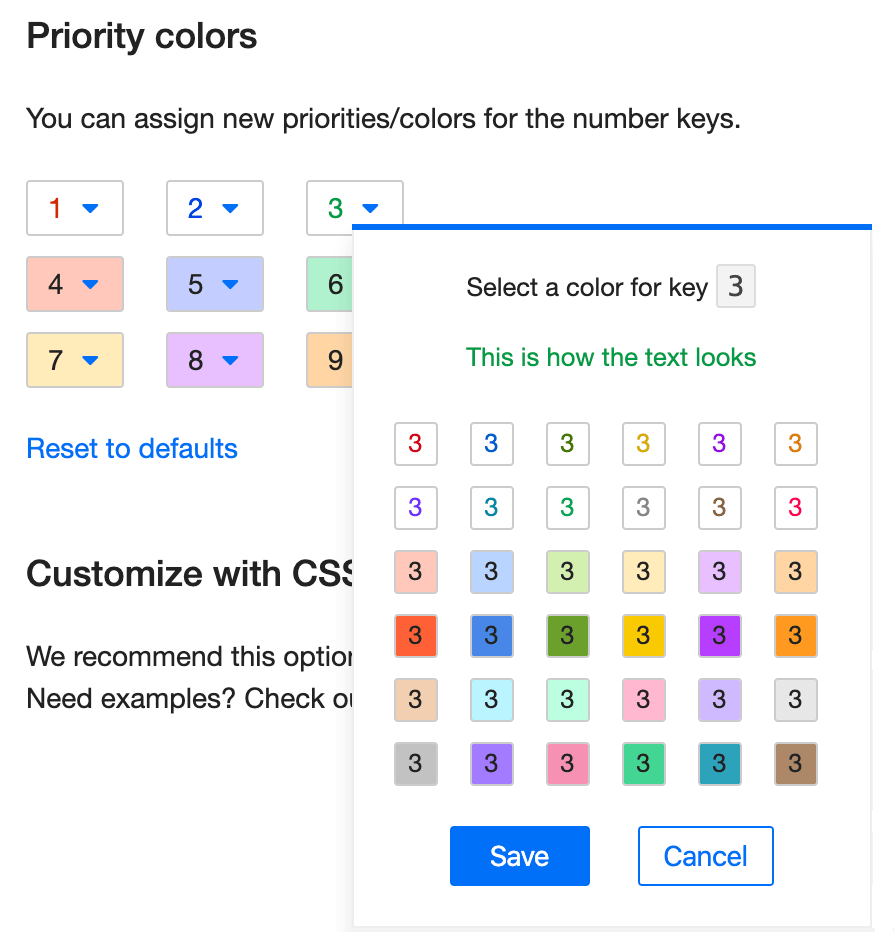
Color (priority)
Select a list item and press a number key from 1 to 9 to set color. Press zero 0 to remove color. When typing, use smart syntax !1 ... !9 at the beginning or the end of the list item.
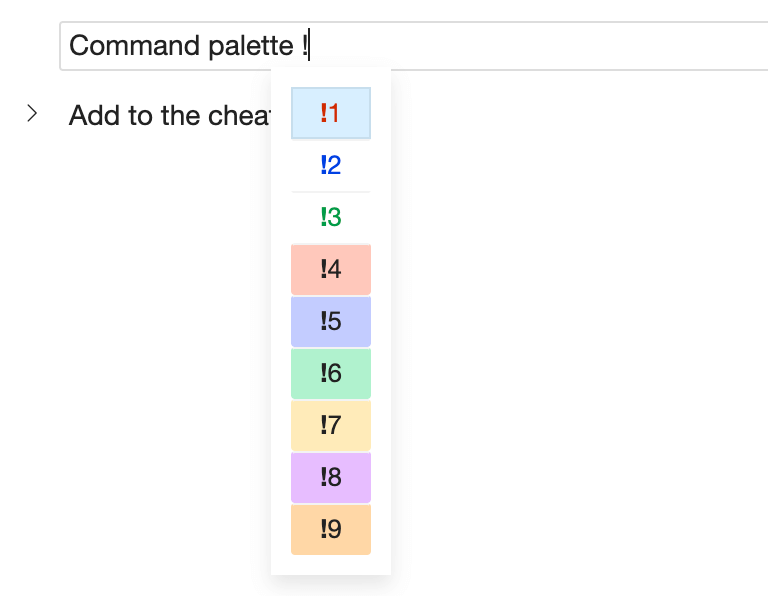
Color is a shared property, so anyone working with that list will see the same colors.
Colors can stand for priority levels. Search for priority: 1 or color: 1 to find all list items with the same color (priority).

Customize colors pro
PRO customers can customize the default color palette. The customization works for the whole account. If you change colors, it will affect all people working with your lists.
If you decide to remove all customized colors, press the Reset to defaults link on your profile page.
✅ Works with multi-selected list items (read more on bulk operations)
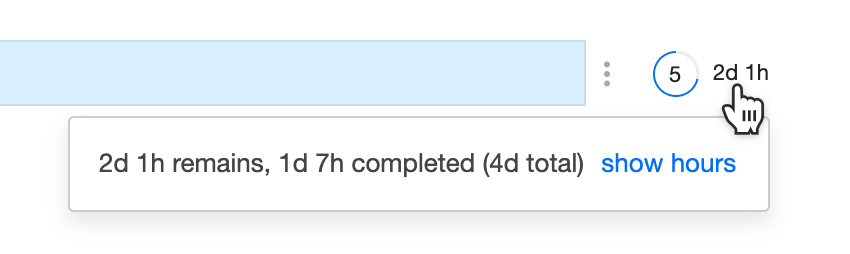
Progress tracking with time estimates
Use time tags to track progress and to see how much have you already done.
Time estimation with tags
Press tt for the Tags dialog window, or put the time estimate with # smart syntax, at the end of the task.
Checkvist understands estimates in minutes, hours, or days, so use tags like 15m, 3h, or 8d.
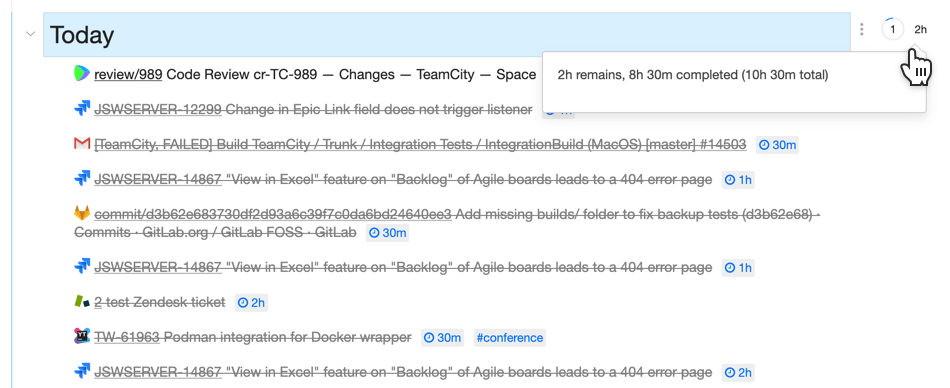
Checkvist will calculate the total time and show it beside the parent item.
#60m = #1h
#8h = #1d
When you complete tasks, the colored circle grays out. The number in the circle shows the remaining open items, and the figures near are the remaining time.
Hover to see the details and to select whether you want total time in hours or days:
Progress tracking for a branch
For a list with mixed content, you can track progress only for the branches that contain tasks - with or without time estimation.
Select a branch and press pc. You'll see how many open tasks are in that branch. Hover the progress icon for other details.
💡️ If you use time tags like 15m, 3h, or 8d, the progress tracker will appear near the parent task automatically.
Progress counter on the whole list
Progress counter works for the whole list as well. Select the corresponding checkbox in the Options oo menu:
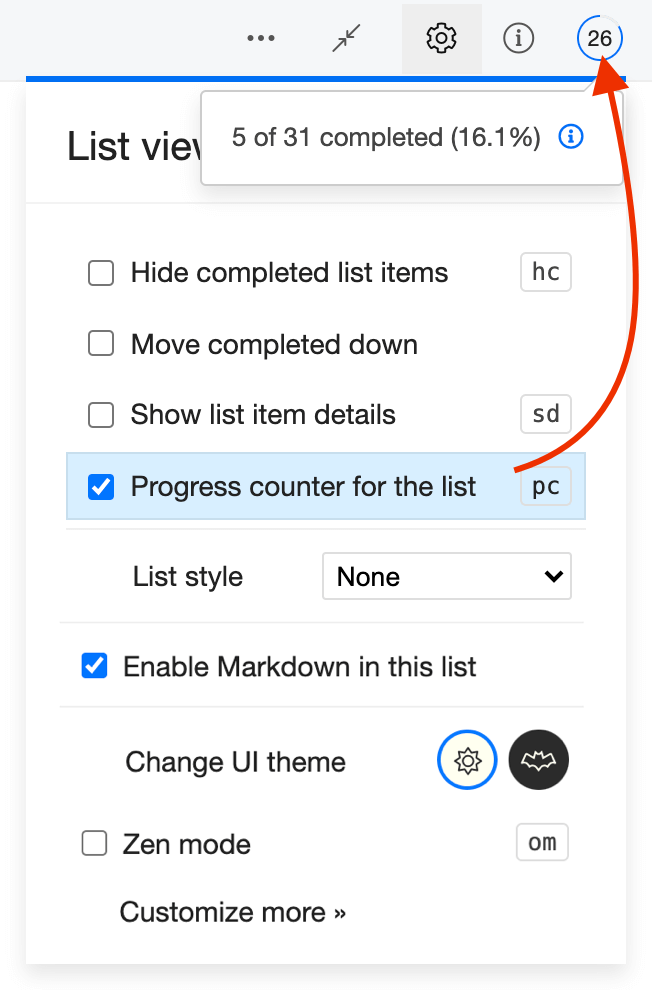
☝️ The figure in the progress counter depends on the Close parent task when the last child is closed option on your Settings page. They might also look strange if you have forgotten you enabled the Hide completed option.
Progress counter on the Lists home page
On the Lists page, the counter can show either of two metrics
The number of open tasks (excluding parents),
- If the progress counter is activated on the whole list.

The total number of list items (including parent items),
- If you there is no progress counter on the whole list; or
- If the progress counter was activated on some of the branches, but not the whole list.

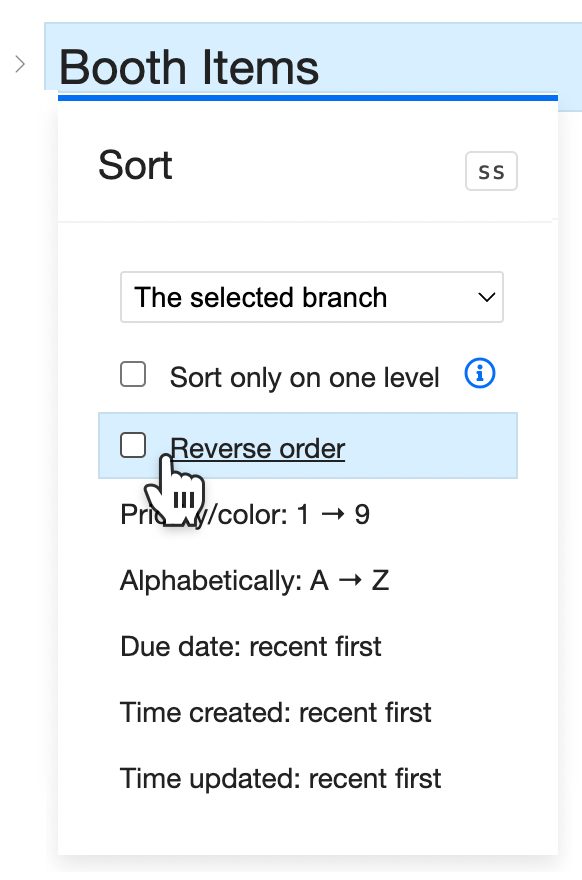
Sort
Press ss to invoke the Sort menu. You can sort one branch or the whole list.
- by priority
- alphabetically
- by due date
- by time created (newest first)
- by time updated (recent first).
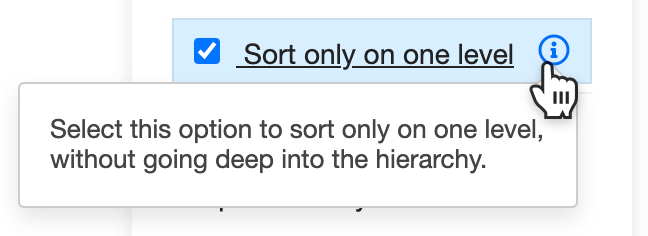
Shallow sort
Shallow sort allows sorting one level deep.
Reverse sorting
Select the Reverse order checkbox to sort from Z to A, from oldest to newest, and so on.
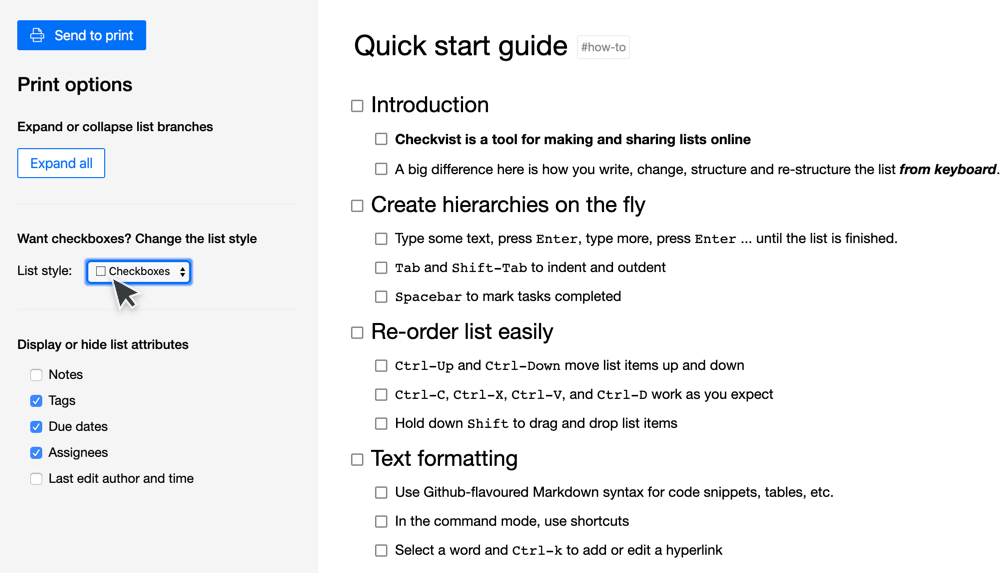
Checkvist optimizes the lists for printing.
But if you need to control how the list prints out, use the Checkvist's Print preview first.
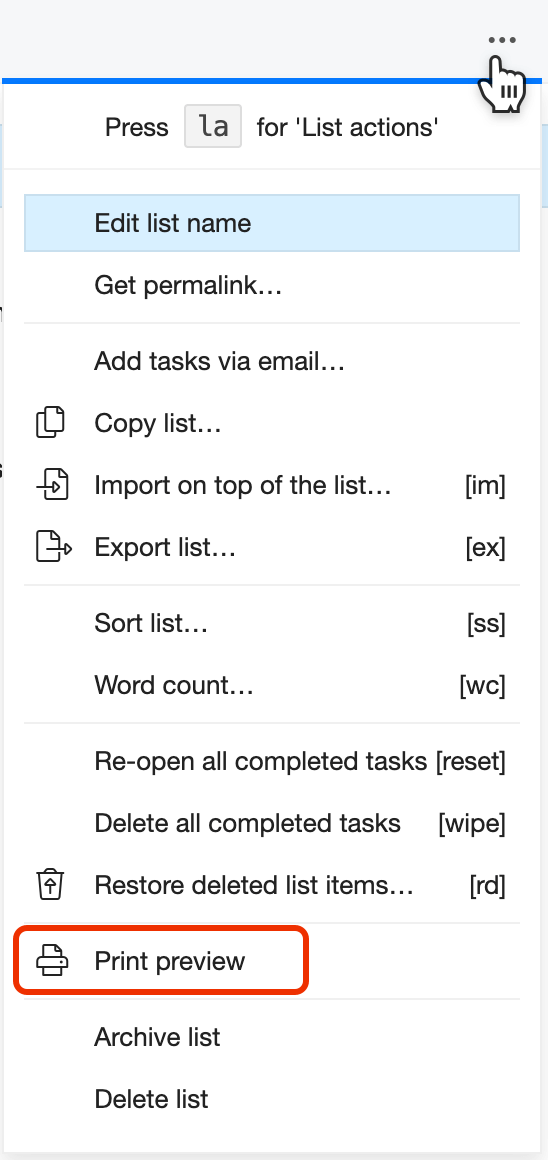
The Print preview has several options, like
- hiding tags, due dates, or assignees
- displaying or hiding notes
- printing out checkboxes (useful for checklists!)
If you need to print a part of the list, use filter or focus.
How to copy lists and list items
Select one or several list items and copy them with the usual copy-cut-paste shortcuts Ctrl+ c, Ctrl+ x, Ctrl+ v, or even duplicate with Ctrl+ d.
If you select a parent item, Ctrl+ c will copy the whole branch.
☝️ How to select several list items and save time with bulk operations
Copy with URL
Ctrl-Shift-c copies text of a list item with its unique URL.
The list item formatting will be copied in Markdown. If you press Ctrl-Shift-c on a list item with children, you'll copy the text of the children, too.
💡 You can use the Copy, Cut and Copy with URL shortcuts in the Lists and locations, ll menu window.
Copy list
Copy the whole list with the Copy list… command from the 'list actions' menu in the toolbar. You can copy only list items with certain attributes:
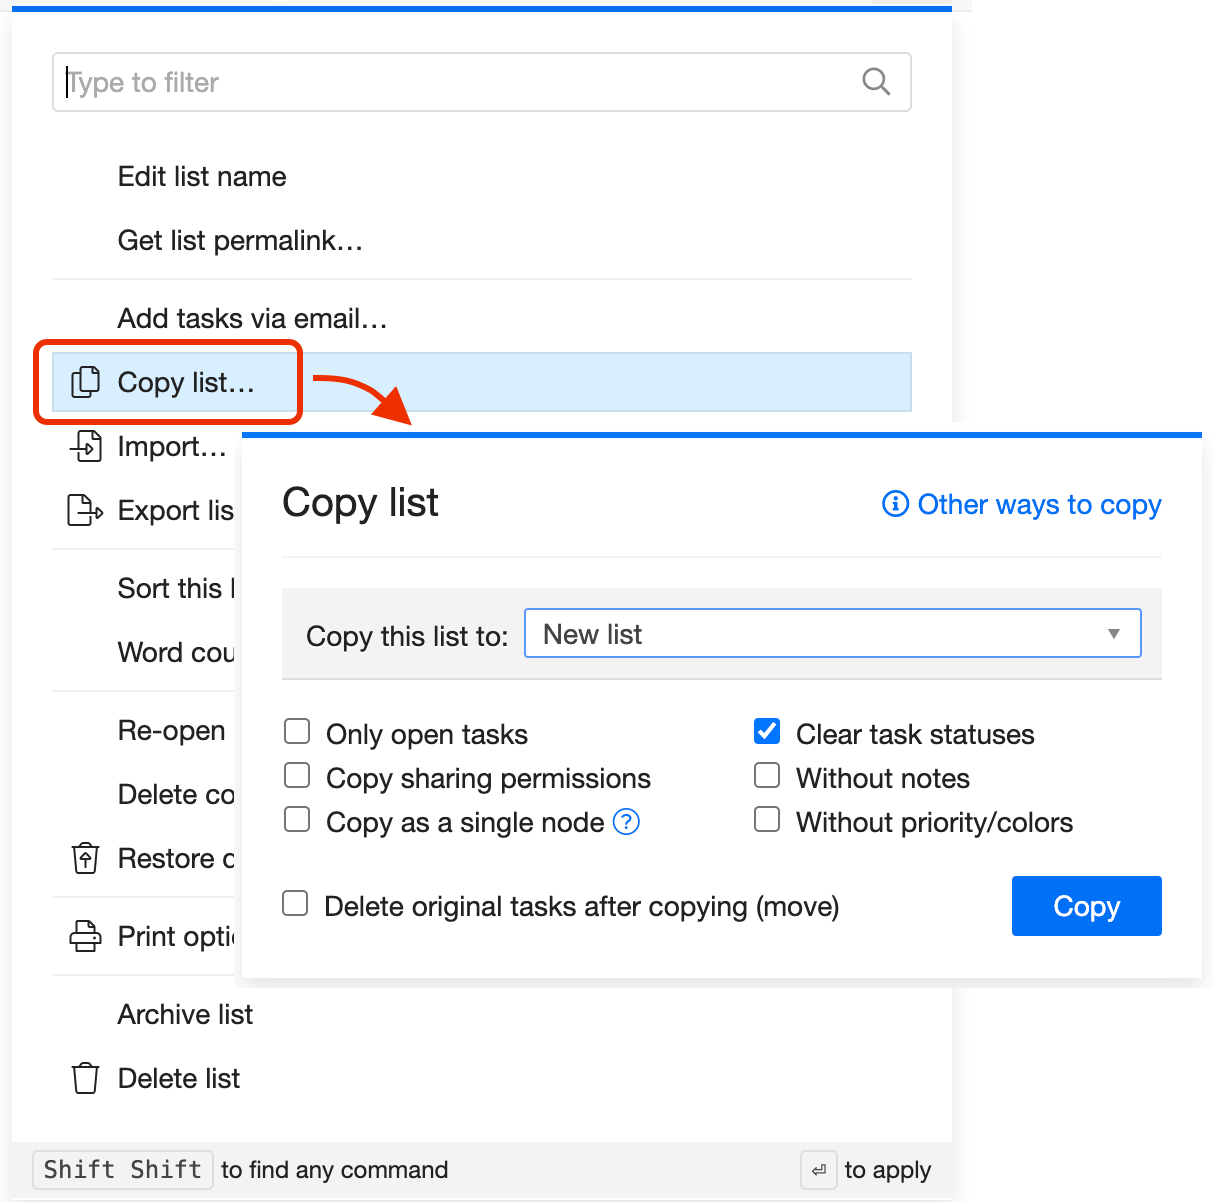
You can create a new copy of the list, or 'inline' it into another list. Select the As a single node option in the Copy list... dialog box, and you will copy the whole list to the new destination as one node, with the list name as a root task.
Move list items
You can move list items to another place in the same list or any other list without leaving your current location. Select the task you want to move and press mm.
In the Move window, type to find the target destination, then press Enter to move the list item to that place.
If you choose a list, the selected item will move to the top of that list. If you choose a list item, it will move under it, as a child.
✅ Works with multi-selected list items (read more on bulk operations)
Move list items to a bookmark
If you have bookmarks on lists or list items, you can move the selection to a bookmarked location. Select the task(s) and press mb.
If the bookmark has a digit shortcut assigned, you can also use mb0..mb9 to move directly.
✅ Works with multi-selected list items (read more on bulk operations)
Extract a branch as a separate list
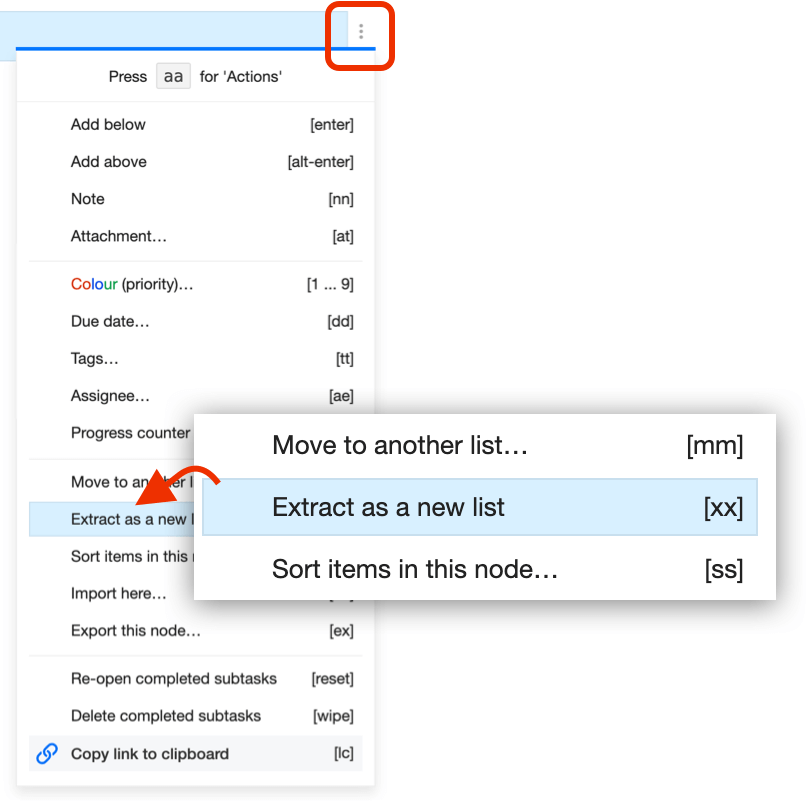
You can 'cut off' some list branches, and create new lists out of them.
- Select the top list item of the node you want to extract.
- Press xx
- The node becomes a new list, linked to the old one as
 List title.
You don't need to share the new list with the same team. It will be automatically available to the people who worked on the original one.
Undo
Most operations are undoable with one-step undo. Press Ctrl+Z or uu to undo the last action.
To restore recently deleted items (~24h), use the 'Restore deleted' rd command.
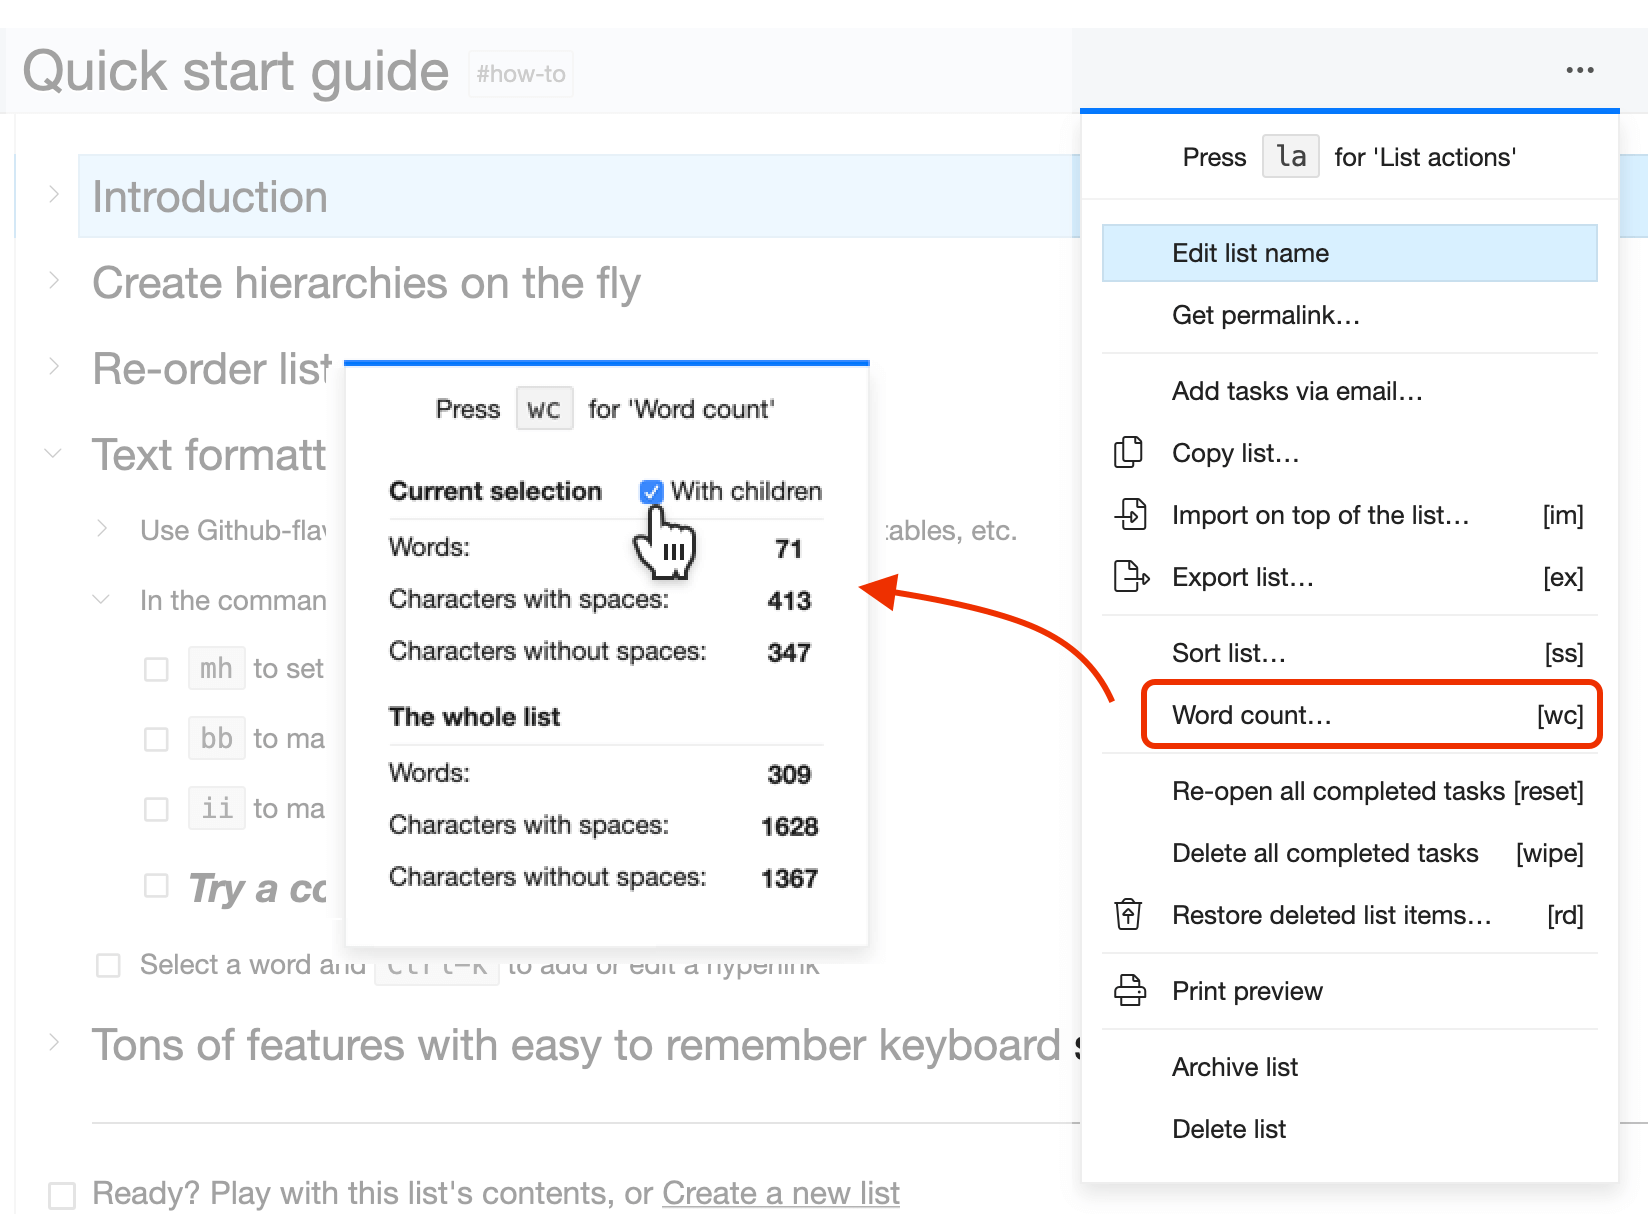
Word count
Checkvist can count words and characters, with or without spaces, on one branch or the whole list.
Open the List actions menu or press wc to see the 'word count'.
Unselect the 'With children' checkbox, if you need to run the calculation on the parent item.
List sharing and collaboration
☝️ All lists are private unless shared.
Share a list to work together, assign tasks, or set up notifications about changes.
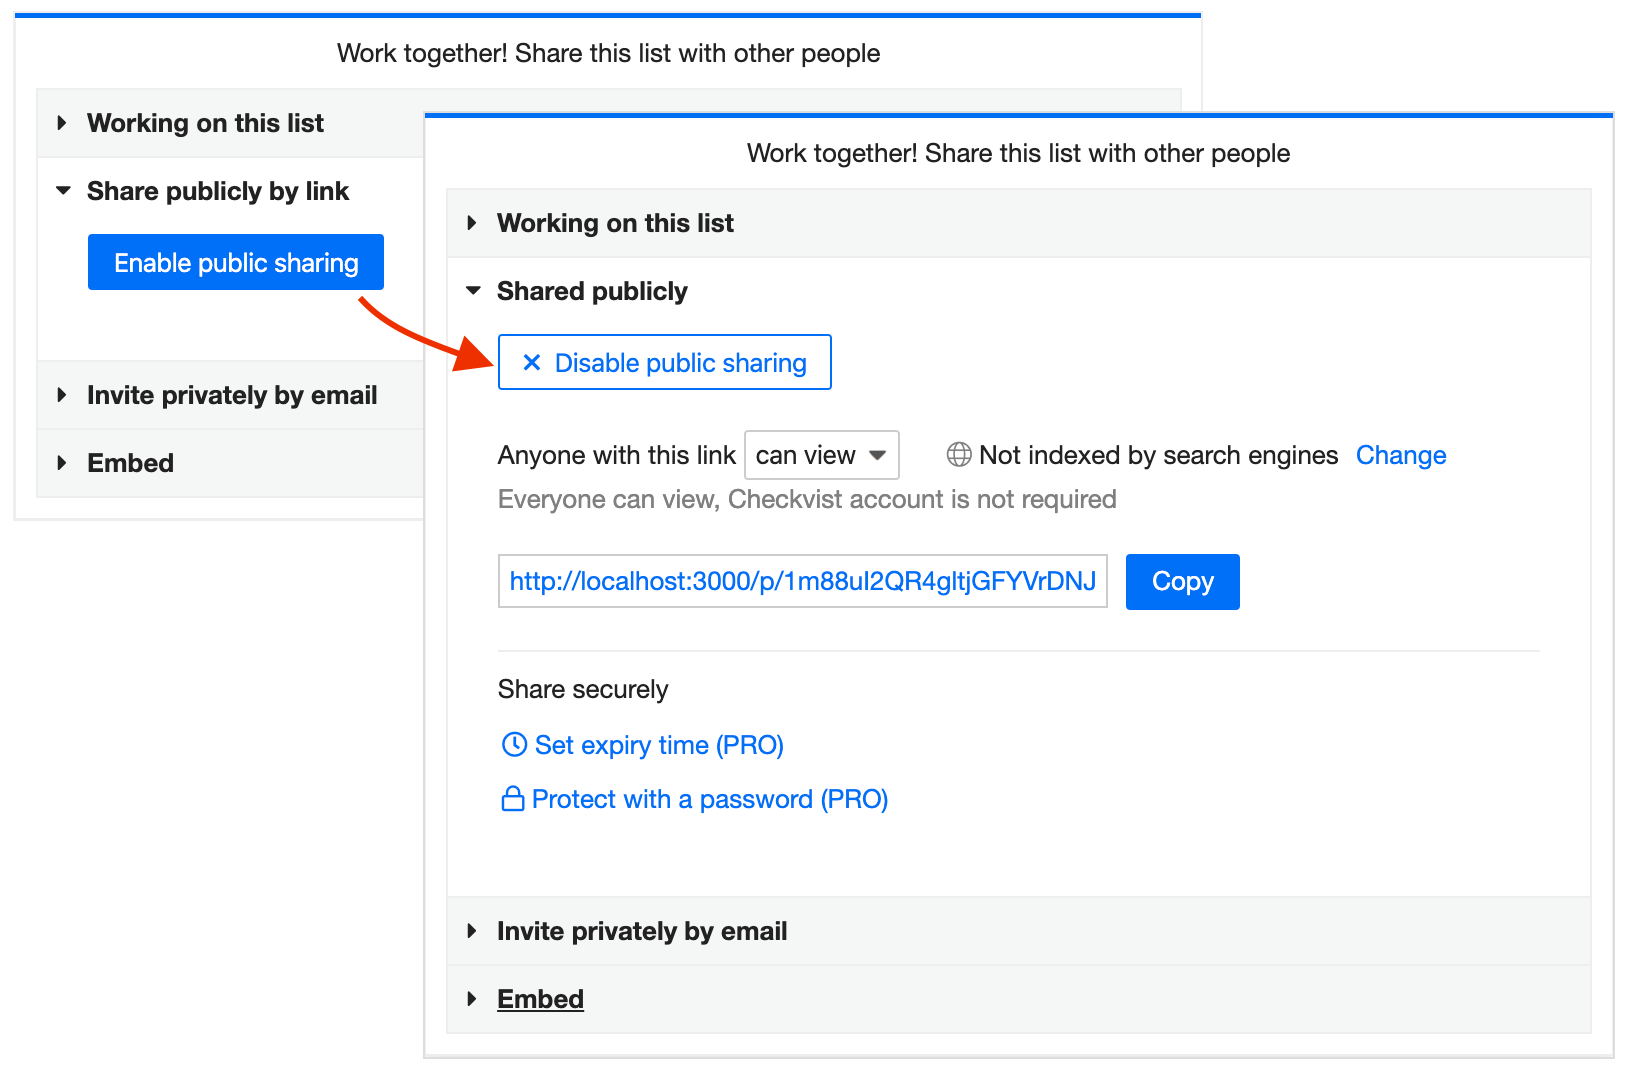
Public sharing
Make your list available to anyone on the web with the unguessable public link that you'll share. Set permissions, so people can only read the list's contents or edit it.
People do not need a Checkvist account to view a public list. But they need it to make edits if they have 'writer's permissions'.
They will also need a Checkvist account if they want to save a public list to their account.
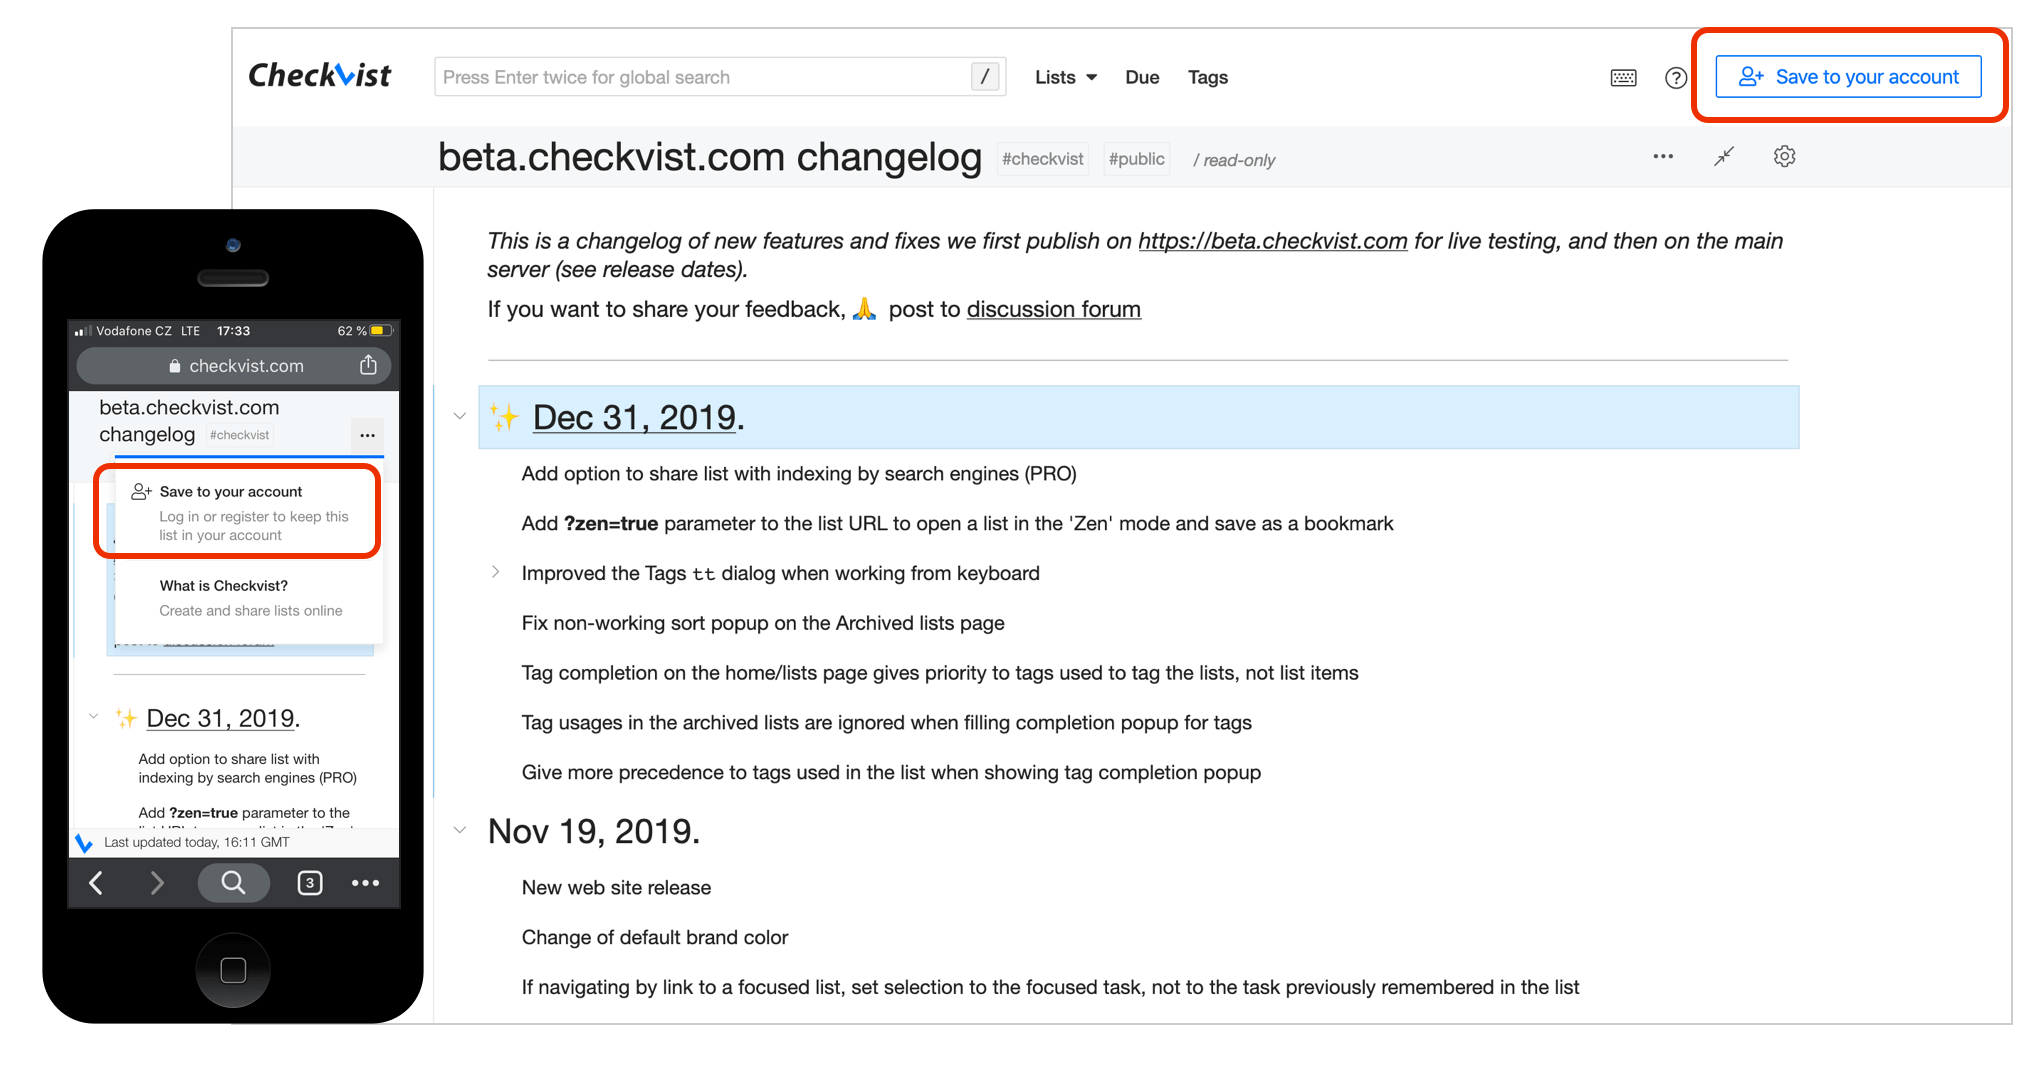
When you press 'Save a list to your account', the list gets shared with you. The list author receives a notification that you joined the list of collaborators and can control the edit permissions.
The author can 'un-share' anyone from the list, or disable the public sharing altogether. The author can send everyone email notifications about the public list updates.
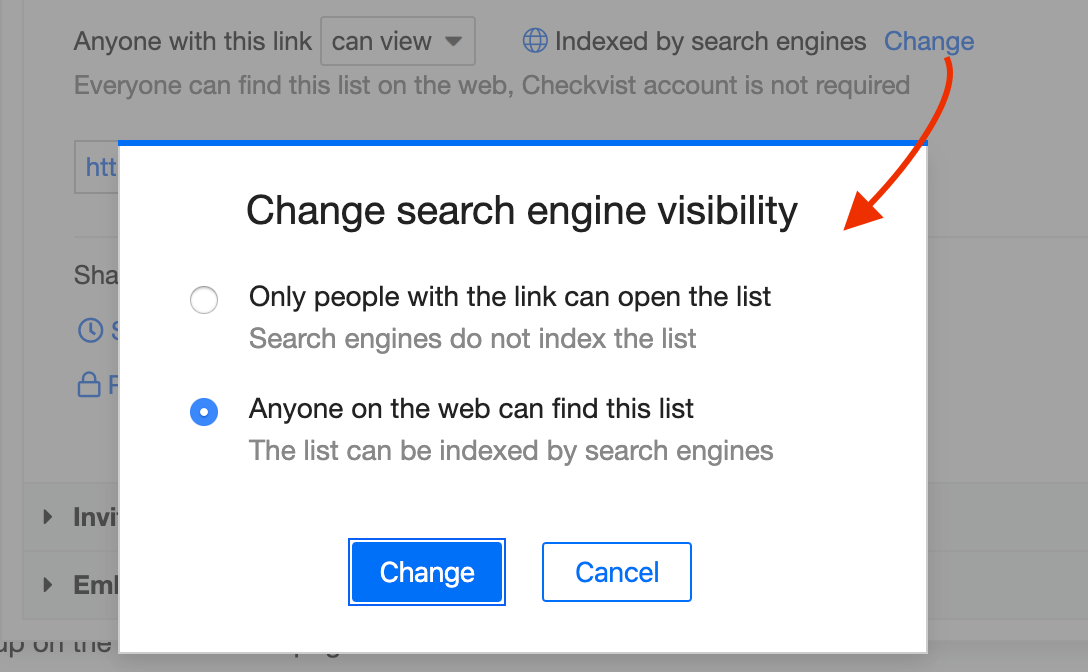
Indexing by search engines pro
By default, all public lists are not indexed by search engines. Want to let the world know about your list? Change the search engines visibility right in the 'Share' dialog window.
Link security pro
If you have a PRO account, you can set a public view expiry time or a password, for security reasons.

Expiry time Set a time limit for the lists's public view, and after this time has passed, the public link will stop working. The list will become invisible for the public again. You can update the expiry time, or set '0' for the public view to never expire.
Password Set a password required to open a public list. For more security, send the public link and the list's password via different channels. You can update or remove the password anytime.
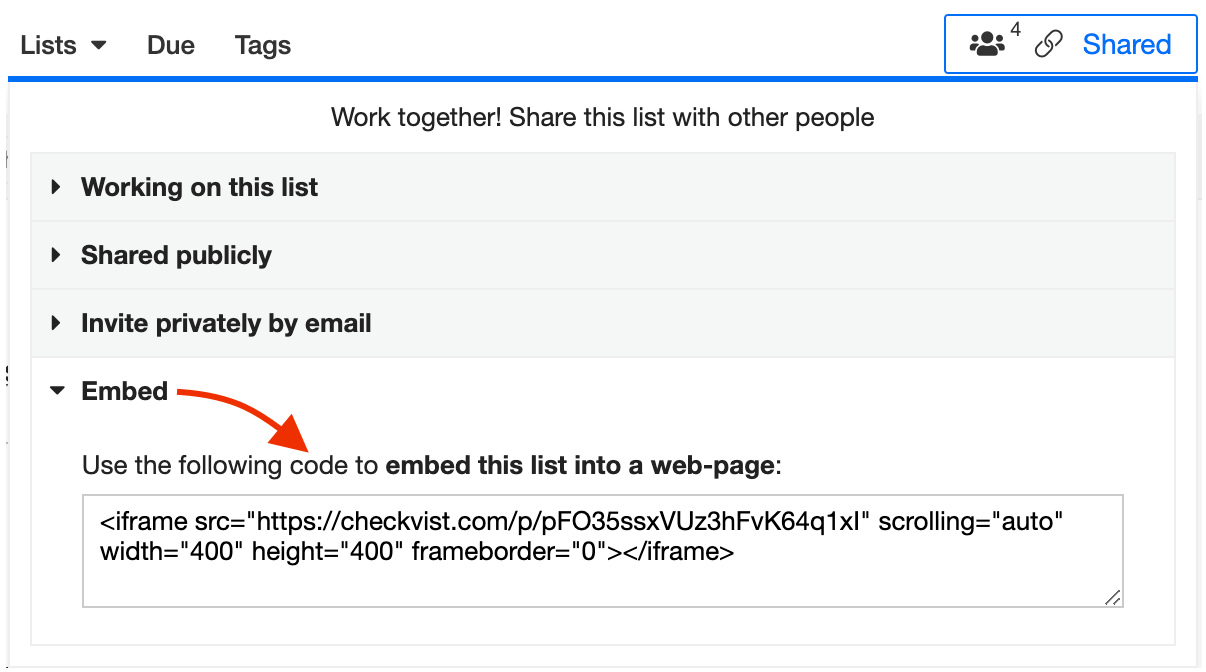
Embed a list into a webpage or a blog post
Open the Share dialog window and copy the code snippet from the Embed section. Change the width and the height of the iframe if you like, and publish it.
Your readers can print the list out right from your webpage. They can also open the list in a new browser tab, copy the contents to their Checkvist account, or export the list.
Here is a short demo of how it works.
Un-publish
If you decide to stop the public sharing, click the Disable public sharing button. After that, the list will be visible only to those who joined via email sharing, and to the list owner.
Also, a public list becomes private after the link expiry time has passed (see Link security).
Public list examples—Checkvist how-to guides
Private sharing
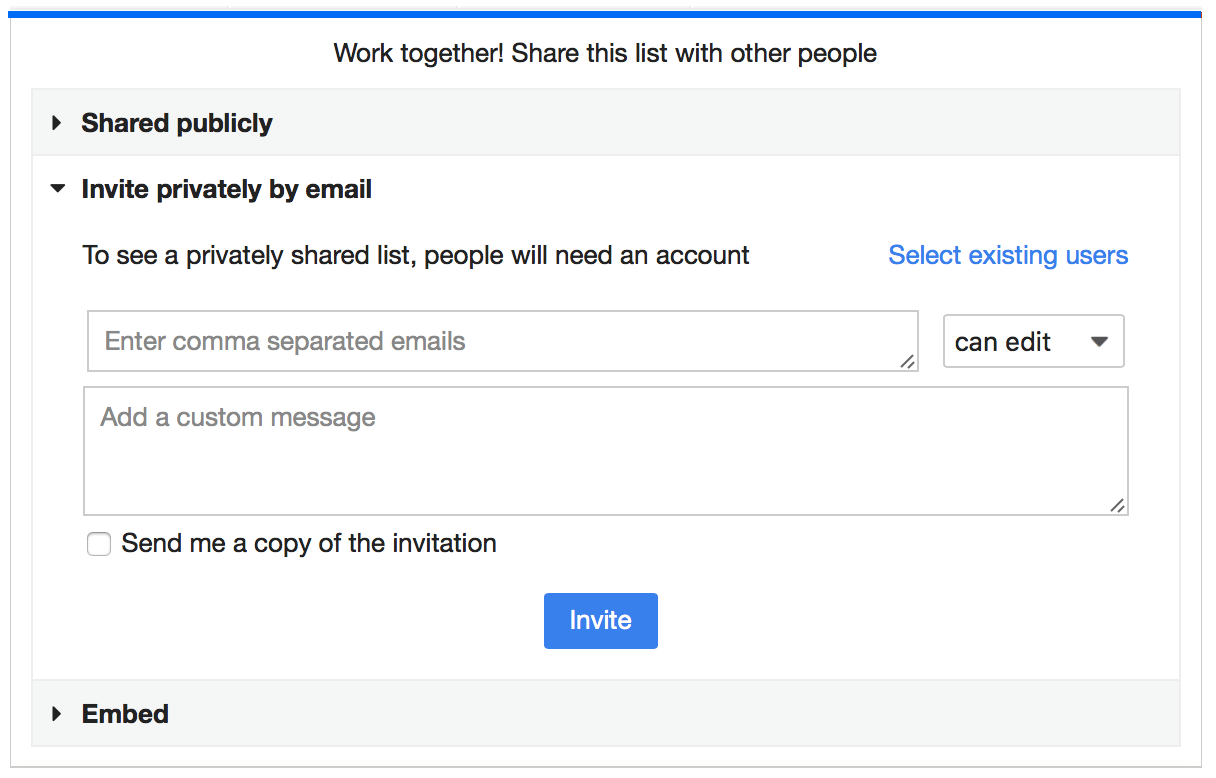
When you share a list with email, Checkvist sends the invitation link to the email address you gave. Only the person with that email address can access the list.
- Click the Invite privately by email section in the Share dialog window.
- Enter emails of your collaborators in the text field. Separate emails with commas.
- Add an optional message, so they understand who's inviting them and why.
Set collaboration permissions for each invitation:
- With writer's permissions, one can make any changes to the list, to edit or delete list items. A 'writer' can re-share a list or make it public, but only the list owner can delete a list.
- With reader's permissions, one can only read, but not make any changes to the list.
To share a list with those who have been working with you on other lists, click Select existing users. Selected people will get access to the list immediately.
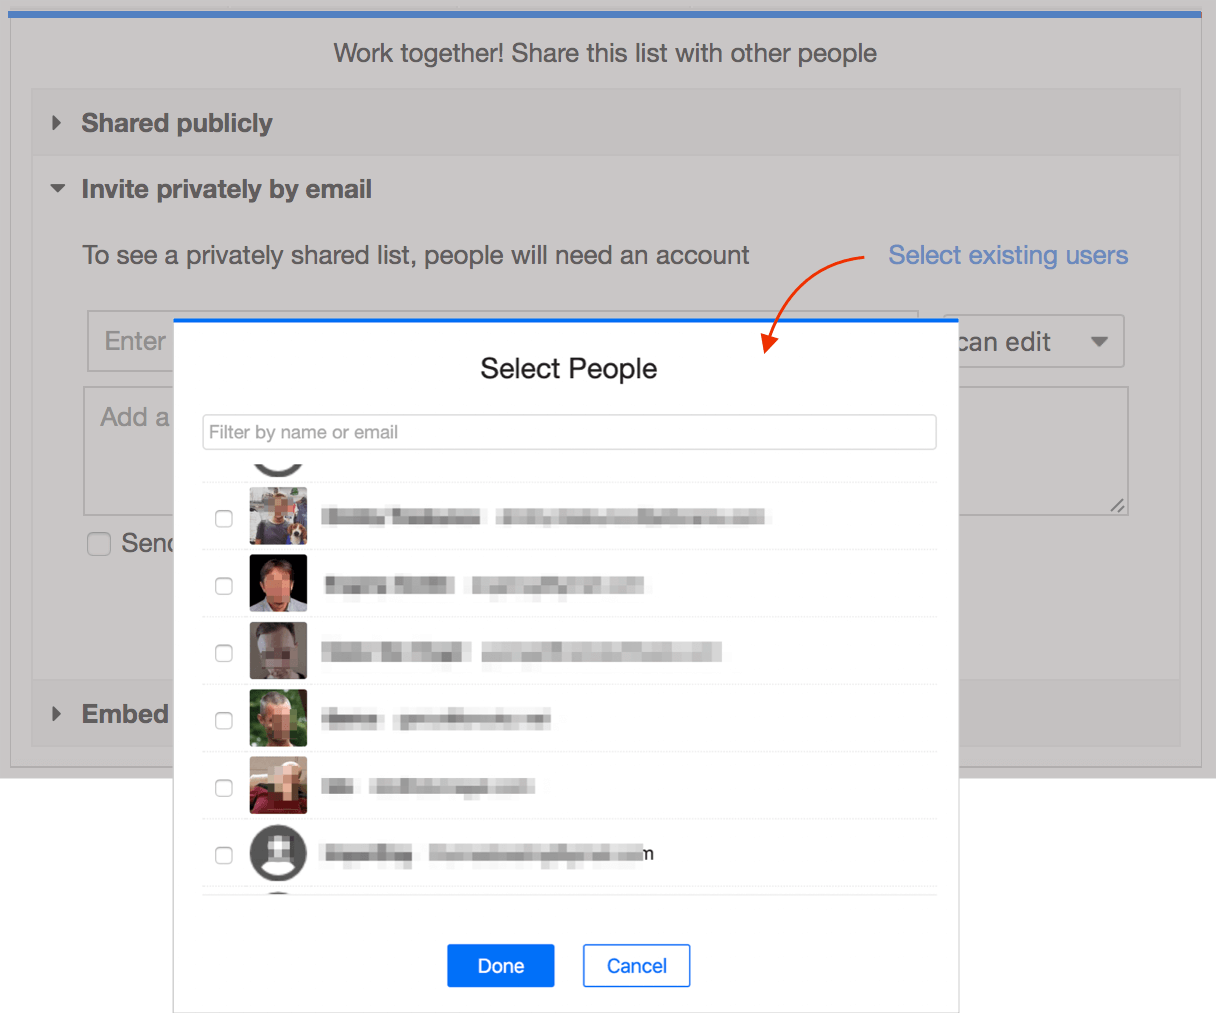
People without a Checkvist account need to register after accepting your email invitation.
How to un-share a list
You can find the list of all collaborators in the topmost section of the Share dialog. Change permissions or un-share the list anytime there.
Share a filtered or focused list
You can share a filtered or a focused list, publicly or privately. When people open it, they will see only the filtered or focused part at first.
But they can un-focus or un-filter it, and see the whole list later.
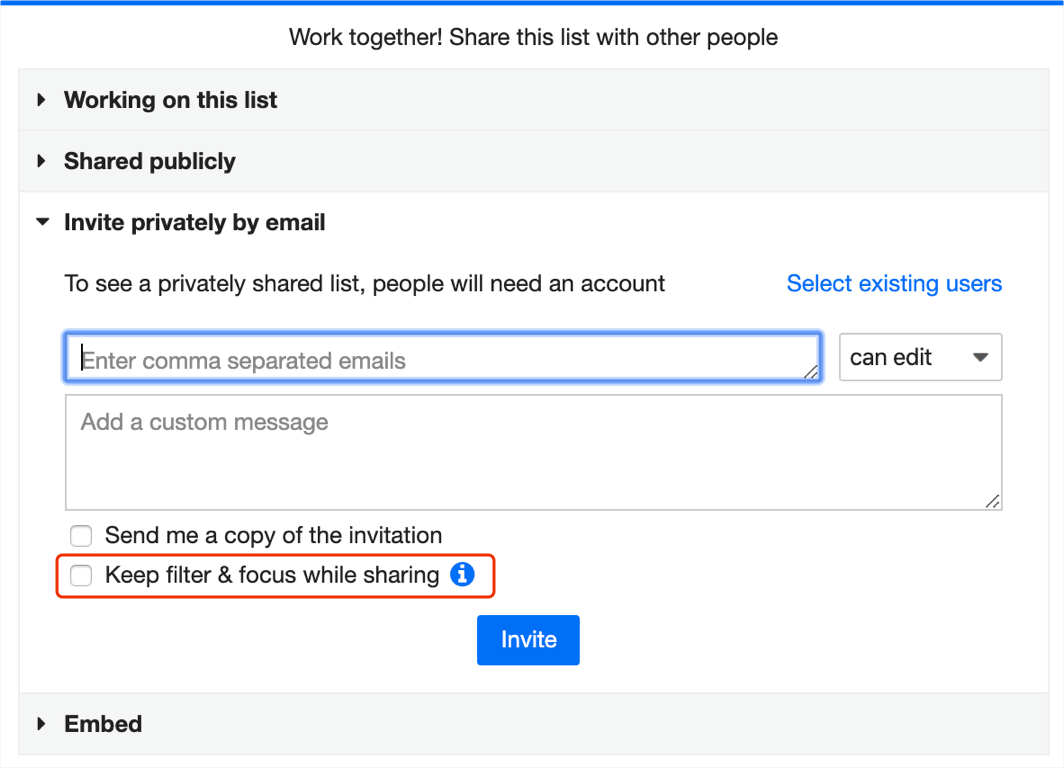
To share a list with a filter or a focus, check the option Keep filter and focus. The option will appear in the Share dialog only if the list has an active filter or focus.
To remove the filter or focus from the public sharing, un-check the option. After that, all people who open the public link will see the whole list.
To update the filter or focus for the public sharing,
- Set a new filter or a new focus, and then
- Click the Update link which will appear near the Keep filter and focus option.
List permissions
Owner is a person who has created the list, but the role is transferrable. Only owners can delete a list (others can only archive or un-share them). Only owners can enable Markdown formatting for the list. If the list owner has a PRO account, they can customize list styling.
Writer can edit or delete list items, share lists, and send notifications. Writers need a Checkvist account to work on a list, even if the list is public.
Reader
is a view-only role, who cannot make any edits. The only exception is when you
assign a task to a reader. Then the reader can change that task status, add notes or attach
files to it.
Readers do not need a Checkvist account to view a public list.
Bulk sharing
You can share several lists with the same people at once.
- Click the logo or press hh to open the Lists home page
- Select the lists you want to share
- Click the Share button in the bottom bar.
Notifications
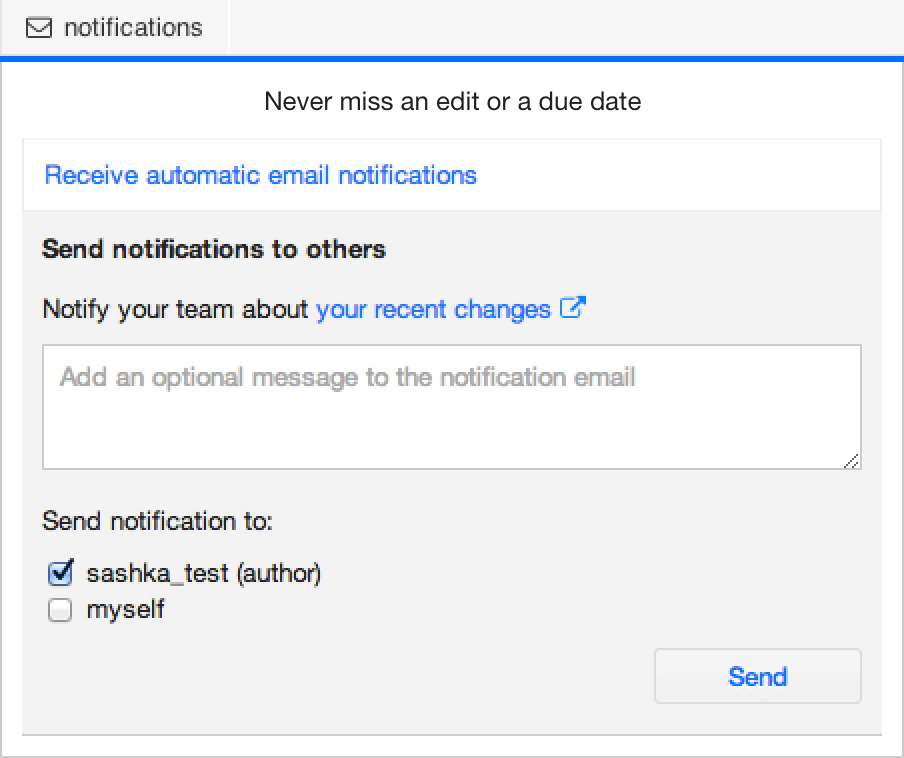
Manual email notifications
With a free account, you can send and receive manual email notifications about changes made in the shared lists.
Click the notifications link in the toolbar. Then select the Send notifications to others section. Now check the people you want to notify. The email will contain all the changes you've made during the last session (~ 30 min).
You can preview changes before sending notification.
Automatic pro
With a PRO account, you can configure automatic notifications.
- Watch all changes as they happen (sent ~every 5 min, changes within the 5 min period are merged), or
- Receive a daily digest, sent at your preferred time.
- Get a daily due task reminder for the list.
When a list has configured automatic notifications, the empty icon in the toolbar changes to

Manage, pause, and resume notifications for all your lists on your Profile→Notifications tab.
Checkvist also sends an automatic notification when somebody assigns a task to you.
Bookmarks PRO
Bookmark any place in your lists and jump to it with one click or a keyboard shortcut. Bookmarks remember the context you create them in: a global search, a filtered or a focused list, or the Due page.
To see all your bookmarks, open the bb Bookmarks tab in the Command palette.

Bookmark a filtered list or a global search
When you type something in the search field, a bookmark icon appears on the right side. Click it to save a bookmark for this specific search. Once saved, the icon becomes filled.
You can give the bookmark a meaningful name and assign a shortcut. When a bookmark has a shortcut, you can open it anywhere by pressing b and a number key.
How to view all filters saved in this list? Press / or click the search field, and you'll see all your saved filters in the popup window below. Use the arrow keys to navigate and Enter to jump to that bookmark.

You can always find all your bookmarks in the bb Bookmarks tab in the Command palette.
Bookmark lists and list items
The search and filter bookmarks show the icon in the search field. Bookmarks for list items and lists are displayed on the left margin.
Press the ab (add bookmark) shortcut to bookmark a selected list item. Give bookmark a more meaningful name, assign a shortcut, and press Save.

To remove a bookmark, use the cb (clear bookmark) shortcut on the selected list item. Or click the corresponding bookmark icon in the left margin, and press the Remove button.
💡Short-cutted bookmarks: a super-fast way
- Set the selection to a list item.
- Press the b and a number key to set a shortcut.
- Press Enter or click the Save button.
Bookmarks for the Due page
On the Due page, you can set bookmarks on list items or save the filtered Due page as a bookmark.
Set bookmarks for the filtered Due page:
- Filter the Due page with a term, like @myname due:now.
- Click the bookmark icon on the right side of the filter field.
- Bookmark the filter and optionally assign a keyboard shortcut (b and a number key).
Save list item bookmarks from the Due page:
- Hover over the left side of a list item and click the bookmark icon, or
- Use the shortcut ab on a selected list item.
- Save a bookmark for the list item. This bookmark will be opened in the context of the list page (its original place).
Navigate bookmarks from anywhere
Open the Bookmarks list anywhere by pressing bb. Type to filter bookmarks, use the arrow keys to select the desired bookmark, and press Enter to jump to it.
Move tasks to a bookmark
Press mb to open the Move to bookmark window. Type to filter, use the arrow keys to select the target bookmark, and press Enter to move the selected list items to that bookmarked list or list item. See Move list items to a bookmark for details.
Due dates
Add and remove due dates
Add a due date via the Due date window: select a list item, and type dd
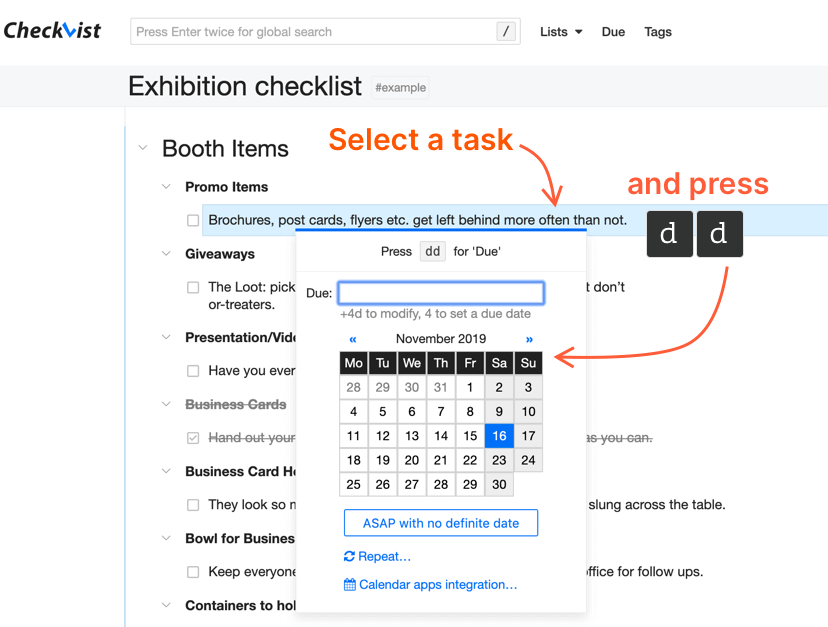
Save time and use td and tm shortcuts to set the due date for today and tomorrow.
If you don't know the exact due date, but want to mark something as important, set due to ASAP with the as shortcut.
Press cd to clear due date.
All tasks with a due date appear on the Due screen. Click the Due link in the top navigation or use the gd (Go Due) shortcut to see the Due page.
Repeating tasks pro
Set a repeating pattern for regular tasks. Click the Repeat... link in the Due dialog window or press dr.
Then set a pattern:
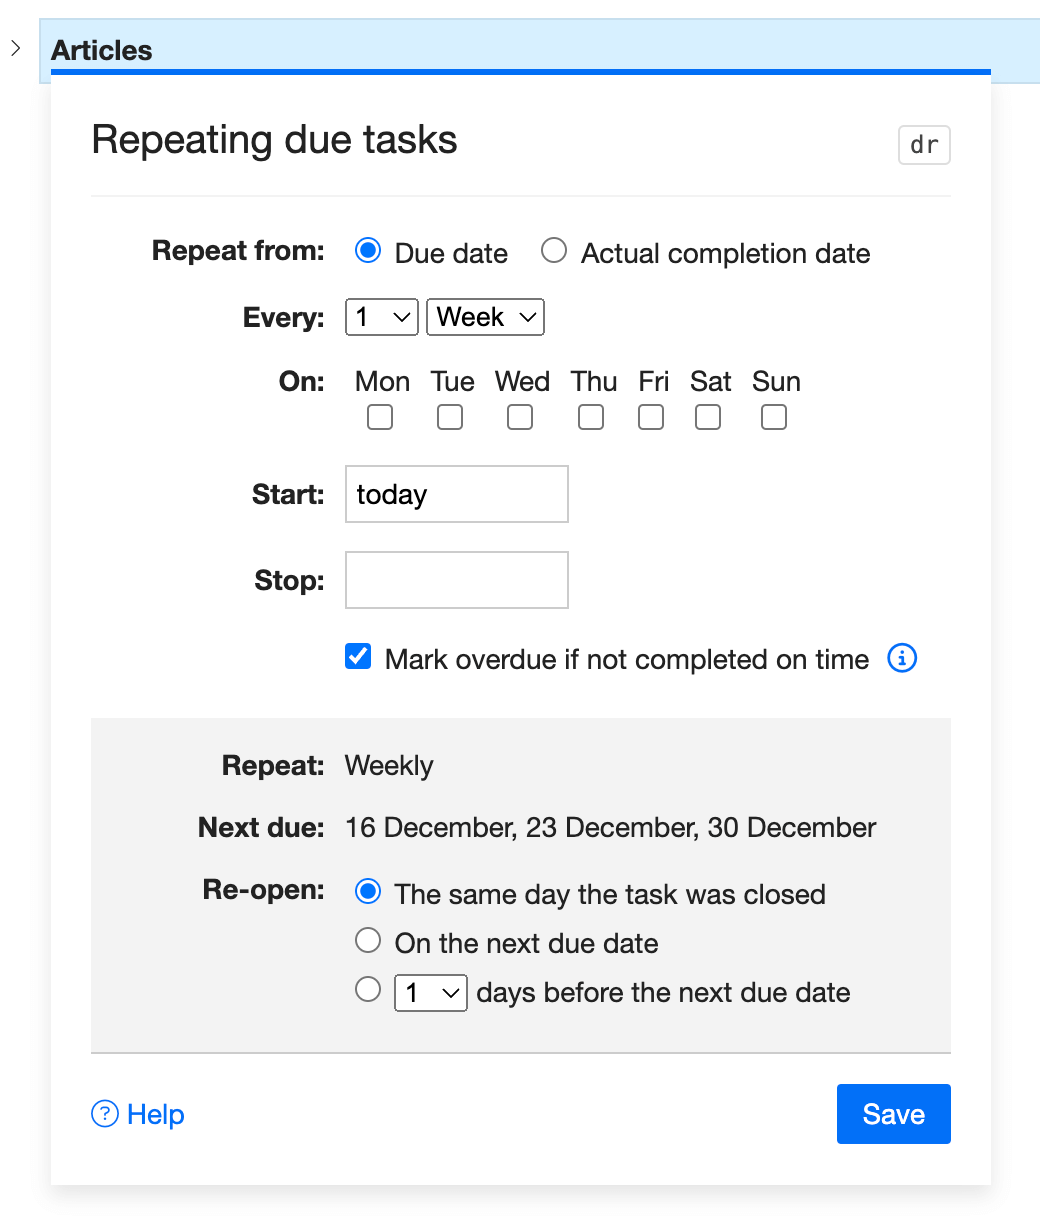
1. Select Repeat from → Due date, and the next due date will be calculated from the previous due date.
Example: you have a weekly task for Mondays. And even if you complete it on Wednesday, the next due date is still the next Monday.
2. With Repeat from → Actual completion date, you can not select a specific day of the week. The next due date is always calculated from the actual completion date.
To regulate when the first repeating due will appear, set the date in the Start date field.
Example: you have a weekly recurring task. You set the Start date to 15 APR, which is Thursday. But if you complete this task not on Thursday, but Friday, the next recurring due date will be set for the next Friday.
The Weekly pattern lets select a day of the week (e.g. every second week, on Mondays and Thursdays).
With the monthly or yearly pattern, the task repeats on the day set in the Start field.
Preview the next three due dates in the bottom part of the dialog box, and check if it's what you expected.
With the Re-open option, you can set the time when the due date will be renewed. If you have a task which is due once a month, you might want to see it only 3 or 5 days before it's due. Or right on the next due date. If you don't use the option, the task will be re-opened within an hour after you complete it.
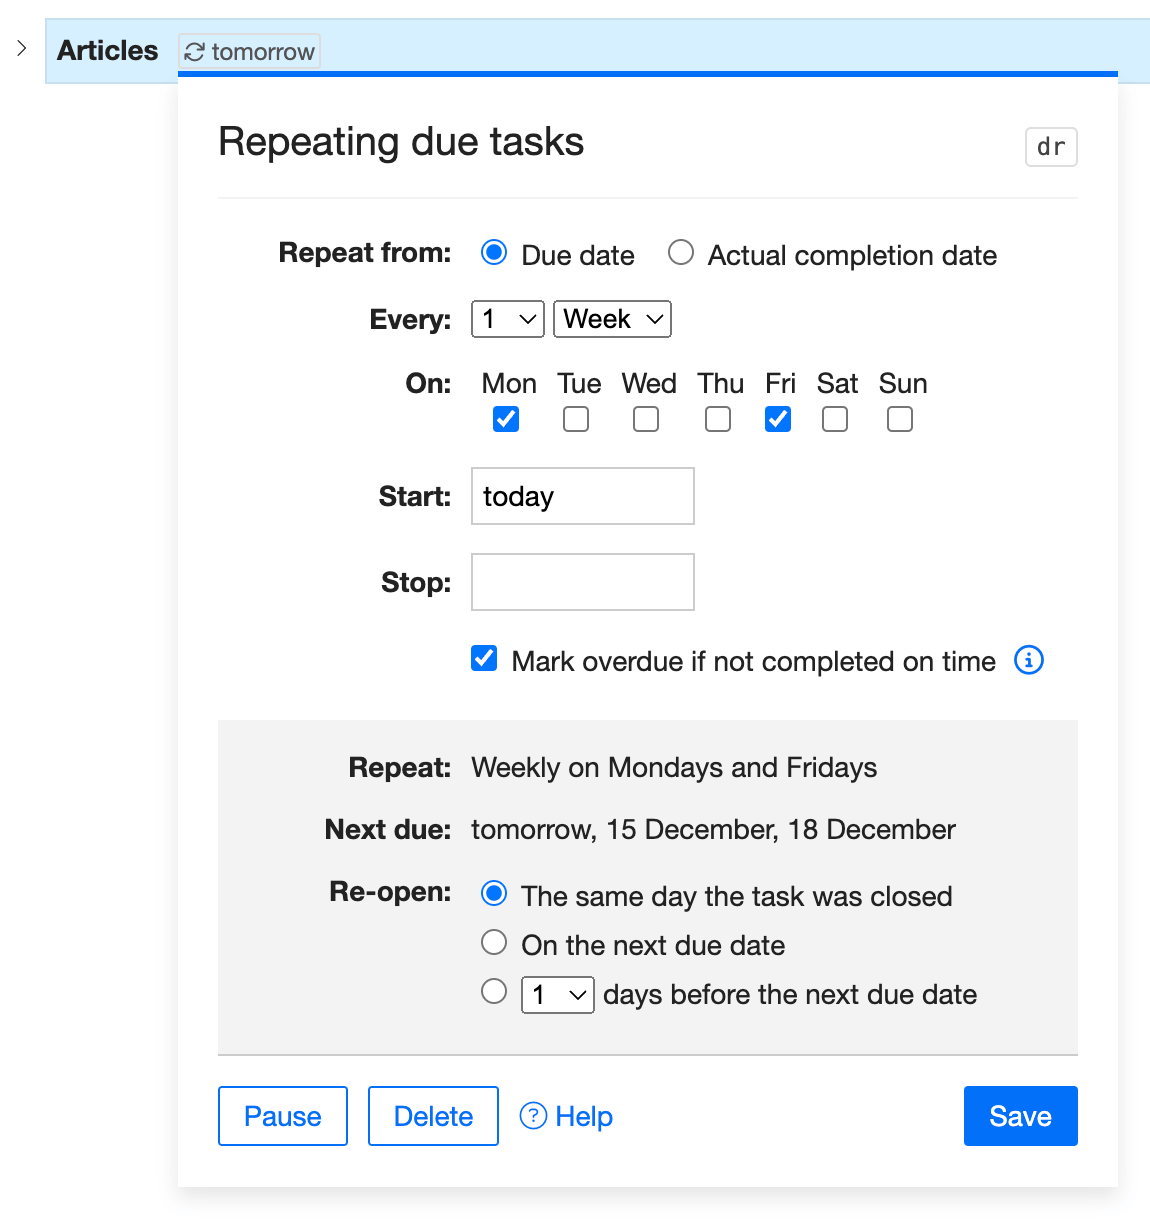
Pause a due task with the Pause button. A paused task is not generated until you un-pause it. After that, it will follow the same pattern and will start with the closest due date.
Repeating tasks are marked with the icon. To see all repeating tasks, open the Repeating tab on the Due page.
Information about repeating tasks is included in the OPML import and export. It is also sent to the Calendar apps via Calendar apps integration.
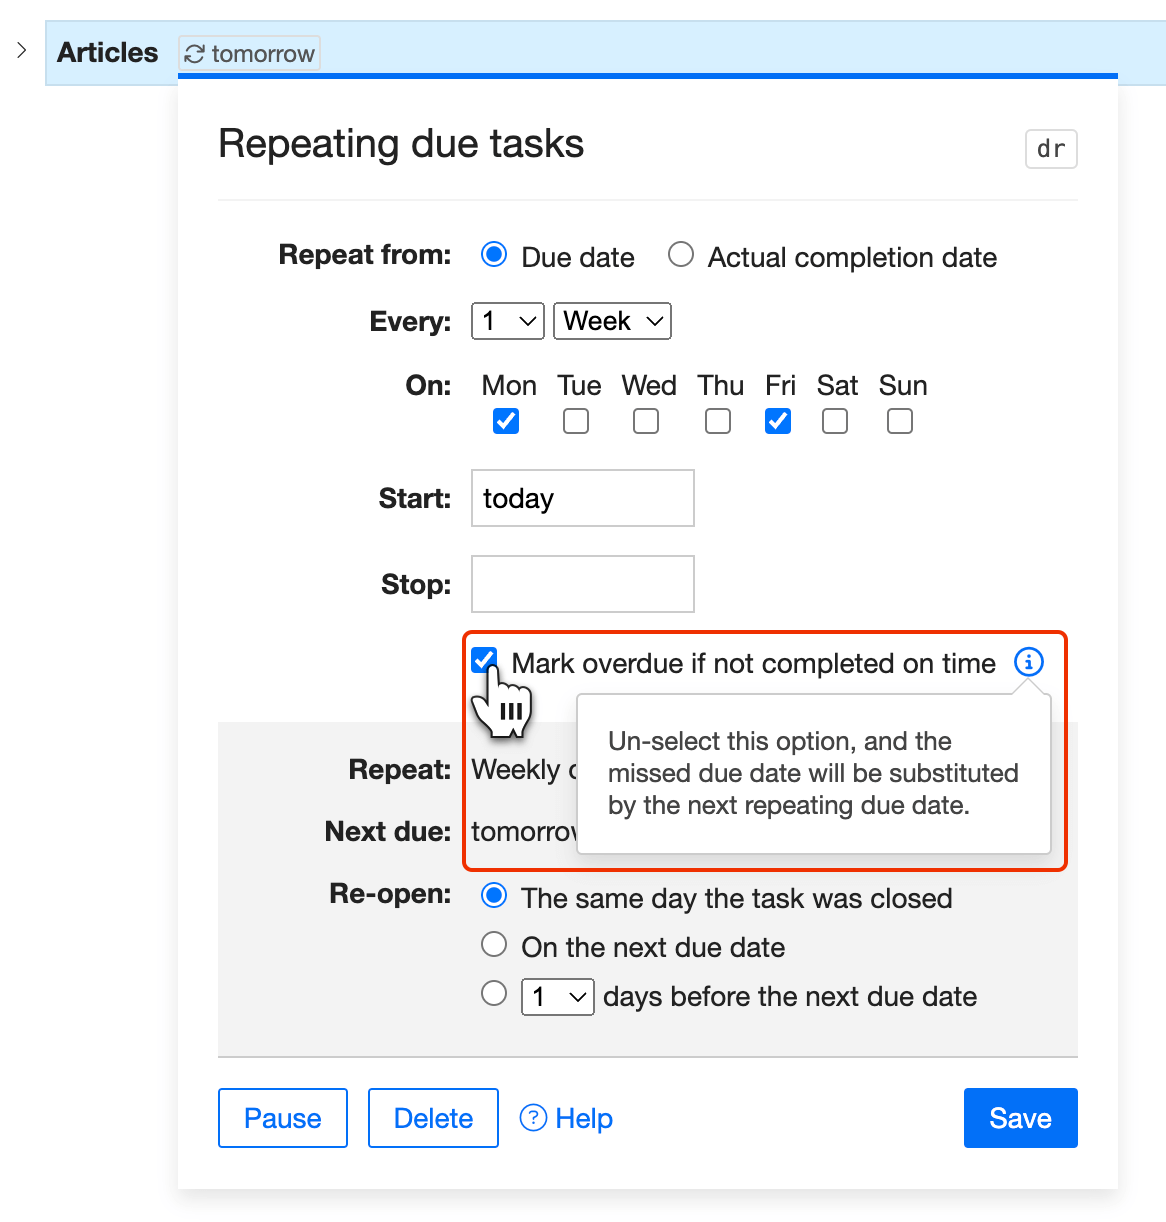
Configurable overdue for repeating tasks
The Mark overdue... option lets you decide whether to mark a repeating task 'overdue' if it was not completed on time. If you don’t want to see it with a red 'overdue' label, tick off the checkbox. The uncompleted task will silently disappear and reappear on the next due date.
How to delete repeating tasks
To Delete a repeating pattern, click the Delete button in the Repeating dialog window. In this case, the task will have only the last due date and will lose it's 'repeating' quality.
To do the same from the keyboard, press cd twice. The first time it will clear the current due date, the second time it will remove the repeating due.
Add due date via smart syntax
Edit a list item and use the ^ shortcut with autocompletion to select a due date.
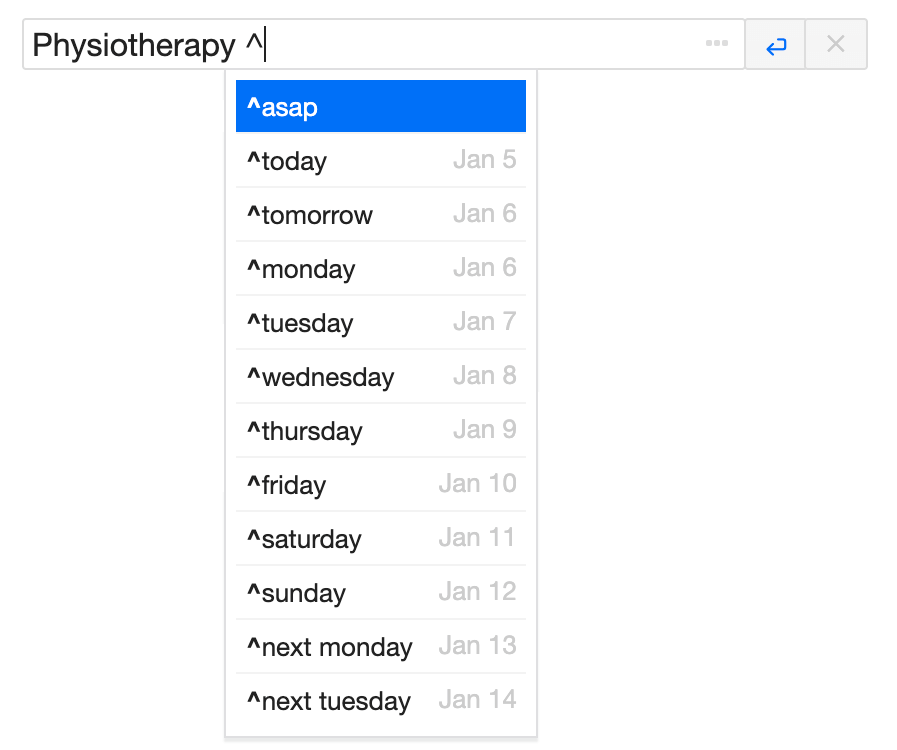
Due date syntax
| ^asap or ^shortlist | ASAP - as soon as possible, with no definite date |
| ^today | Today (tod also works) |
| ^tomorrow | Tomorrow (tom also works) |
| ^friday | Next Friday to occur (fri also works) |
| ^next friday | The second Friday to occur (next fri also works) |
| ^25 Apr | April 25 this year (unless April 25 has passed, in which case it assumes next year) |
| ^Apr 25 | April 25 this year (unless April 25 has passed, in which case it assumes next year) |
| ^04/25/2010 | April 25, 2010 |
| ^01/04/2010 | April 1, 2010 |
| ^2010-04-25 | April 25, 2010 |
| ^any | Tasks with any due date |
| ^none | Tasks without due dates |
Due date settings
Configure due dates settings on your Profile → Settings page.
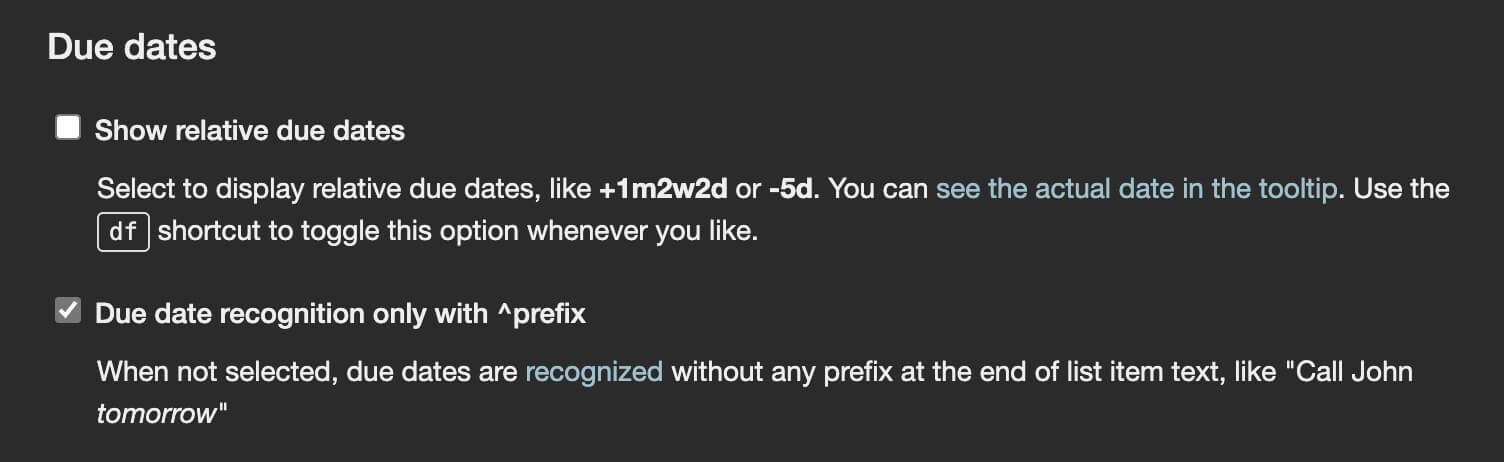
Relative due dates
Select the option or use the df shortcut to display due dates in a relative format. The overdue dates are marked with red. You can still find the exact date in the tooltip:

Automatic due date recognition
Checkvist can recognize due dates automatically, without any prefix. Place the date at the end of list item text, like "Call John tomorrow". Tomorrow then becomes a due date.
✅ Works with multi-selected list items (read more on bulk operations)
Due date email notifications pro
Subscribe to due date email notifications to know what's pending. Click the icon in the toolbar or select the lists to watch on the Profile → Notifications page.
You will receive a daily email with tasks which are due
- Today
- Tomorrow
- ASAP, or
- Overdue
If you prefer to watch all tasks with due dates, select the All lists option on the Profile → Notifications page.
By default, we dispatch the Due notification at midnight, but you can change that on the profile page.
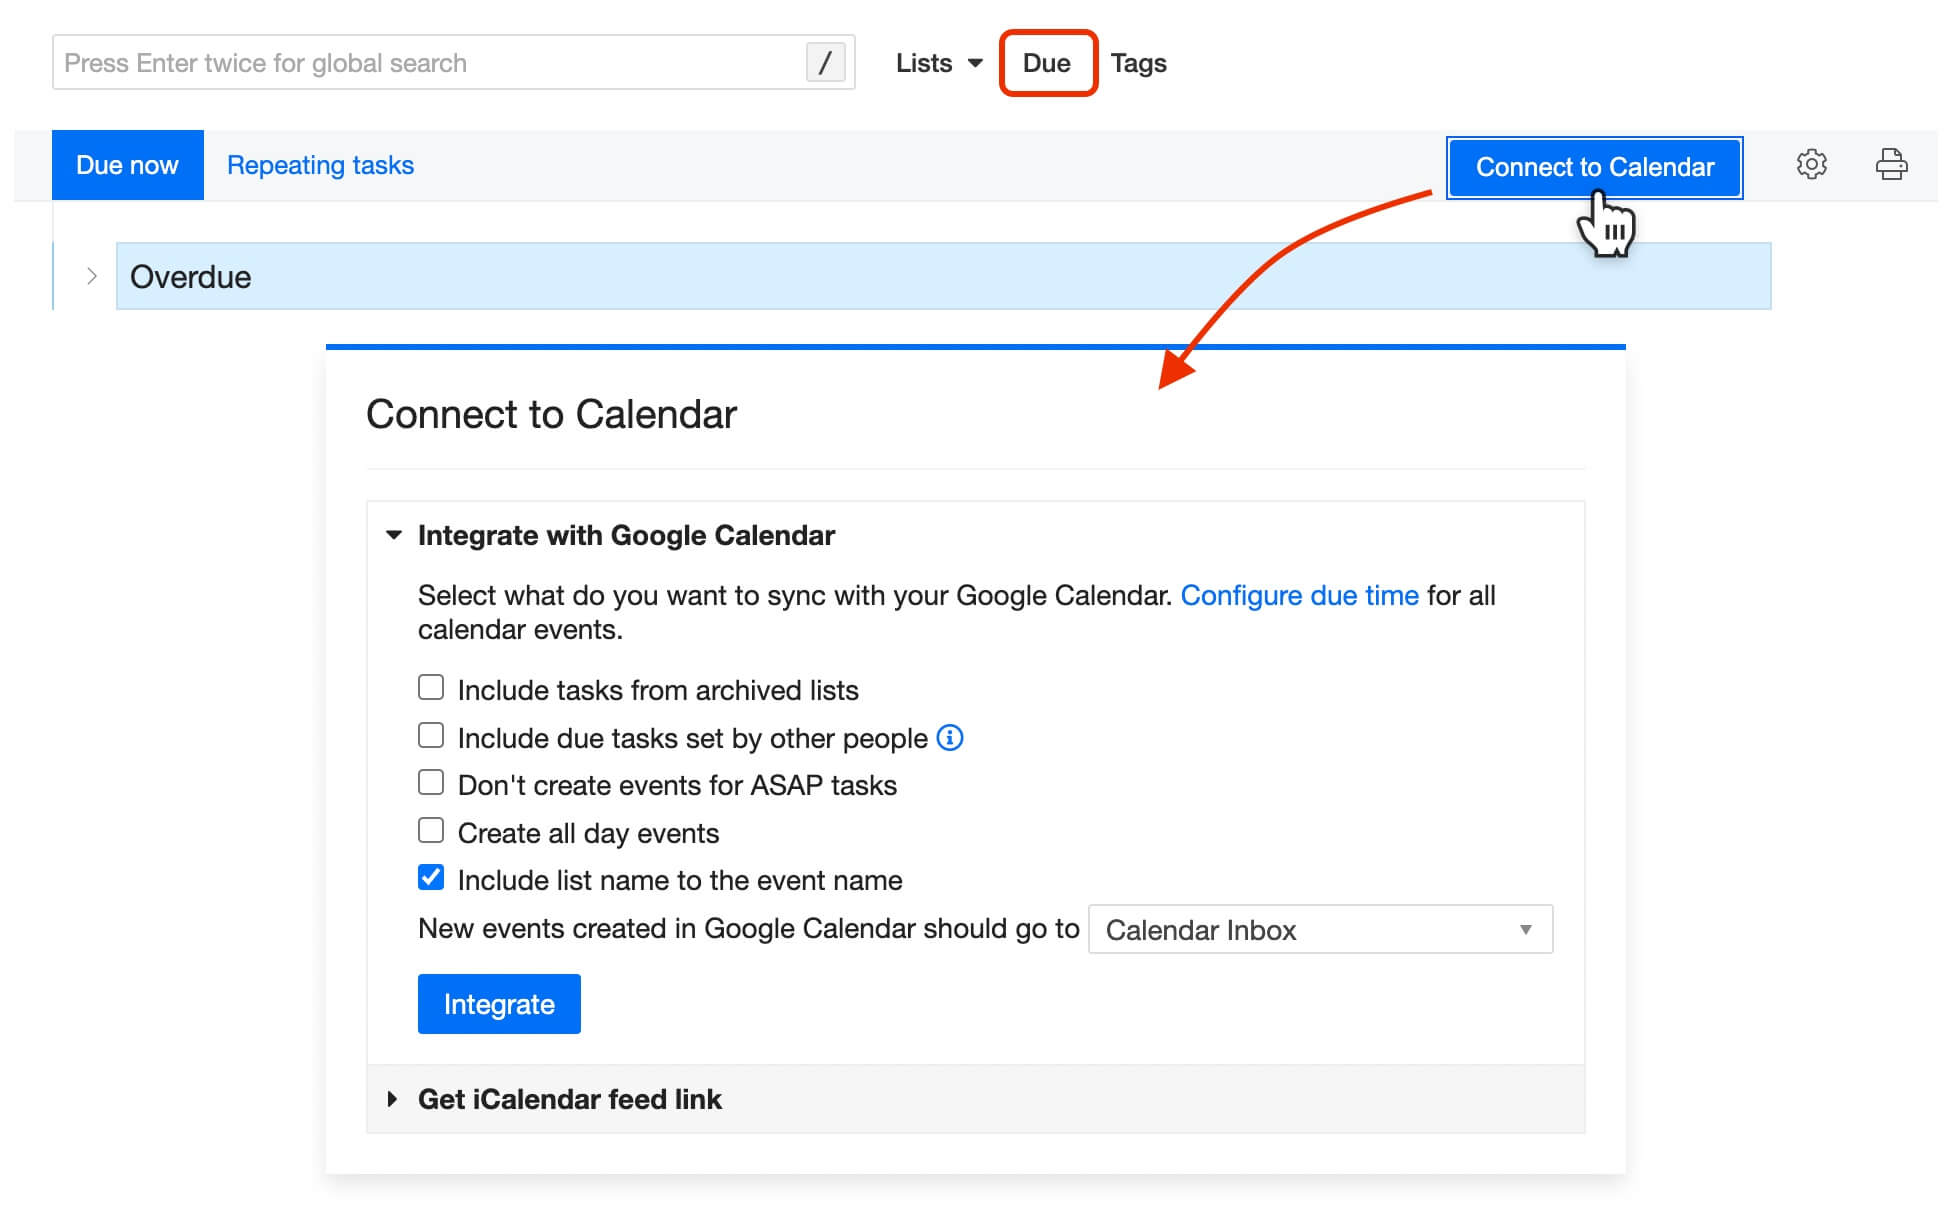
Calendar integration pro
Integrate Checkvist with a calendar and see all your scheduled tasks Google Calendar, Apple Calendar, MS Outlook Calendar, or any other calendar that can get updates with a iCal feed.
☝ 2-way synchronization is now available only for Google Calendar. All other calendars will only sync one way, that is receive updates from Checkvist.
️To connect your Calendar with your Checkvist account, use the Connect to Calendar button on the Due page, or open the Due date dialog box (use the dd shortcut) and Click the Connect to Calendar link.
Right now all Checkvist's tasks have the same due time. You can set it on the Profile → Notifications page.
Google Calendar integration
When you integrate Checkvist with your Google Calendar, you grant Checkvist rights to create a new calendar called 'Checkvist' there.
All your scheduled tasks from Checkvist will sync with that Calendar. The tasks will sync both ways - when you update them in Checkvist, and when you update them in Google Calendar.
When you delete an event in the Calendar, Checkvist keeps the task but removes the due date.
When you create a new event in the Calendar, a new task with a due date will appear on top of the list you select in the Calendar integration dialog window.
️ More details and troubleshooting of Google Calendar integration
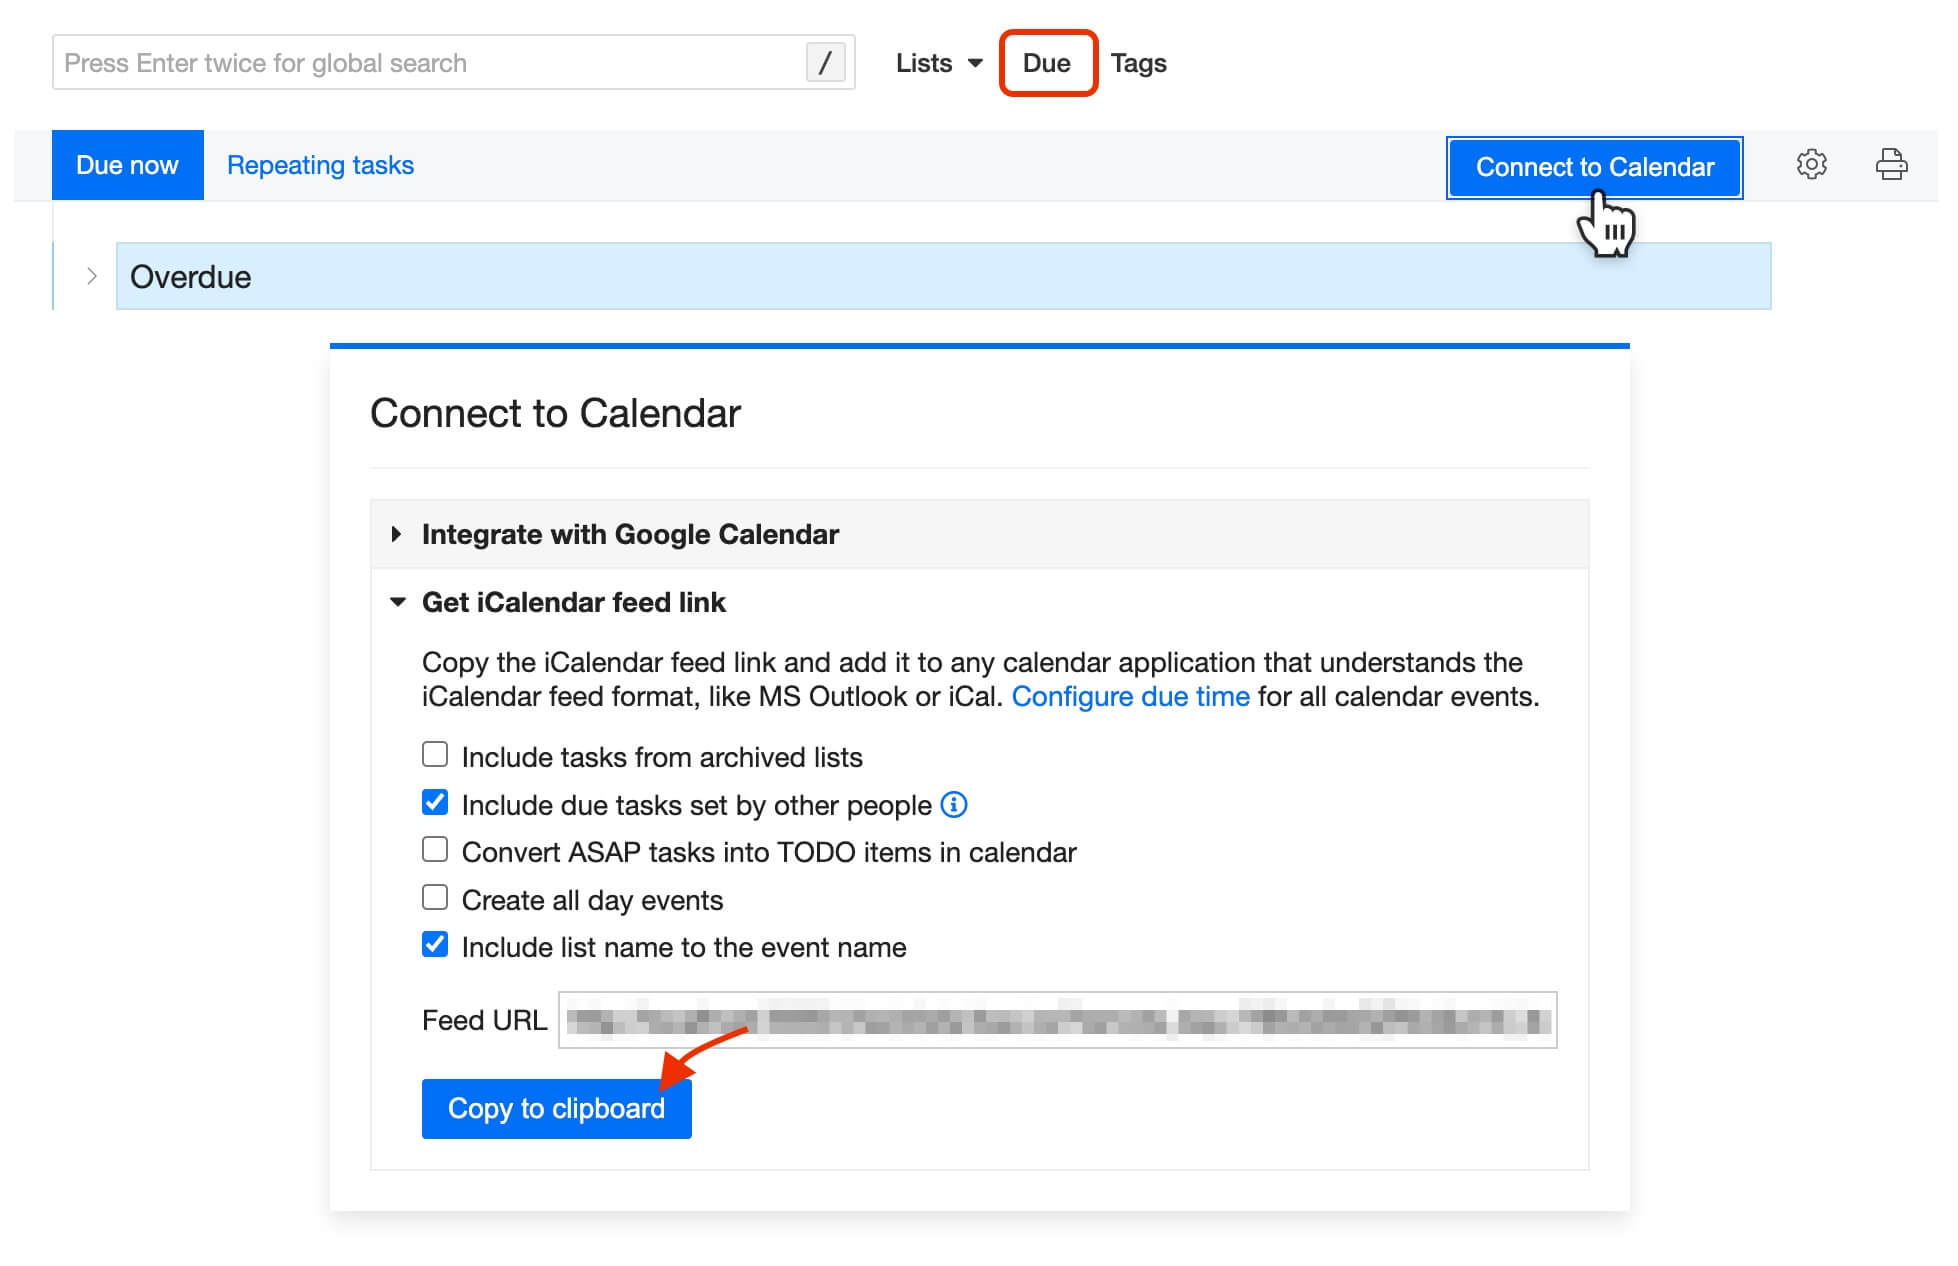
iCalendar feed
Use the iCalendar feed link to integrate Checkvist with your favourite calendar app. The link works with any calendar app that supports the iCalendar feed format: MS Outlook Calendar, iCal, and many others.
Copy the feed URL from the Calendar integration dialog window, and use it to subscribe your calendar app to this feed.
Tags
Tag a list item
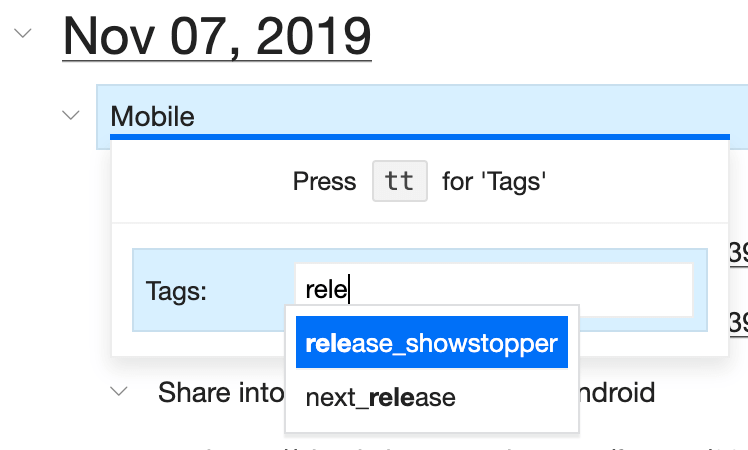
Press tt on a selected list item to invoke the Tags dialog window. If you want to add a tag while writing, use the # smart syntax, and add a tag at the end of the line.
Autocompletion will suggest tags already used in your lists.
☝️ If you want to use multi-word_tags, please put a hyphen or an underscore between the words.
Tag lists
Double click a list name and append a tag with the smart syntax #word.
If you want to tag several lists at once, select those lists on the home page. In the bottom bar, press the Tag button or use the same tt shortcut. The rest works the same way.
After that, you can use tags to filter lists or group them on the home page.
Search and filter with tags
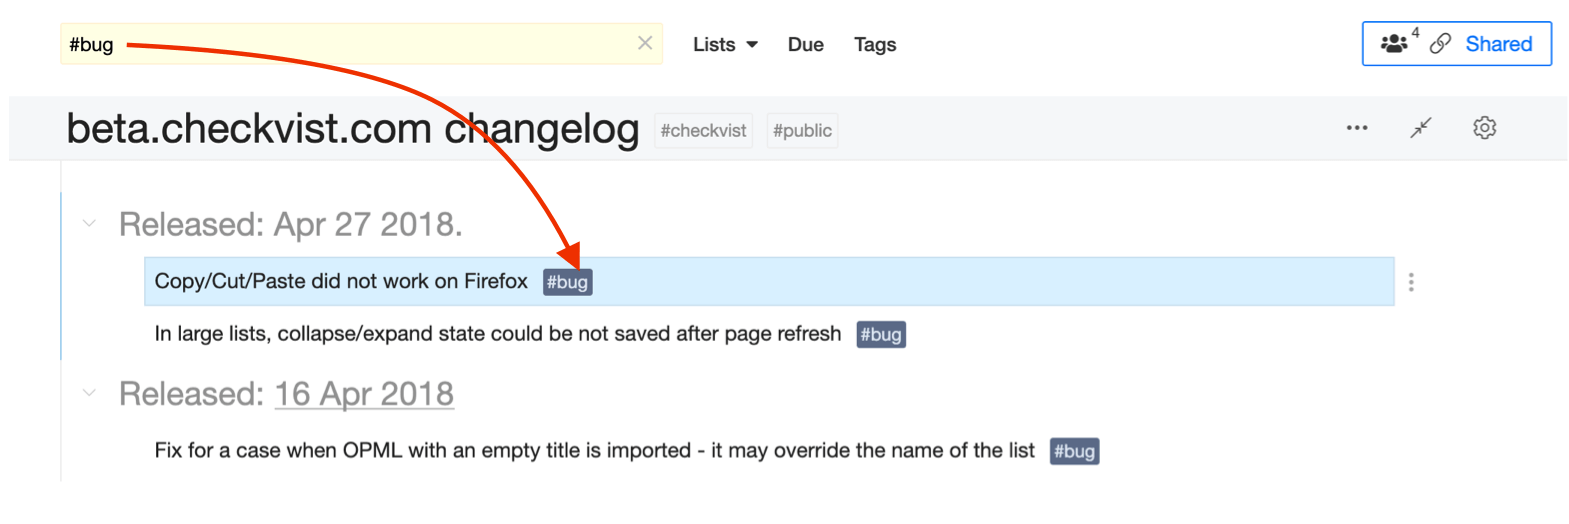
Click a tag to filter all items tagged with it in the list. You can also press / to set the focus in the search field, and type # or tag: to use the autocompletion to find a tag you need.
If you want to search through all lists, press the Enter key twice.
Clear the filter with the cf shortcut.
Tag map
Click the Tags link in the top navigation or press gt (Go Tags) to see all your tags on one page. Click a tag to see all its usages in all lists.
Color, rename, merge, make private and delete tags pro
If you have a PRO account, you can change a tag's color or name, make a tag private, or merge several tags into one.
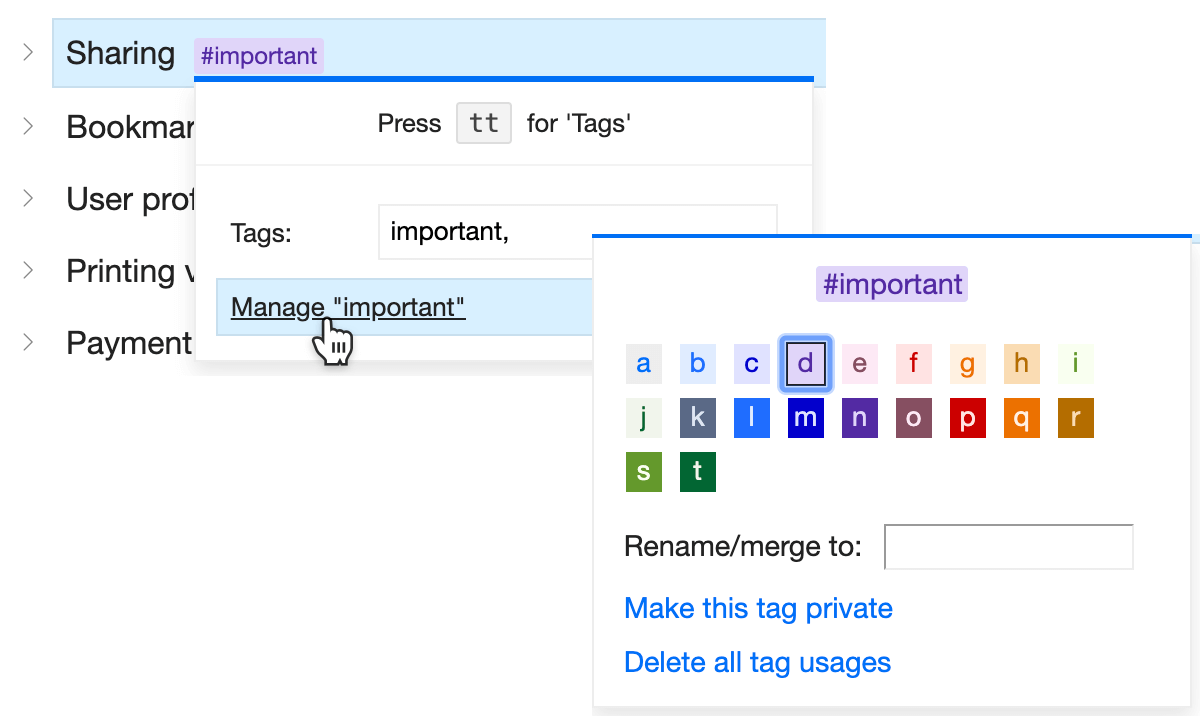
- Color Select a color for important tags to make them more visible. The colors are visible only to you.
- Rename or merge Rename a tag or merge similar tags into one.
- Private tags When you make a tag private, it becomes visible to you and no one else.
- Delete tag usages You can delete all usages of a given tag from all your lists. The action can not be undone.
Tag shortcuts and syntax
| tt | Show the Tags window to set and manage tags |
| ct | Clear tags on the selected list items |
| gt | Open the Tags page |
| #word | When editing, set tag with #prefixed word at the end of the list item |
| tag:word | Same as #word, but works both at the end and at the beginning of a list item |
| #one, #two | Bulk add several tags (comma separated or not) |
| #two_words or #two-words | For two or more word tags, use a hyphen or an underscore between words |
✅ Works with multi-selected list items (read more on bulk operations)
Notes
In Checkvist, a note is like a comment on a list item. A note is not a sub-item it can't have tags or due dates, completed, or invalidated.
Only authors can edit their notes. To edit a note, double-click it or use the ee ('edit') shortcut.
Everyone who has a 'write' access to the list can delete notes. Use cn keyboard shortcut to remove all notes from the selected list item.
Information about new notes appears in email notifications.
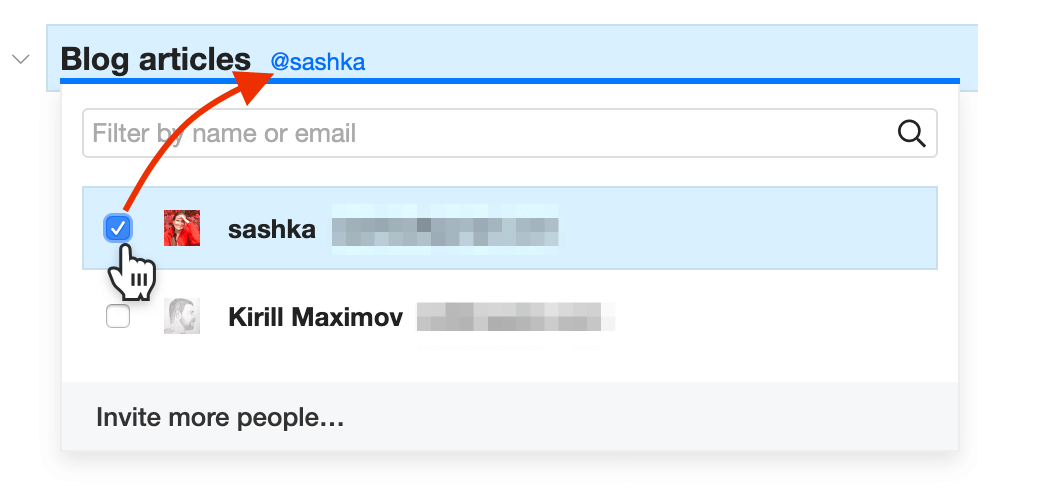
Assigning pro
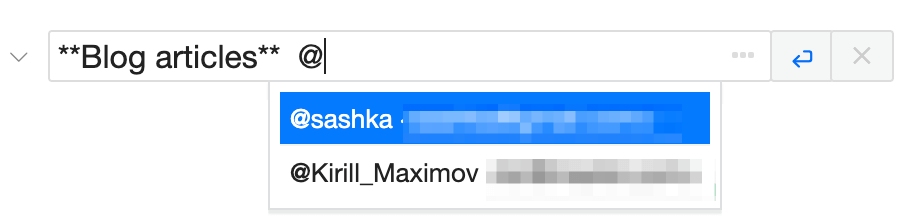
With a PRO account, you can delegate tasks to other people. Type ae on a selected list item to assign it to one or several people.
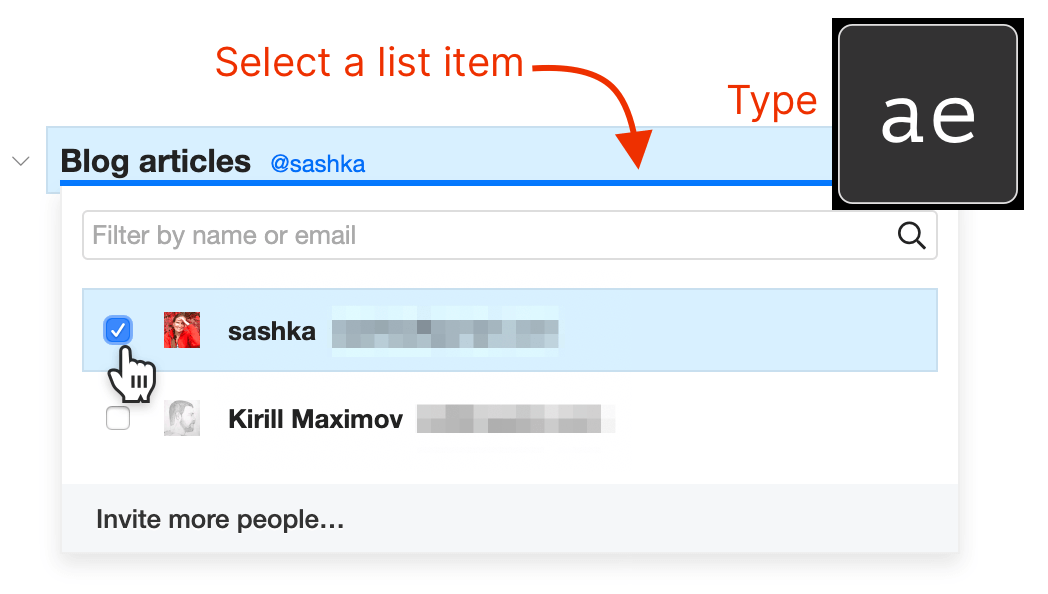
You can also add assignees via smart syntax with @username.
Type ca ('clear assignee') to remove all assignees from the selected list item.
✅ Works with multi-selected list items (read more on bulk operations)
All assignees receive email notifications when a list item or its sub-items change.
You can assign a task to a person that has the read-only permissions to the list. In this case, the assignee can:
- Edit the assigned task
- Change its status
- Add notes and attachments to that task.
To see all items assigned to a person, type @username in the search field and press Search.
Attachments pro
If you have a PRO account, you can attach files to the selected list items.
Type at to invoke the Attach dialog window and select where to upload a file from.
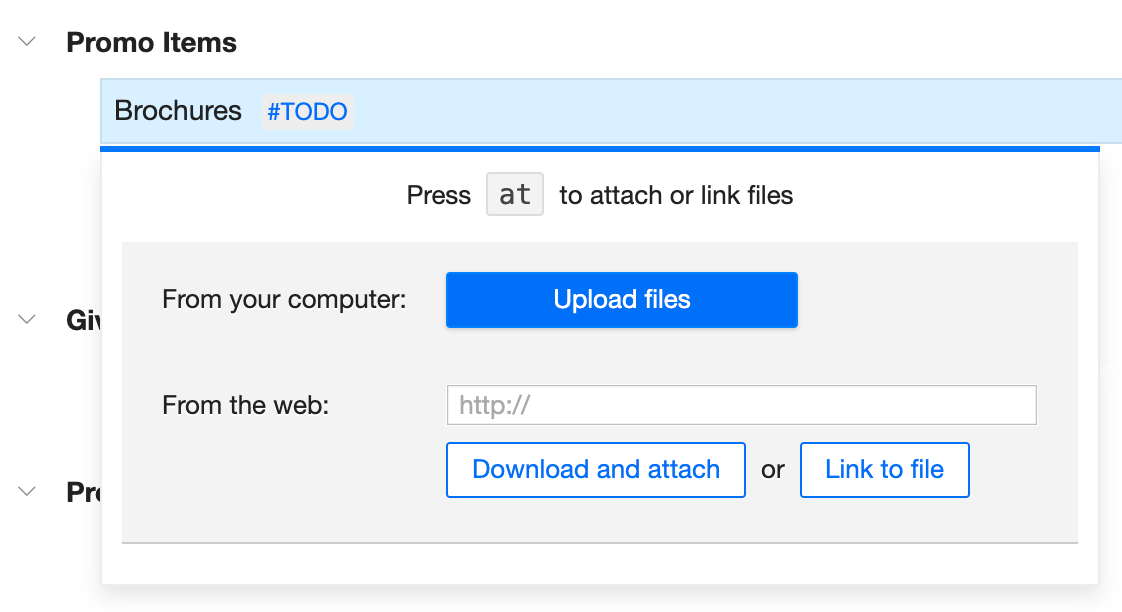
Use drag-and-drop to attach files with the mouse.
Use arrow keys to navigate between the attached files. Press Enter to preview the attached image.
See how attachments work in a ~1 min demo
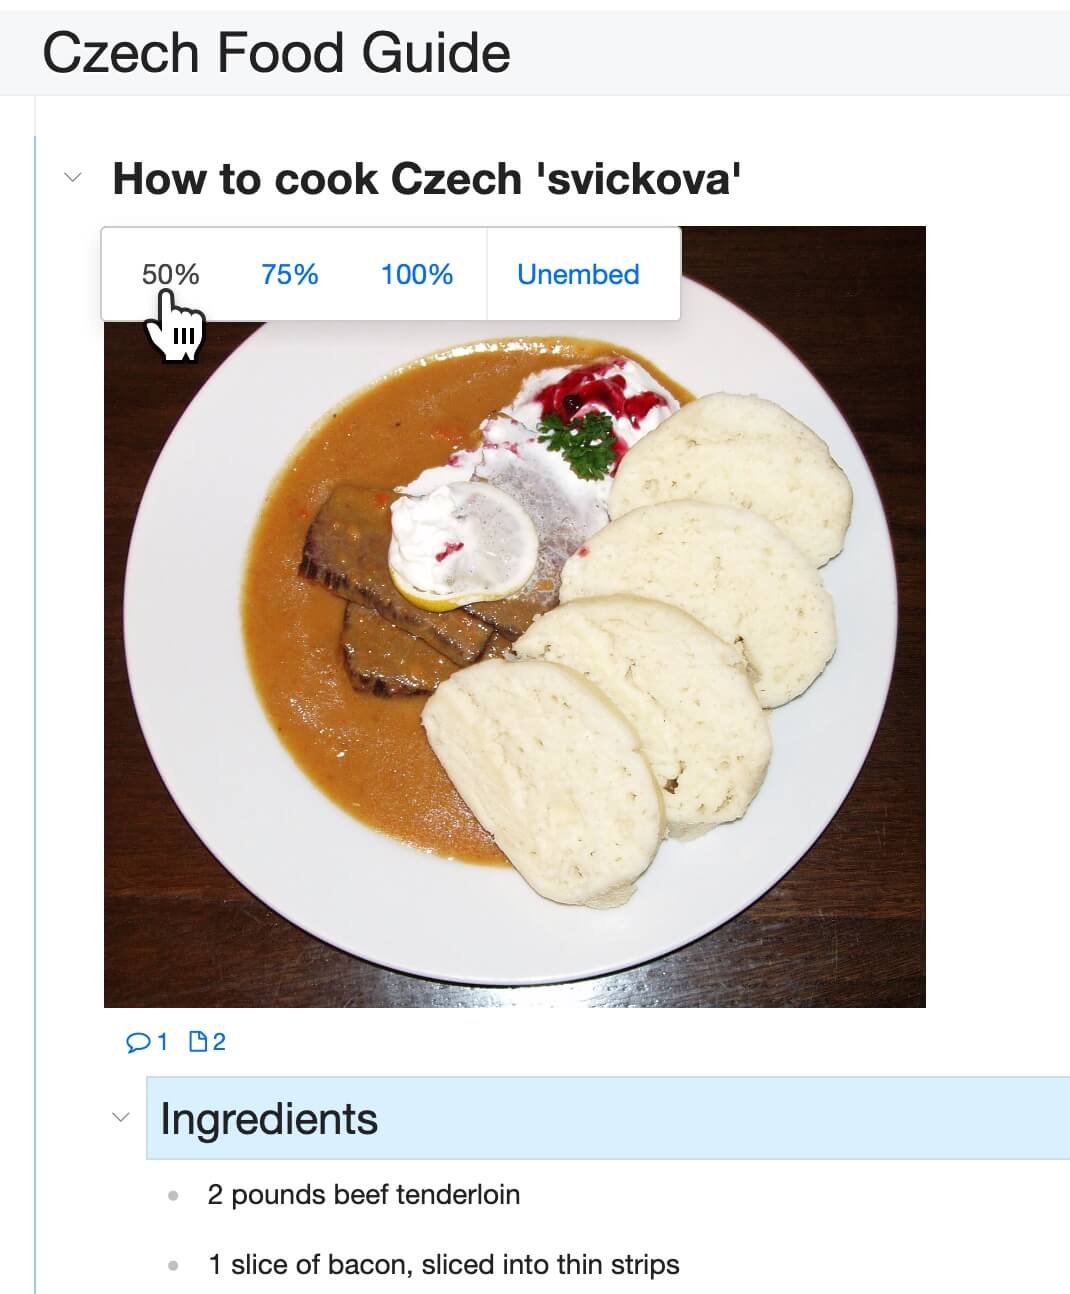
To embed an image, drag-and-drop it to a list item. Or type img: into the text and select an image to upload.
After you've uploaded and embedded the image, you can change its size from 100% to 75% or 50%.
Linking
Internal links
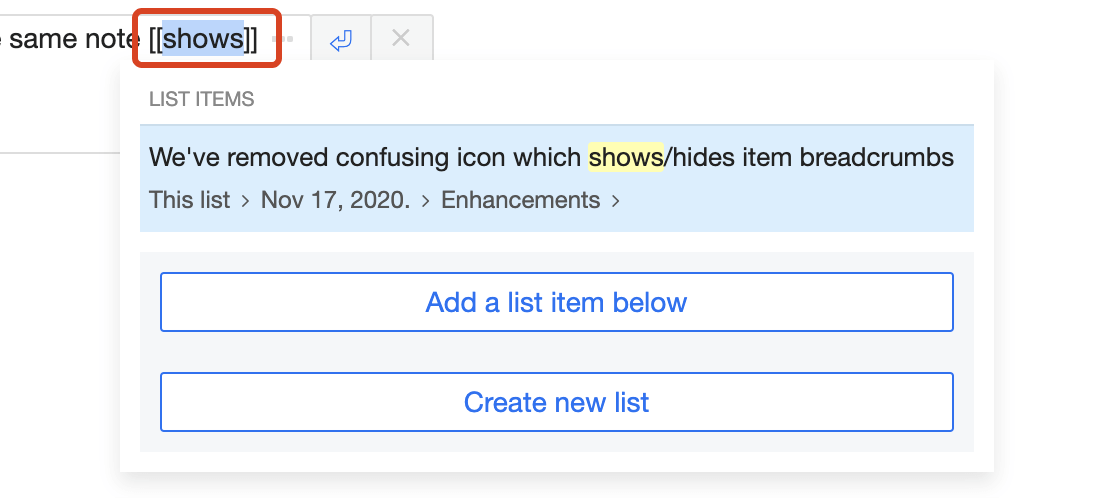
Create links between list items
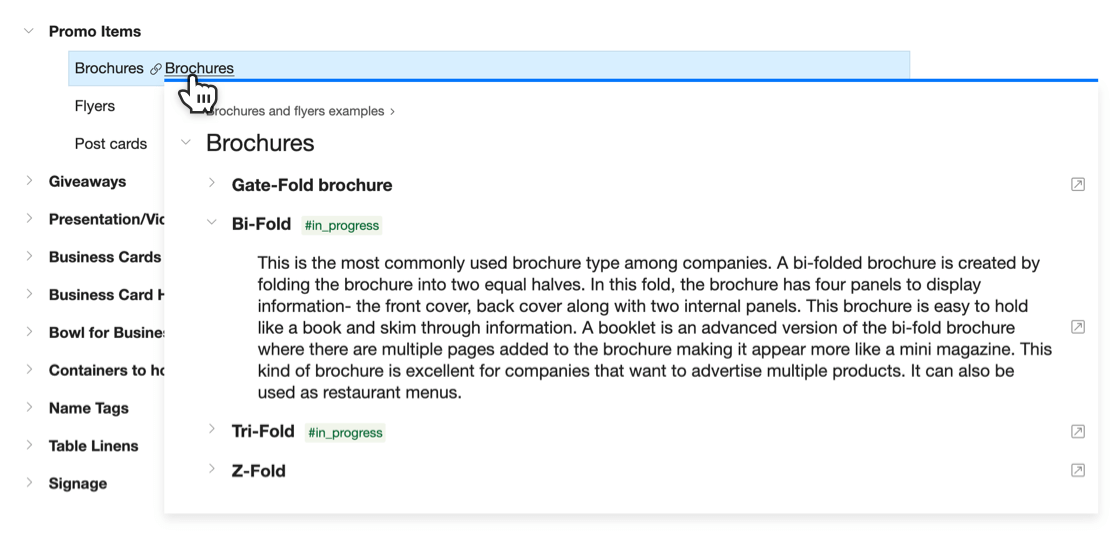
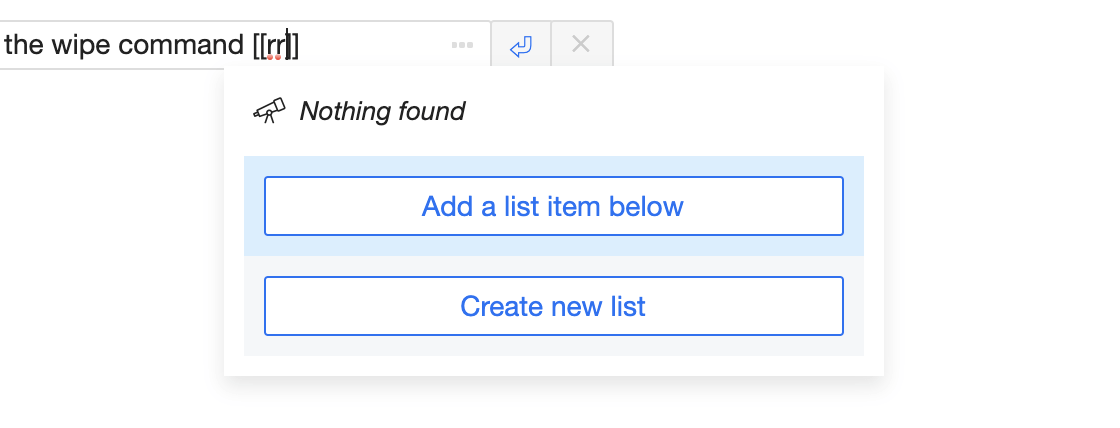
In the text of a list item, start typing [[ and select the target link from all your lists and list items:

The link has the Markdown format where the [] part contains the link's text, and the () part contains the link's hyperlink. In our case, the link's text is the text of the list item you've selected, and the hyperlink is its specific address.
A link to another list item has a small icon. A link to a list has a small Checkvist logo icon.
Preview
Even if you change the link's text, you can see the original link's text in the preview window. To open the preview, hover the link and see the linked item with all its tags, due dates, and sub-tasks.
Edit and remove links
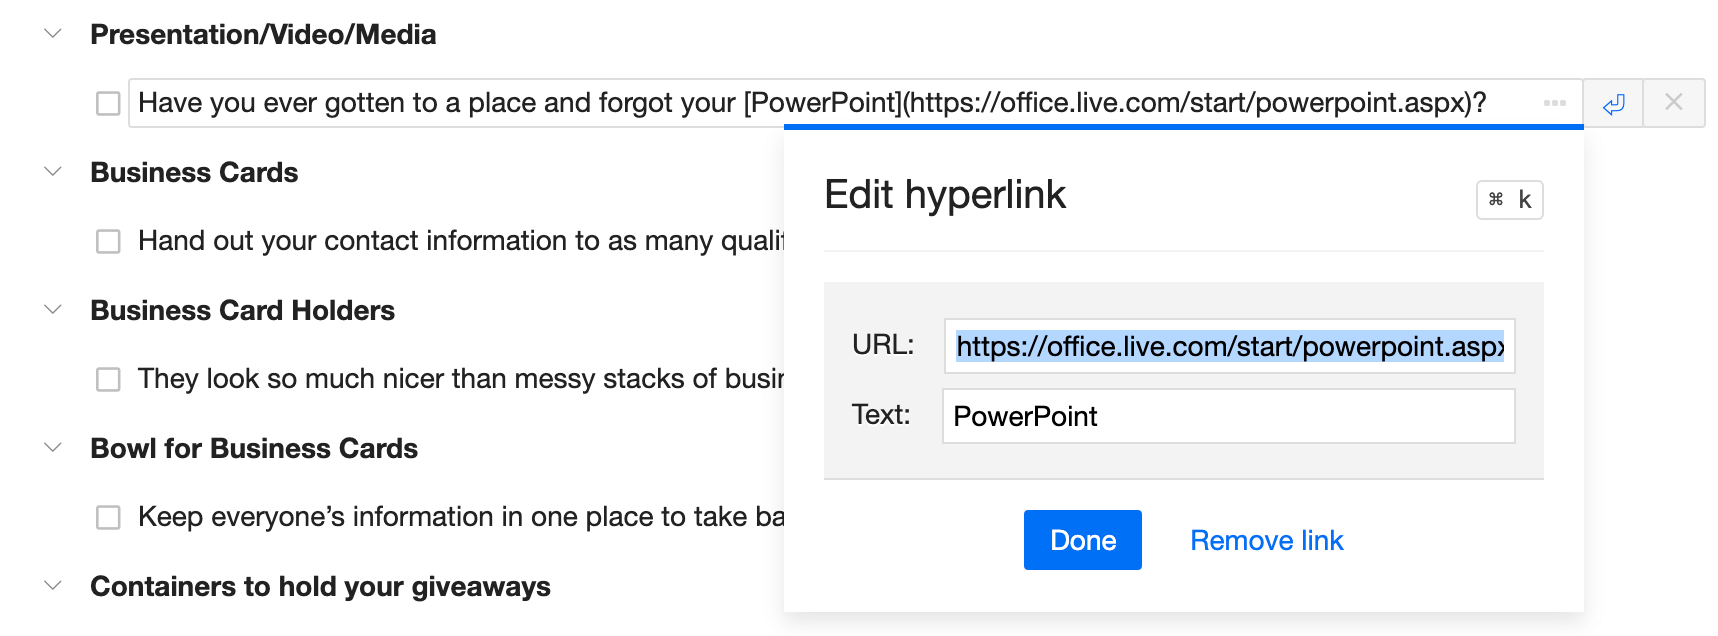
You can make edits in the Markdown link syntax or invoke the Edit hyperlink window, just like we do with external links.
Set cursor into the link syntax - and press Ctrl+ k.
Backlinks
When you create a link, the target list item will show a 'backlink' - the name of the list and the text of the 'destination' list item.
You can preview the 'backlink' the same way you preview the linked item - just hover it.
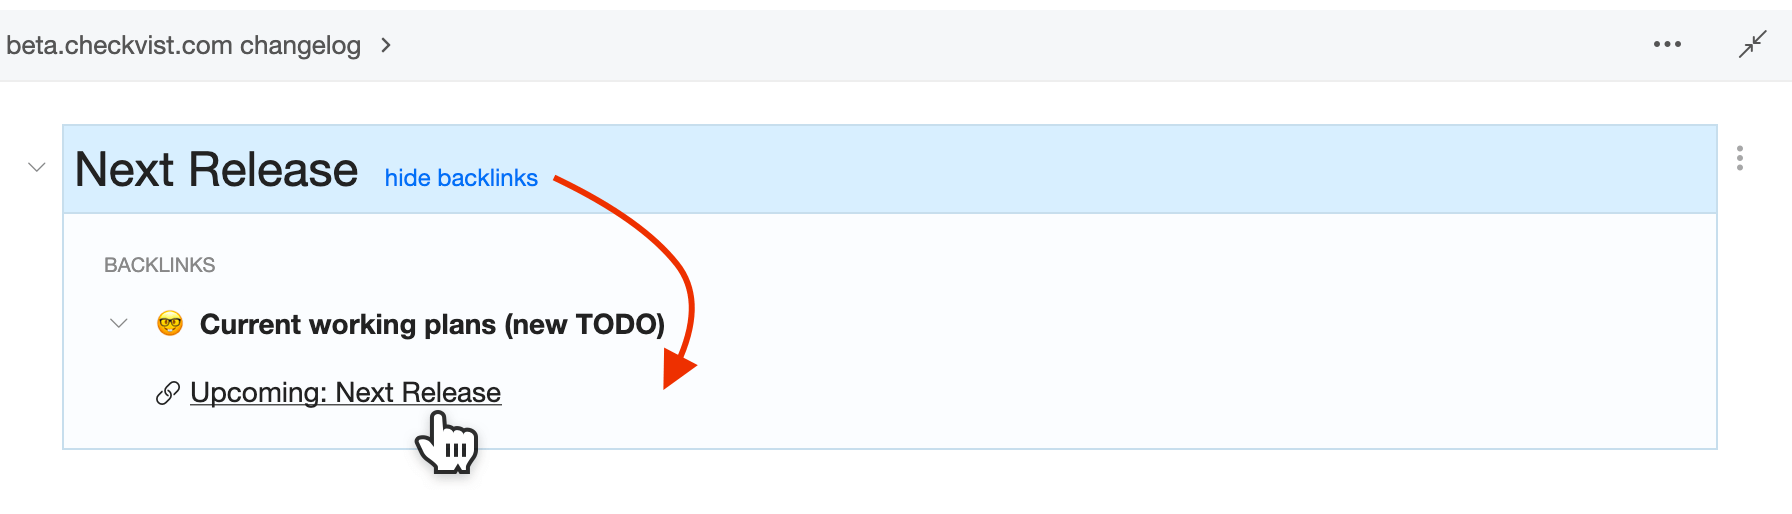
The links reflect the status of the task. If the original task is 'done', its reference link will look as 'done', struck-through, too.
Advanced linking tips
- Pre-select text and type [[. The selection will get surrounded by square brackets. Now all you need to do is to select the link target.
- You can create a link to a new list item or even a list. After that, move the new linked item anywhere in your lists with the mm shortcut.
- Use filters has:link or has:backlink to find all list items with links or backlinks. Or find them in the List details window.
Linking with permalinks
Every list item has a permalink—a hyperlink that doesn't change when you change that item's text or position. Use these links to create cross-list structures. All from the keyboard:
- Copy the permalink with tc (task copy) or lc (link copy) shortcut.
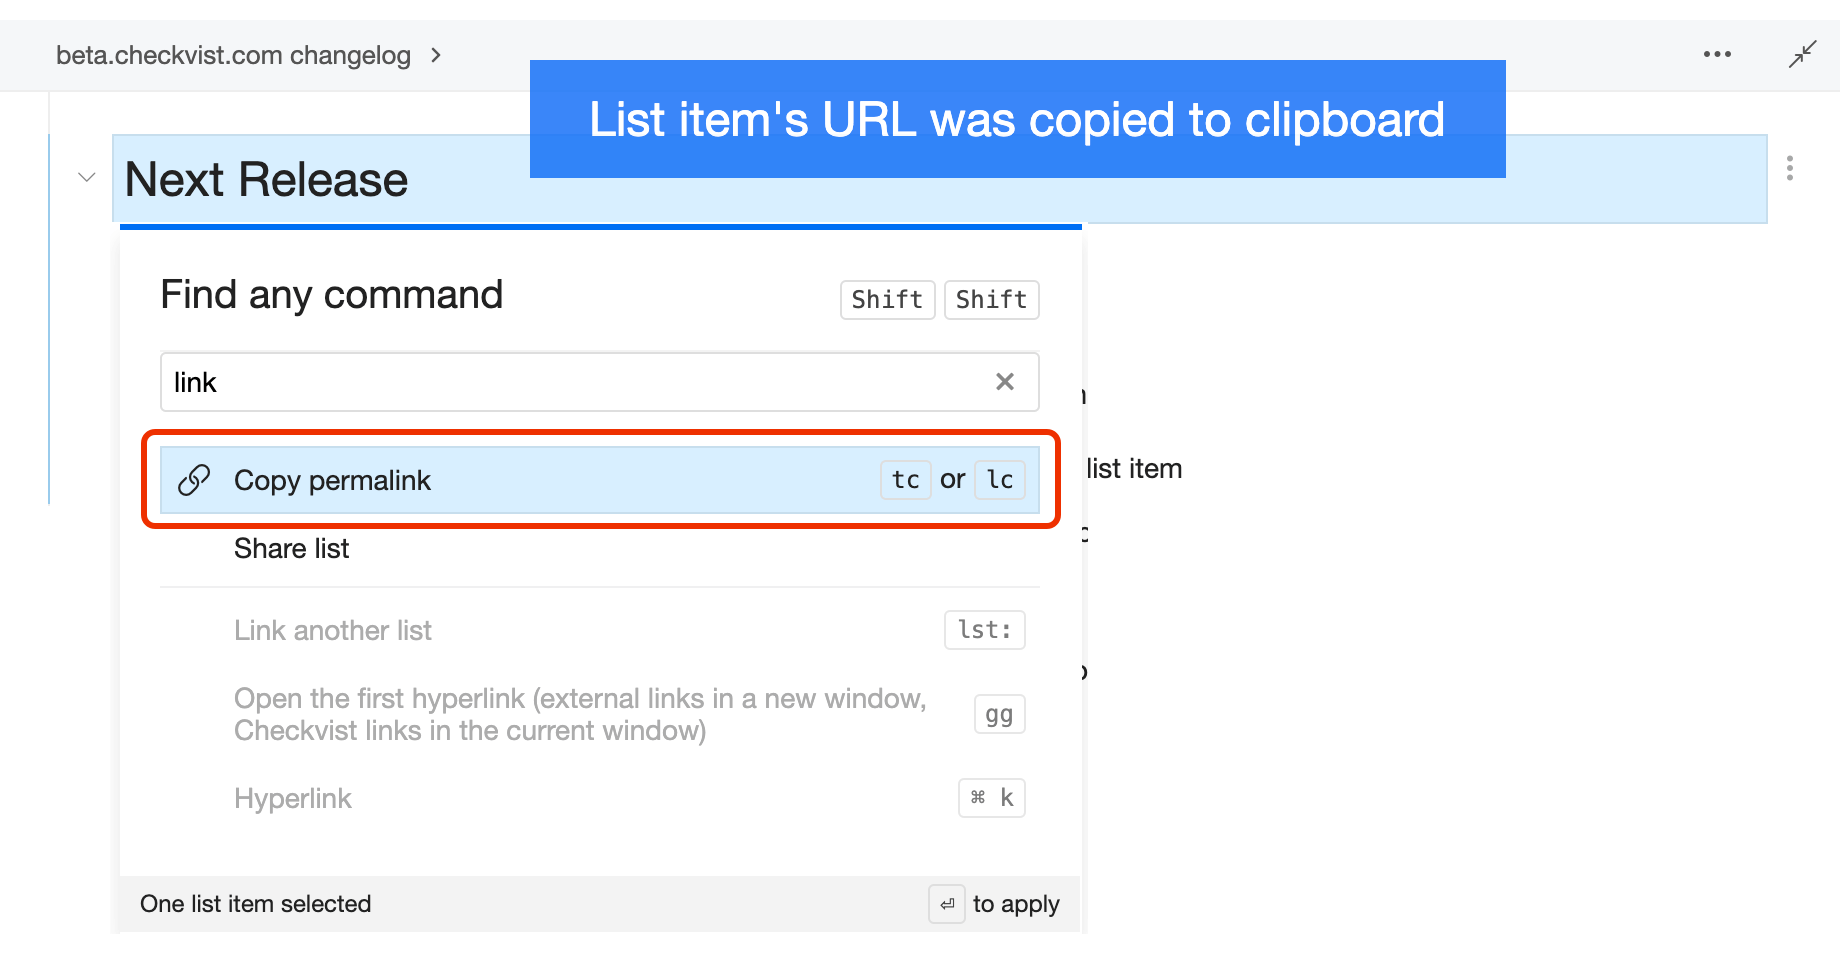
- Paste that link with Ctrl+ v into another list item.
-
The hyperlink should transform, 'embedding' the original task text.
☝️ The old syntax lst: and lnk: is deprecated.
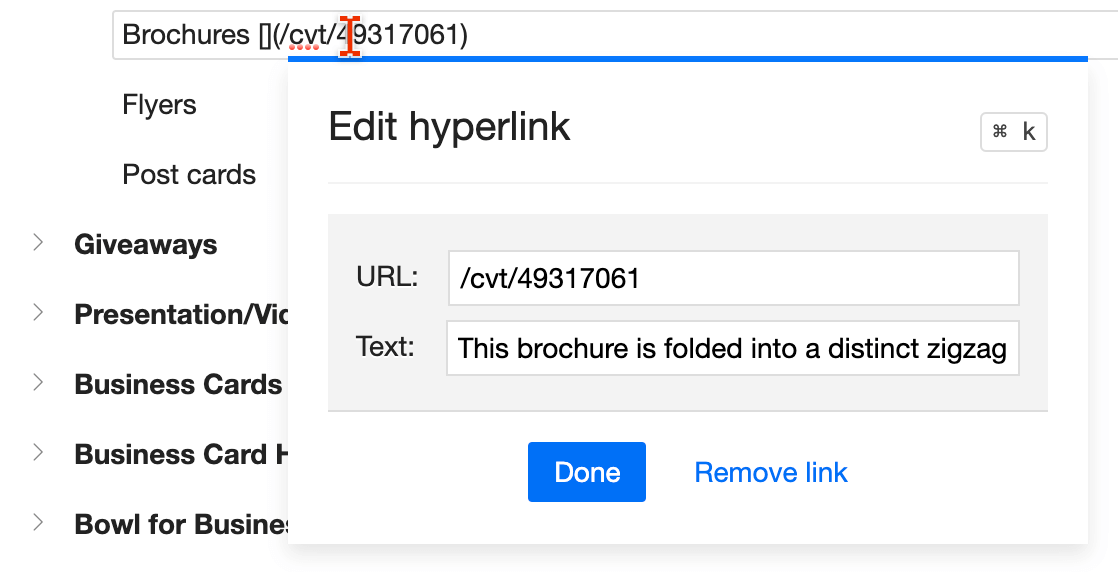
Links to external resources
Press Ctrl+ k when you edit a list item and add text with a hyperlink. Pre-select the text, and you will have to only paste a hyperlink in the URL field:
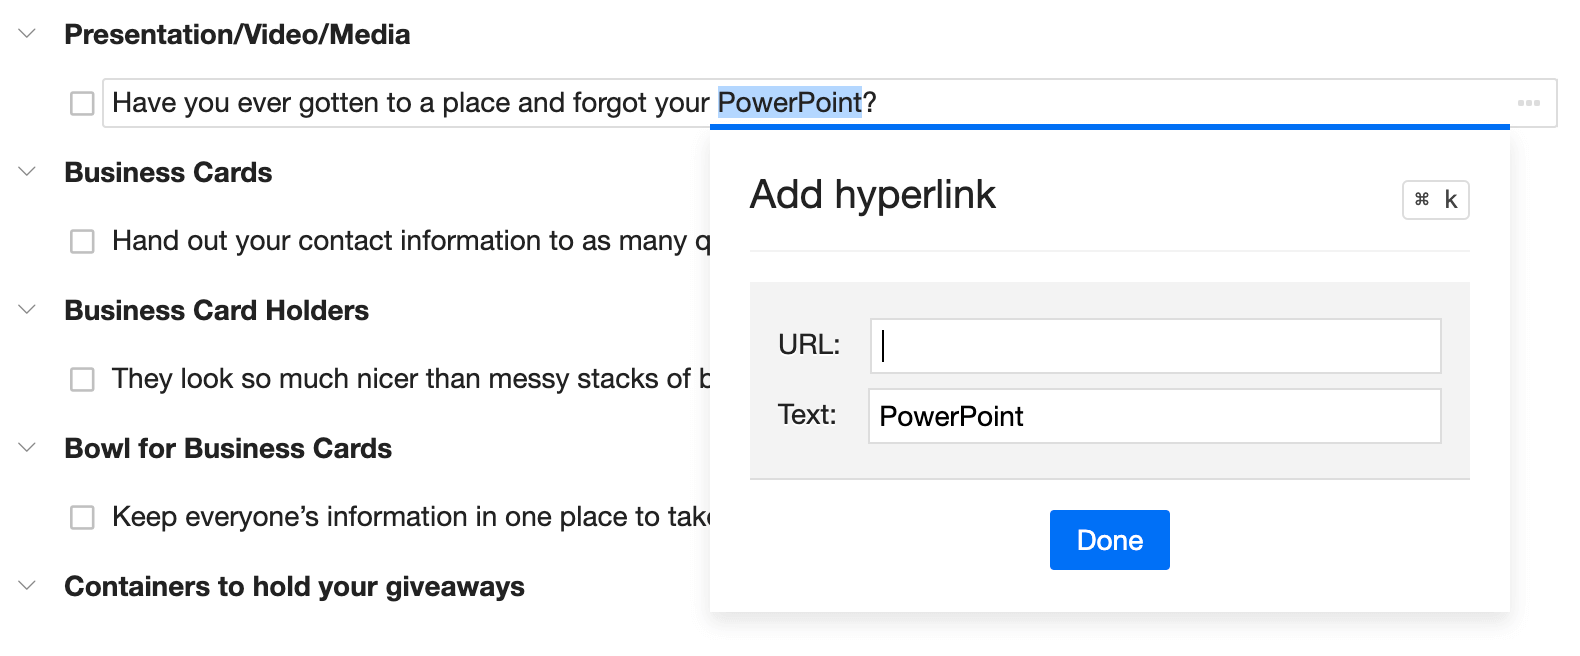
Hyperlinks use Markdown format. When you want to edit a hyperlink, press the same Ctrl+ k, and edit the text or the URL in a more convenient form:
YouTube integration
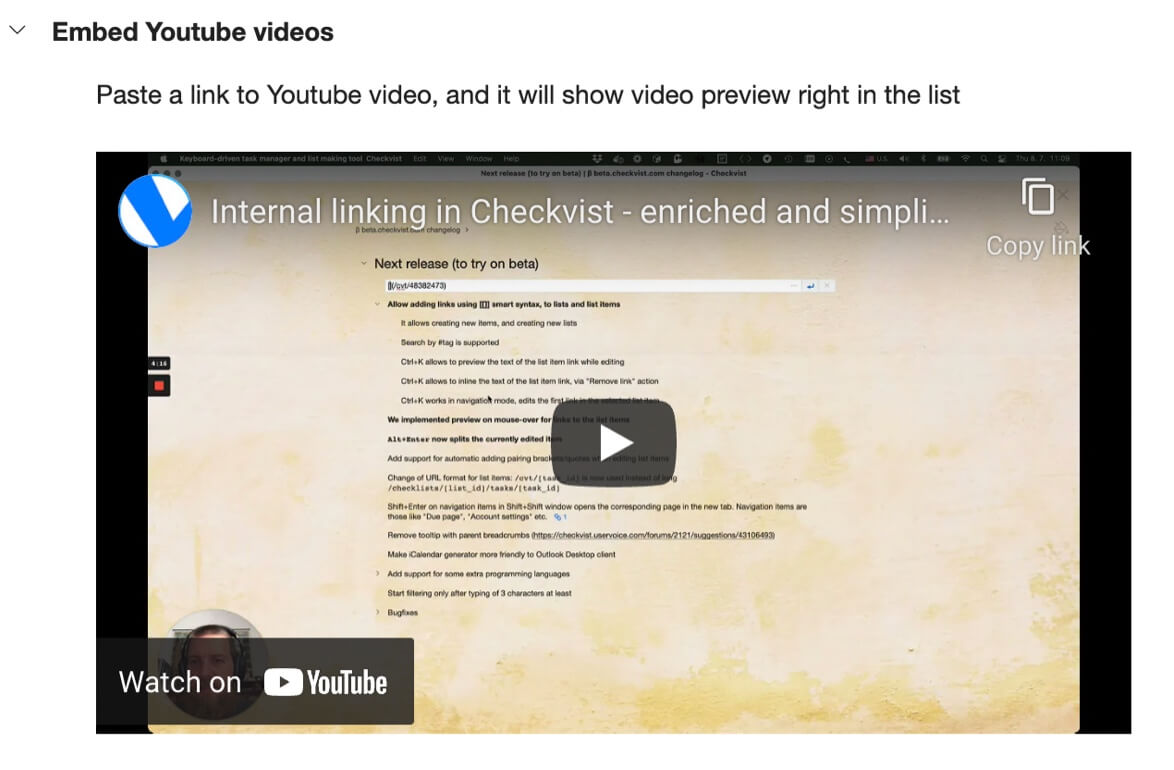
Paste a link to a YouTube video and Checkvist will offer you to Embed the video, or to keep it as a link. You can create and save whole YouTube playlists and share them with others.
☝️ The easiest way to collect and organize web links and videos is to use Checkvist Web Clipper for Chrome or for Firefox.
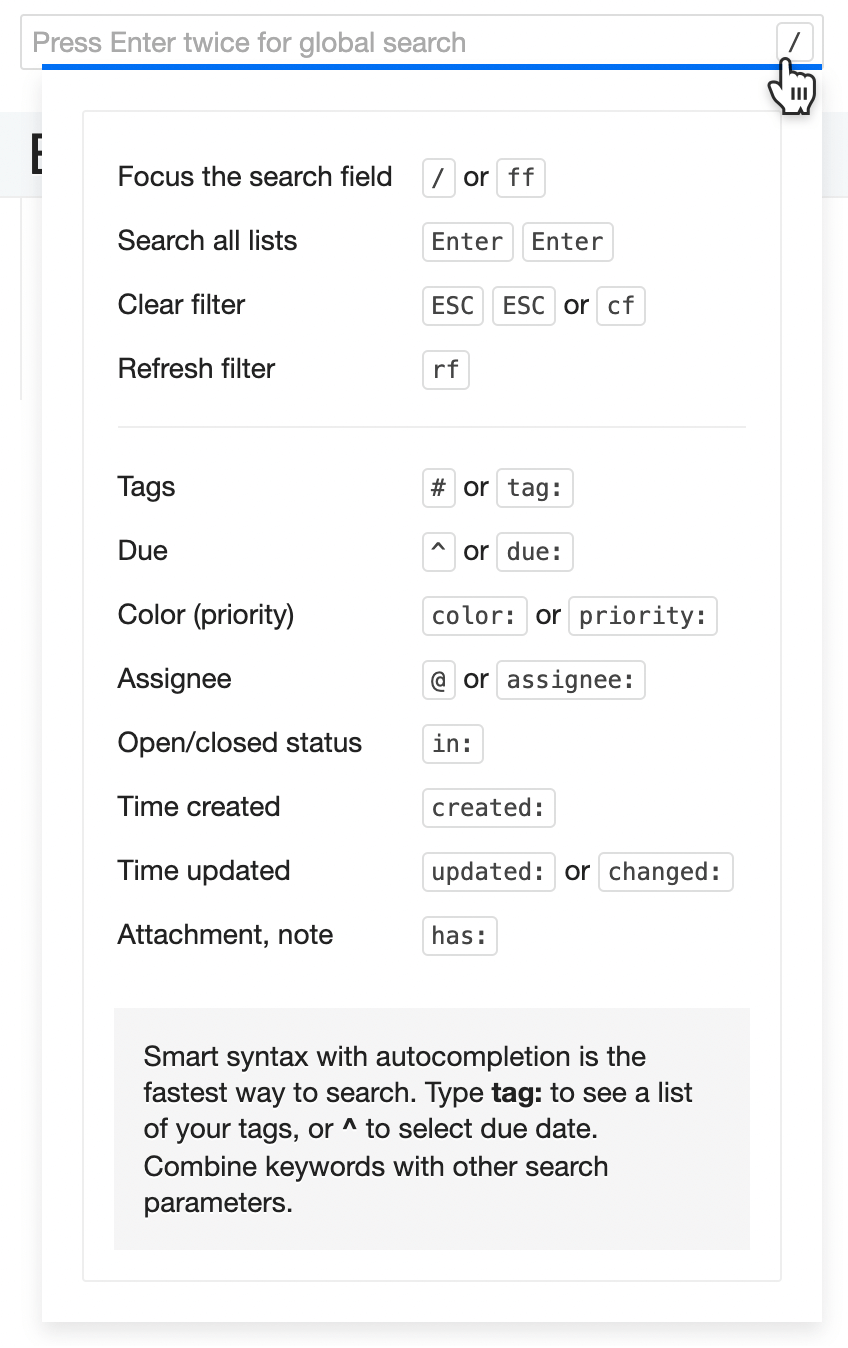
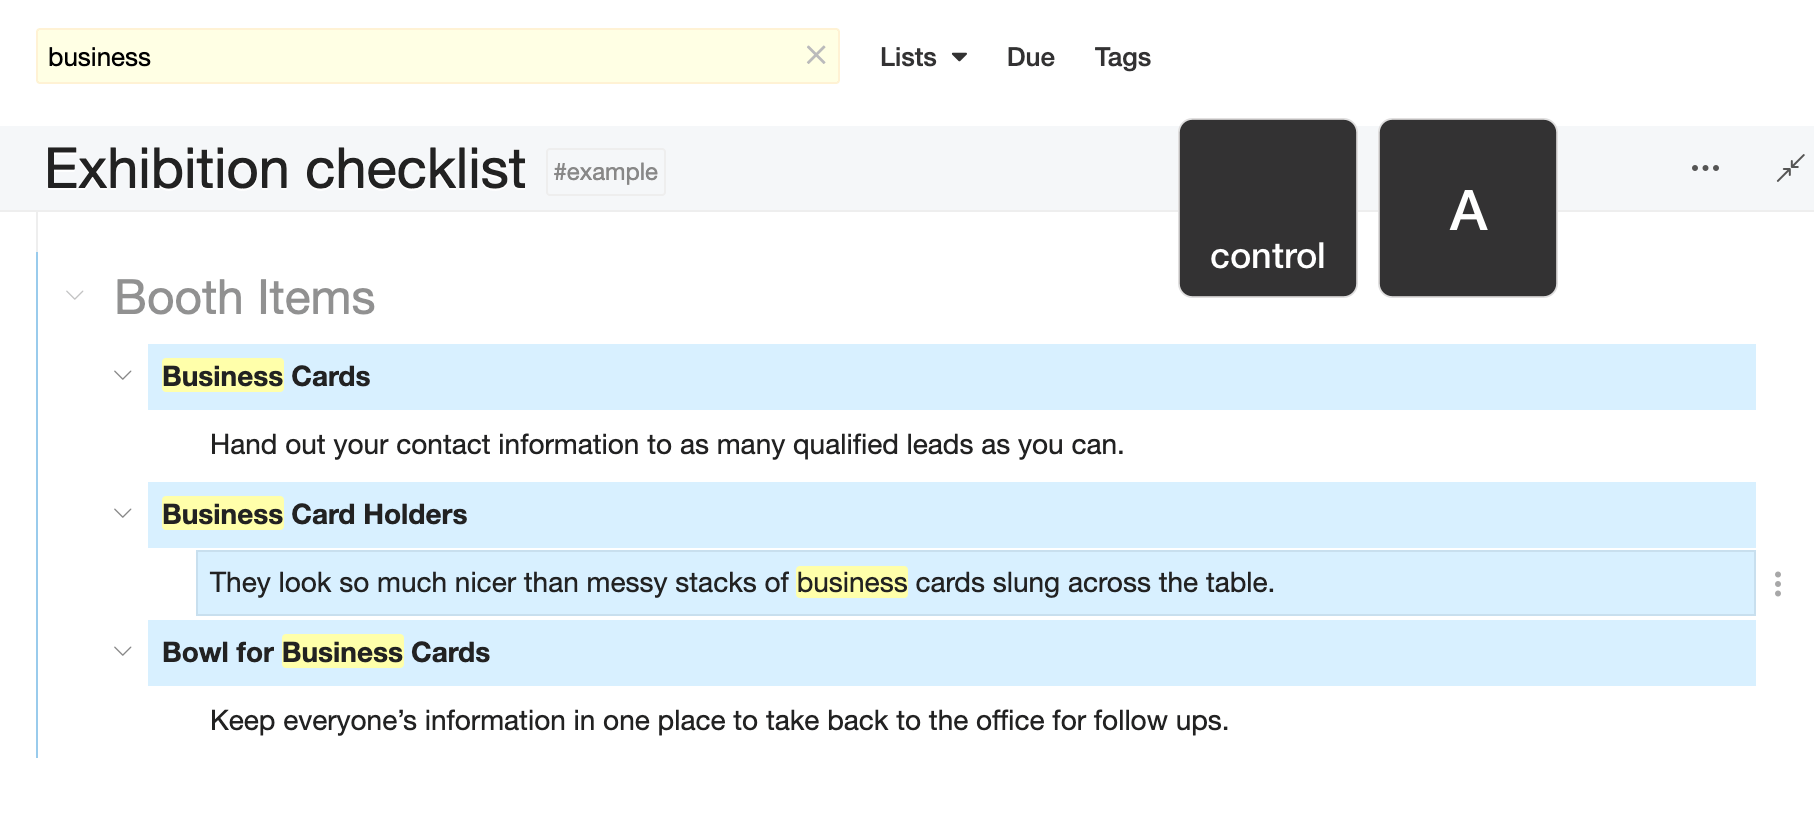
Search
Press / or ff to set focus into the Search field. Type words or other search parameters: due period, tags, assignee, color.
The filter will work as you type.
To search in all your lists, press Enter twice.
To clear filter, press ESC twice or click the X icon.
☝️ You can filter a list by word parts. But the cross-list search works only with the whole words. Otherwise, both filter and global search support the same search syntax.
Press ? to see the search syntax reference
Search syntax
| / or ff | Set focus to the search field and filter on the fly |
| Enter Enter | Search all lists |
| ESC ESC or cf | Clear filter |
| rf | Refresh filter and update results |
| # or tag: | Find items tagged with a certain tag |
| @ or assignee: | List items assigned to certain people |
| ^overdue (or due: overdue) | Find all overdue tasks |
| ^asap | All tasks marked ASAP |
| ^now | Overdue, due ASAP, and today |
| ^any | Find all due tasks |
| ^today | Tasks which are due today (without overdue and ASAP tasks) |
| ^tomorrow | Tasks which are due tomorrow |
| ^week | Tasks due this week (from Mon to Sun) |
| ^next week | Same, for the next week (from next Mon to next Sun) |
| ^last week | Find tasks from the previous week |
| ^month | Tasks due from 1 to 30/31 day of the current month |
| ^next month | Same for the next calendar month |
| ^last month | Find tasks from the previous month |
| ^none | Find all tasks where the due date is not set |
| in: open | Search open tasks only (default setting if due is specified) |
| in: closed | Search closed tasks only |
| in: all | Search all your tasks (default if due is not specified) |
| in: todo | Filter todo items (those with checkboxes). Global search does not work yet. |
| created: | List items created at a certain time |
| changed: or updated: | Tasks updated (same as changed) during a certain period of time |
| changed: 3h (2d, 1w) | List items updated during the last 3 hours (2 days, 1 week) |
| updated: Jan 8, 2022 | List items changed on a certain date |
| changed: today (yesterday, current week, previous week) | Include only items updated today (yesterday, current week, previous week) |
| updated: current month | List items last changed this month |
| color:1 (2, 3, etc) | List items colored red (blue, green, etc) |
| priority: 1 (2, 3, etc) | Same as color |
| color: any | Tasks with any color/priority |
| color: none | Tasks without color/priority |
| has: attachment | Only list items with attachments |
| has: backlink | Only list items linked from other list items are shown |
| has: hyperlink | Only list items with hyperlinks are shown (local filtering only) |
| has: note | Only list items with notes |
Export and Import
Export
Checkvist is an open system. You can import or export lists with both Free or PRO accounts, and without restrictions.
We have optimised Export for work with the keyboard, so you can do it in a couple of keystrokes.
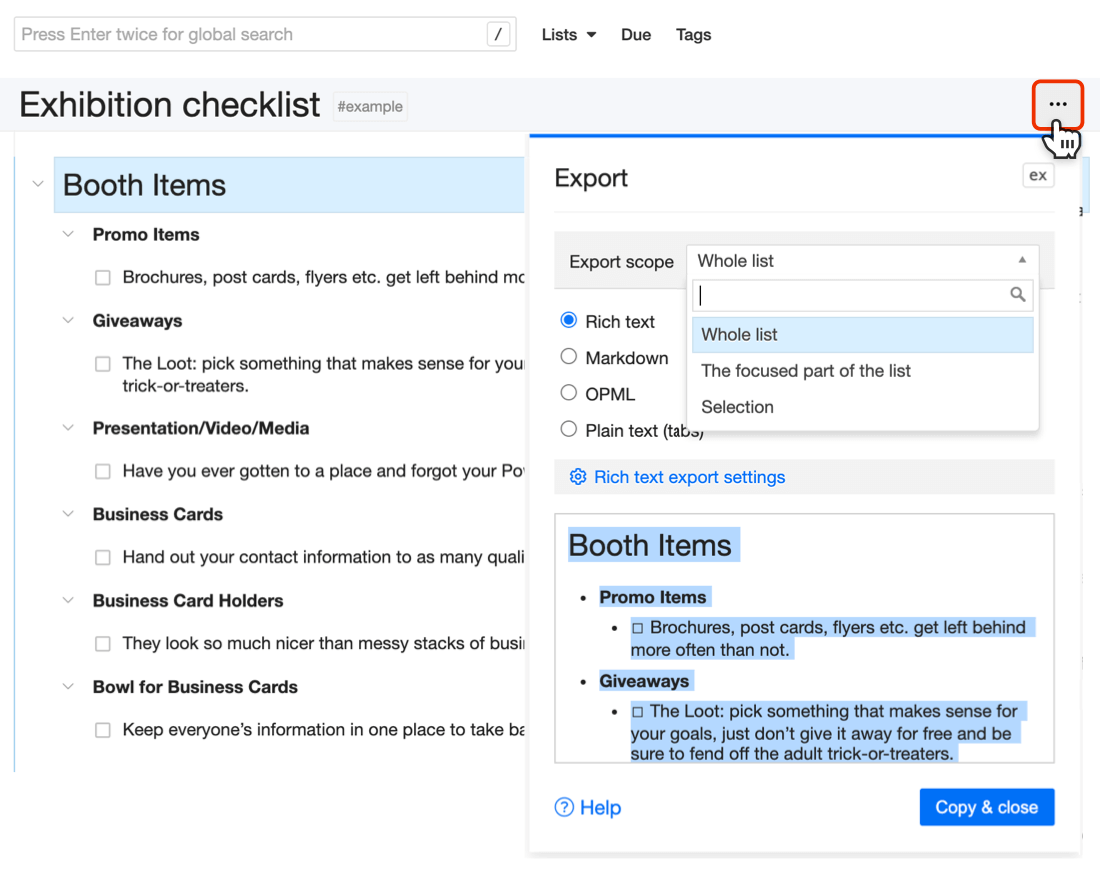
The export scope depends on the selection.
- If you have selected a branch, the default option is to export just that branch.
- If there is no selection, the default action is to export all list.
- For a focused list, the default option is the focused part of the list.
But you can change the scope in the Export dialog window.
Type ex, or click Export... in the Actions ellipsis after a list item or in the toolbar.
Each export format has its options. You can decide whether to include or omit certain data. For instance, Markdown and Rich text have an automatic header generation option.
☝️ Select several list items or branches and 'export' them with Ctrl+ c Ctrl+ v. See how to use multi-selection and bulk operations.
Supported export formats
- Rich text
- Keep text formatting (headers, bolds, italic, etc) and copy your list into an e-mail or a text editor, like Google Docs, Pages or Word.
- Markdown
- Markdown is a plain text syntax for basic
text formatting, that can convert to HTML and
other formats.
You can export a list as a hierarchy of headings (H1 is always reserved for the list name).
Specify the depth of the hierarchy with the Generate automatic headers from option.
You can keep your custom Markdown headings, if you want. Also you choose to export as headers only items with sub-items.Deeper levels of hierarchy are exported as Markdown sub-lists. If you decide to export notes, they'll appear as plain text with the note's author name before it. Embedded images will appear embedded in Markdown as well. Attached files will appear as links after the text or a heading.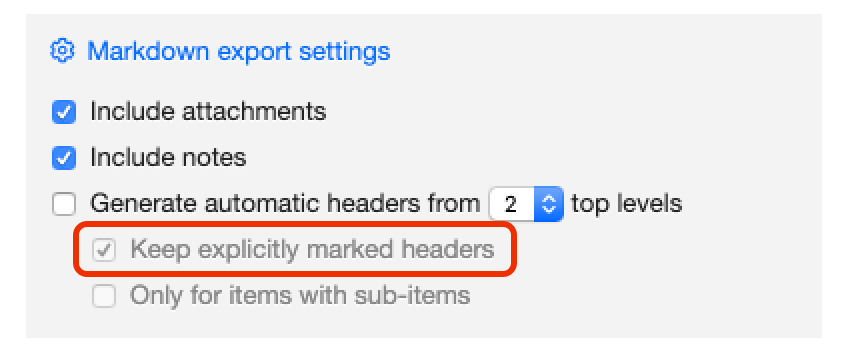
- OPML
- Outline Processor Markup Language is a
common XML format for outlines.
Currently Checkvist exports data to the OPML 2.0 format with some non-standard extensions. Each export
option adds XML attributes or additional
outlineXML elements).
This allows to export Checkvist data into OPML format, and then import into other tools, like OmniOutliner.
Besides, Checkvist uses OPML to backup all list contents with all their attributes. - Plain text
- Text stripped of any formatting, which you can open, read, and edit with most text editors.
When you export from Checkvist to plain text, subtasks are indented with tabulation.
Line breaks are replaced with spaces. Notes (if you choose to export them) have the same indentation.
Status and last update details are shown in parenthesis after the text.
Import
You can import a list from another application either from plain text (indented) or from OPML.
There are two simple options.
1. Press im or select Import in the Actions menu.
Select where you want to see imported text - on top or at the bottom of the list, or under the currently selected list item (if there is any).
'Replace list's contents is a more dangerous option. Select it only when you want to completely replace the list contents with the imported text.

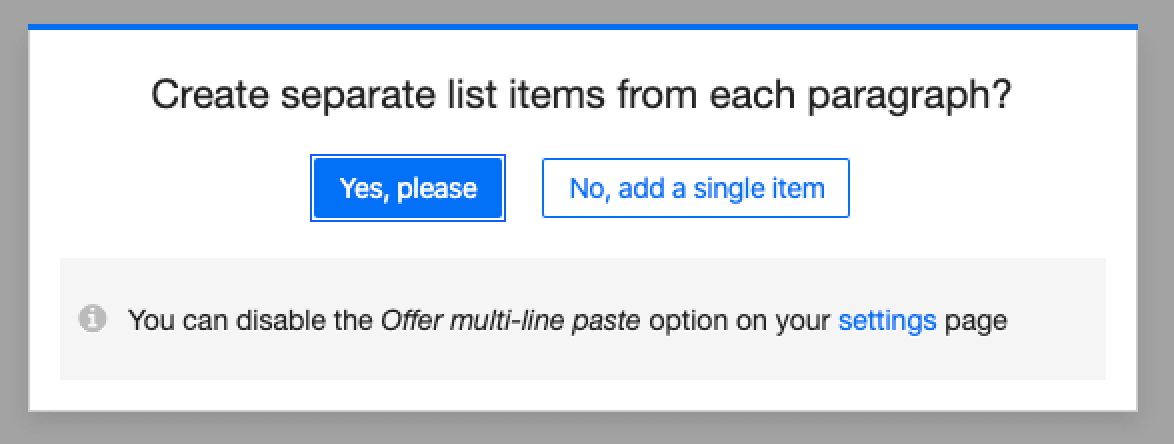
2. Copy Ctrl+ c the text in any text editor or a web page and Ctrl+ v it into your list. If you paste a multi-line text, Checkvist will ask you to choose how do you want to import it:
Supported import formats
- Plain text
-
When Checkvist imports plain text, it analyzes relative indents of every list item.
For instance:
              this is some top-level item
              - this is a sub-item
              - this is another sub-item
                - more deeply nested item

              another top-level item
The option Separate tasks with an empty line lets you import multi-line items. When enabled, you can import the following as 3 items:this is first top-level item - this is a sub-item - this is another sub-itemCheckvist preserves line-breaks during the import. - OPML
- Outline Processor Markup Language is a
common XML format for outlines.
Checkvist imports and exports data to the OPML 2.0 format with some non-standard extensions. Each export
option adds XML attributes or additional
outlineXML elements.
This allows to export Checkvist data into OPML format, and then import to other tools, like OmniOutliner.
Also, Checkvist uses OPML for backup all lists contents with all their attributes.
Integrations
Checkvist has browser extensions and third-party tools that make your work more efficient. You can find them on the Profile → Tools page.
Slack integration pro
Do you use Slack's Save for Later? Integrate Slack with Checkvist and turn your Slack messages into a fully-featured to-do list:
- Add tags, due dates, priorities
- Search and filter on the fly /
- Press gg to jump to the original Slack message
How to integrate Checkvist with Slack?
- Open your Profile → Tools page.
- In the Slack integration section, click the Add to Slack button.
- Authorize Checkvist in your Slack. To make the integration work, Checkvist needs permission to receive Slack events about saved messages and access user names.
- Select the list to store the Saved for Later messages or use the default one, called Slack Inbox.
- You can connect several Slacks to Checkvist: just click the Add to Slack button again. You'll see the list of connected Slacks in the same section.
Now, when you save a message for later in Slack, it will automatically appear in the Slack Inbox (or another list of your choice) in Checkvist. Treat it as your usual to-do list or organize and keep valuable project information.
☝️ Organizing and keeping messages from Slack comes in handy when you have a time-limited free Slack account.
Web Сlipper
Capture and structure any information from emails, issue trackers, or web pages.
Do research, plan work, create a to-do list from different sources, or collect materials for a blog or a book.
The information you collect does not pile up in an 'Inbox'.
You can select a target list, a branch in that list, add sub-tasks, notes, #tags, and ^due dates. You can @assign tasks to team members, right in the Web Clipper's window.
 Get web clipper for Chrome
Checkvist web clipper is a free extension you can find in the Chrome Store.
- Press the Add to Chrome button to install the web clipper,
- Log in or create a free Checkvist account, and
- Start organizing and sharing the information you collect on the web.
 Web clipper for Firefox
You can install the same web clipper as an add-on for Firefox, too.
How to use Checkvist Web Clipper
- Log in with your Checkvist credentials or create a free account.
- Click the Checkvist's icon in the browser toolbar or Shift-Alt-c when you find web content you want to keep.
- Select a destination list. Use as many lists as you need - for work, research, a list of movies to watch, or culinary recipes, all with a free account.
- Organize immediately, in the web clipper's window - add #tags and ^due dates after the text.
- Create subtasks - indent and separate text with empty lines.
- Share, collaborate or publish online later.
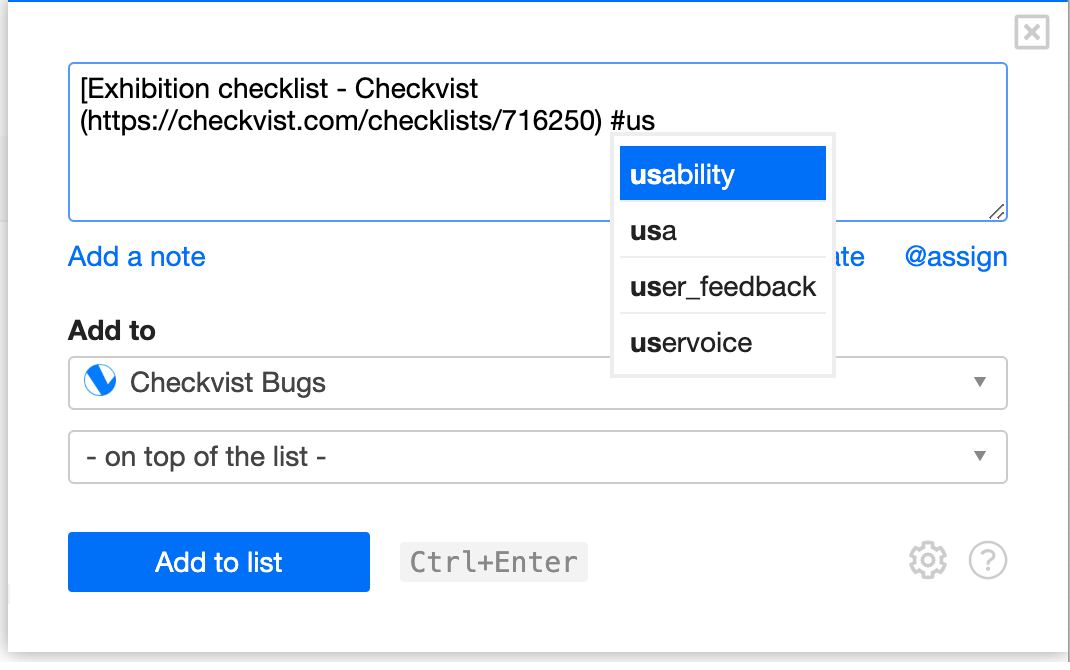
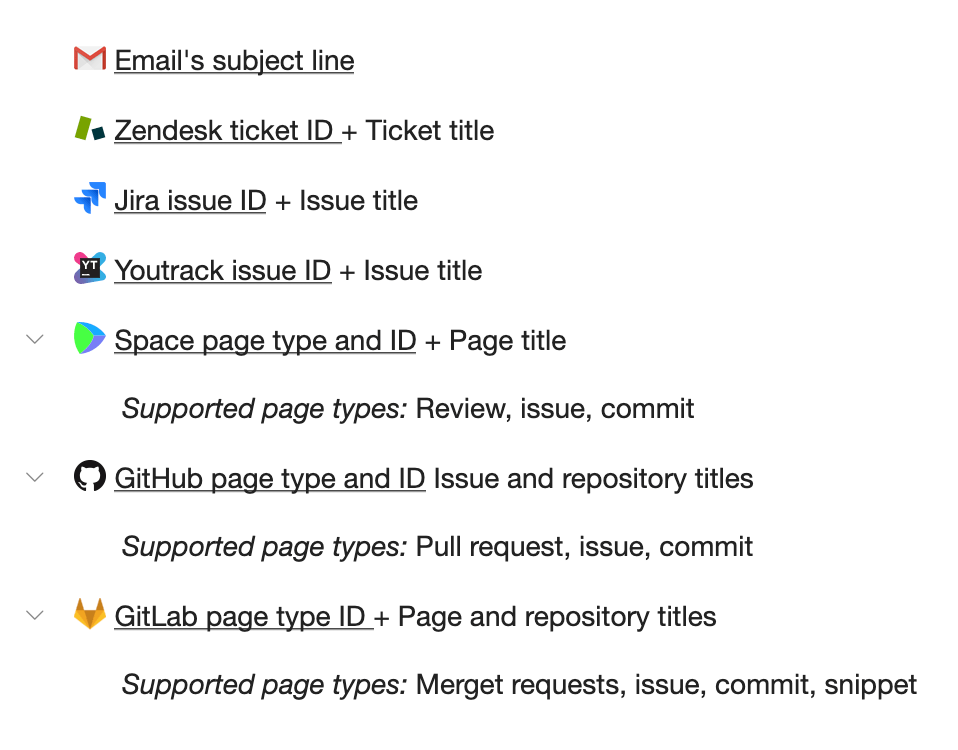
Web Clipper integrations: Gmail, Zendesk, Jira, and other apps
Clip tasks from other apps and create a 'composite' to-do list or a release plan. Create action items from
- Gmail emails,
- Jira or YouTrack issues,
- Zendesk tickets,
- GitHub or GitLab pages.
Organize everything into a flexible, searchable and sharable list. Export to Markdown or rich text format to create a clear 'done list' report by the end of the day.
To collect clippings from the integrated apps,
- Open the app's page or an email
- Click the Web Clipper's icon in the toolbar
- Select a target destination, add tags, due dates or sub-tasks, if needed
- Press Ctrl-Enter to submit
Keyboard shortcuts
- Shift-Alt-c to invoke the bookmarklet,
- Ctrl-Enter to submit,
- Tab to navigate between controls.
Add several list items in one go
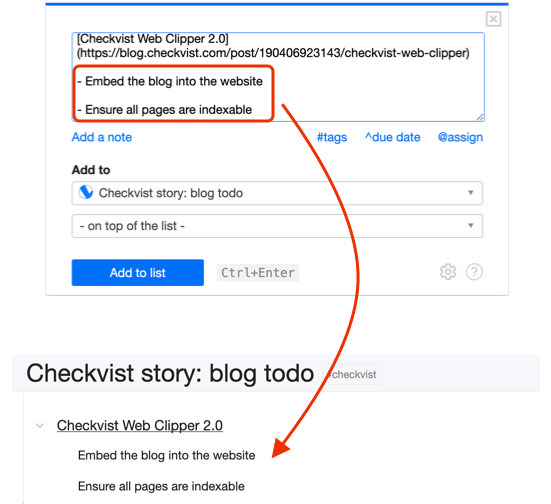
To add several sibling items, separate them with an empty line (the default option) or with a line break —
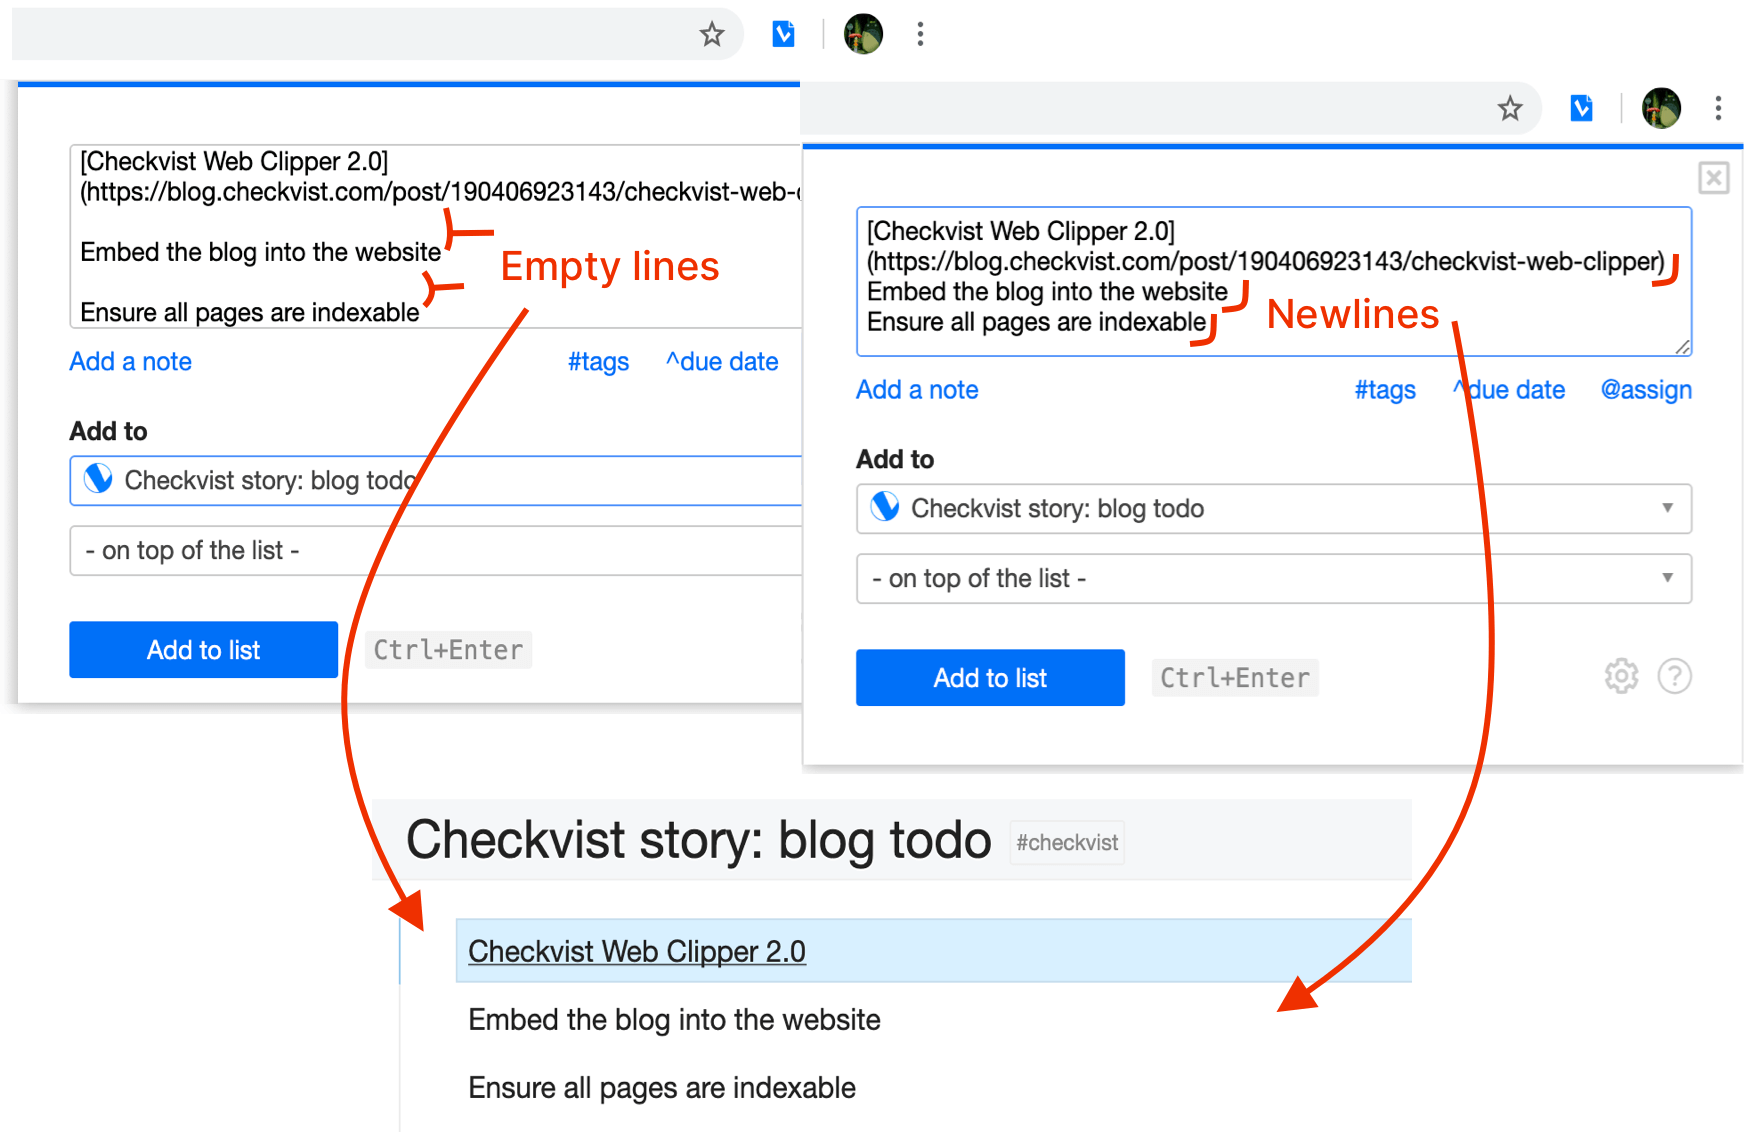
Indent with a dash to create a subtask hierarchy —
If you always want to present multi-line content as one single list item, choose the last option.
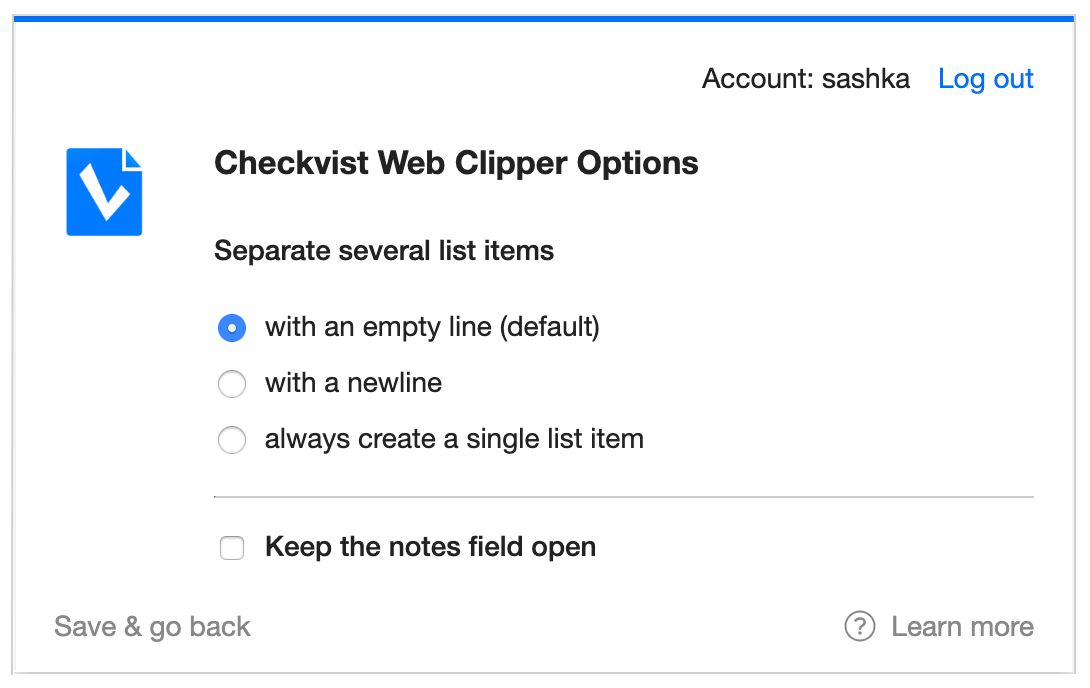
Log out and switch accounts from the same Options window.
To open Options, click the cog icon in the bottom right corner of the web clipper —
Chrome browser extension
No need to keep a tab always open to see your lists. Install Checkvist extension for Chrome, and work with your lists in a pop-up window.
Get Checkvist extension for Chrome
Firefox browser extension and sidebar
Open your lists in Firefox in a pop-up window or the Sidebar.
Get Checkvist extension for Firefox
Zapier integration
 Zapier is a platform that connects many online tools via their
Open API. If you want
to connect one online service to another (say, Checkvist to Evernote or Basecamp) you login to Zapier and create
there
a 'recipe' or 'zap'. A 'zap' specifies what exactly happens in both applications.
Zapier is a platform that connects many online tools via their
Open API. If you want
to connect one online service to another (say, Checkvist to Evernote or Basecamp) you login to Zapier and create
there
a 'recipe' or 'zap'. A 'zap' specifies what exactly happens in both applications.
How to integrate Checkvist with Evernote via Zapier (video)
Connect Checkvist with your favourite apps »
Mobile app
 Work with your lists on the go, online or offline,
on any handheld device with a decent HTML 5 support.
Work with your lists on the go, online or offline,
on any handheld device with a decent HTML 5 support.
Open m.checkvist.com on your mobile device and save it to the 'Home screen'. Use the same credentials to log in.
The mobile app has a more limited feature set, which we enrich with each release.
Open API
Software developers can write extensions or integrate Checkvist with other tools with the Open API.
If you have questions or problems, we'll be very glad to help.
Keyboard shortcuts
Unique keyboard friendliness is what makes Checkvist so special, fast, and flexible.
Many list-making tools have keyboard shortcuts. But Checkvist is the only one designed and built for the keyboard. Almost all actions have keyboard binding, but you don't have to remember them all at once.
Type Shift twice to open command finder, find a command—
and apply it with an
Enter.
You can also print the keyboard cheat sheet out, fold, and put it on your table—
Checkvist keyboard shortcuts.pdf
Basic shortcuts
| ← → | Collapse and expand nodes (also use ec for more options) |
| Enter | Add a list item below |
| Alt Enter | Add a list item above |
| Shift Enter | Add a child item |
| Tab and Shift Tab | Indent and outdent |
| ee or F2 | To edit a list item, double-click or use a keyboard shortcut |
| ei ea | Start editing with the cursor in the insert or append position |
| Ctrl+ c Ctrl+ x Ctrl+ v Ctrl+ d | Copy, cut, paste, duplicate |
| ctrl shift c | Copy selected item and its Checkvist URL to the clipboard |
| Del | Delete, see wipe |
| Ctrl+ z or uu | Undo the last action |
| Shift ↑/↓ | Select adjacent list items |
| Ctrl+ a | Select all expanded list nodes |
| st or Ctrl+ click | Select several list items with the keyboard or with the mouse |
| ESC | Cancel editing, close any pop-up window, or remove selection |
Navigate
| ↑ or j ↓ or k | Navigate up and down the list |
| Home or Fn ← | Go to the first list item in the list |
| End or Fn → | Go to the last list item in the list |
| PgUp or Fn ↑ | Go one page up in the list |
| PgDown or Fn ↓ | Go one page down in the list |
| g ← | Go to the previous location in the list |
| g → | Forward to the next location in the list |
| ll | Go to a list or a list item; create a new list |
| gh | Open the Lists home page |
| gd | Open the Due page |
| gt | Open the Tags page |
| gg | Single Checkvist link opens in the same window, multiple links or links from sub-items open in separate tabs |
| Shift gg | Open hyperlinks in new browser tabs |
Move and re-order
| Hold down Shift | To drag-n-drop list items, hold down the Shift key |
| Ctrl+↑ Ctrl+↓ | Move list items up and down on the same hierarchical level (jump mode) |
| Ctrl+ Alt ↑ or Shift Alt ↑ | Move a list item up one by one (crawl mode) |
| Ctrl+ Alt ↓ or Shift Alt ↓ | Move a list item down one by one (crawl mode) |
| Ctrl Home or Ctrl+ Fn ← | Put the selected list item on the topmost position in the list |
| Ctrl End or Ctrl+ Fn → | Put the selected list item on the last position in the list |
| Alt PgUp or Ctrl+ Fn ↑ | Move to the top position under the parent list item |
| Alt PgDown or Ctrl+ Fn ↓ | Move to the bottom position under the parent list item |
| mm | Move selected list items between lists |
Hoist/Focus
| Shift → | Toggle hoist (focus) for the list item |
| Shift ← | Un-focus and focus parent item |
Expand or collapse branches
| ec | Expand/collapse options |
| Ctrl Shift → | Expand all branches in the list |
| Ctrl Shift ← | Collapse all branches in the list |
| Ctrl Alt . | Expand the selected branch |
| Ctrl Alt , | Collapse the selected branch |
| ec0 | Collapse list + un-focus it |
| ec1..ec9 | Collapse list to the corresponding level |
Change task status
| Del | Press to toggle the task status |
| Shift Spacebar | Mark a task as invalidated |
| reset | Re-open all completed tasks in the list or under selected node |
| wipe | Delete all completed tasks in the list or under selected branch |
Formatting
| Shift Enter | Insert a line break while typing |
| Alt Enter | Splits currently edited item at the cursor position |
| mh | Add or remove Markdown header markup |
| Ctrl+ b | Bold text |
| Ctrl+ i or ii | Italic text |
| todo or do | Toggle task/todo [] prefix |
| Ctrl+ k | Add or edit a hyperlink |
| tc or lc | Copy the task permalink to clipboard |
| 1 2 … 9 | Set priority colors |
| 0 | Remove priority colors |
| Ctrl+ ; | Insert current date, like in Google Spreadsheets |
| Ctrl+ : | Insert current time, like in Google Spreadsheets |
Two-letter shortcuts for actions
| aa | Actions menu for the selected list item(s) |
| la | List actions menu |
| nn | Add a note or comment to a list item |
| cn | Clear notes on the selected list items |
| sn | Show/hide all notes on the page |
| dd | Set a due date |
| td | Schedule a task for today |
| tm | Schedule a task for tomorrow |
| as | Due ASAP, without a definite due date |
| dr | Repeating due date |
| df | Toggle the relative and exact due date formats, see the full due date in the tooltip |
| cd | Clear due dates (press twice to delete a repeating due date) |
| tt | Show the Tags window to set and manage tags |
| ct | Clear tags on the selected list items |
| gt | Open the Tags page |
| ae | Delegate a task to another person |
| ca | Clear assignees on the selected tasks |
| at | Attach files |
| im | Import list items from text or OPML |
| ex | Export list items in RTF, Markdown, OPML formats |
| xx | Extract the selected branch as a new list |
| / or ff | Set focus to the search field and filter on the fly |
| oo | Show Options menu for the current page |
| hc | Hide/show completed and invalidated list items |
| hf | Hide list items due after tomorrow |
| pc | Show or hide progress counter and estimate summary |
| sc | Show/hide list item's context on the Due and Search results pages |
| sd | Show/hide list item details |
| ss | Sort the whole list or the branch under selected item |
| rd | View and restore the list items deleted in the last 24 hours/10 days (for PRO) |
| wc | Word and character counter |
| om | Distraction free Zen UI |
Smart syntax
Like keyboard shortcuts, the smart syntax is a great time saver. Use smart syntax while typing, and select the attributes from the autocompletion window.
Attributes
Add attributes to the end of the list item, and use completion to select the right one.
| # | tag |
| ^ | due date |
| ! | priority |
| @ | assign |
Linking
| [[ | Link to any other list item or a list blog post |
| Ctrl+ k | Add, edit, or remove a link blog post |
| URL recognition | Writing text like http://google.com will automatically transform it into a hyperlink, too. |
| [text](URL) | A link to any other web-page |
| tc or lc | Copy the task permalink to clipboard |
| [jira: issue-ID|URL] [youtrack: issue-ID|URL] |
Issue tracker integration—use these link if you want to list an issue from the two supported issue tracking systems—Jira and YouTrack. You can easily create such links using Checkvist Bookmarklet. |
Text formatting
| ---- | List separator. If a list item consists only of 4 or more hyphen marks (without any text), it will automatically be transformed into a list separator. |
| Markdown | You can use Markdown to format text |
| HTML | You can also use basic HTML markup |
Image uploading and embedding
| img: | Upload an image and embed it directly into the text details and examples |
Markdown
Markdown is a plain text syntax for basic text formatting. Markdown has several dialects. Checkvist supports 'Github Flavoured Markdown', especially good for structured text and code snippets.
Markdown support is enabled by default. You disable it for a single list in the Options menu. To disable Markdown support for all new lists, un-select the option on the Settings page.

Use mh (Markdown heading) keyboard shortcut to mark a line as a header. Depending on the depth of the list hierarchy, the selected list item will become a header from H2 to H6 level.
If you want to set H2 somewhere deep in the list hierarchy, focus (hoist) that line first, and then mh to make it a H2 heading.
Here's a basic Markdown formatting guide. You can use together with Checkvist smart syntax.
List styling
| Prefix [] | Shows checkboxes for the list item and sub-items |
| Prefix [*] | Shows list bullets for the item or sub-items |
| Prefix [1] | Enables list numbering for the sub-items |
Headings
| mh | Add or remove Markdown header markup |
| # | The largest heading |
| ## | Second level heading |
| ###### | The smallest heading |
Text formatting
| [text](URL) | A link to any other web-page |
| **Bold text** | Bold text, also Ctrl+B on selection |
| *Italic text* | Italic text, also Ctrl+I on selection |
| ~~Deleted text~~ | |
|
> Blockquotes > > Can be multi-line |
|
| * List item (un-ordered) |
|
| 1. List item (ordered) |
|
| `return this.add(child);` |
return this.add(child);
|
|
``` // This is multi-line code x = x + 1 if a < b y = y - 1 ``` |
// This is multi-line code
x = x + 1 if a < b
y = y - 1
|
|
```html <h2 class="heading">Title</h2> <p> paragraph of text </p> ``` |
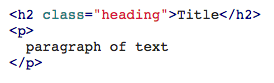 Language prefix (```html, ```ruby, ```php, etc.) enables syntax highlighting. |
|
Tables Use Shift-Enter to write multi-line text within a single list item |
See the GitHub reference on table syntax |
| Escape special characters, like # | \# |
✅ Markdown shortcuts work with multi-selected list items (read more on bulk operations)
PRO features
Security
2-step login verification
Always validate your logins with an authenticator app on your mobile phone.
🔎 More about two-step verification
30-day backup
Your data will be available to you anytime with the automatic 30-day backup to the Cloud and the manual backup of all your lists in OPML format (.zipped).
Checkvist doesn't backup lists if there were no changes. So if you didn’t change anything for a couple of days, you'll have only one backup file, not three same ones.
Restore deleted items
PRO customers have 10 days, not 24 hours to restore deleted list items.
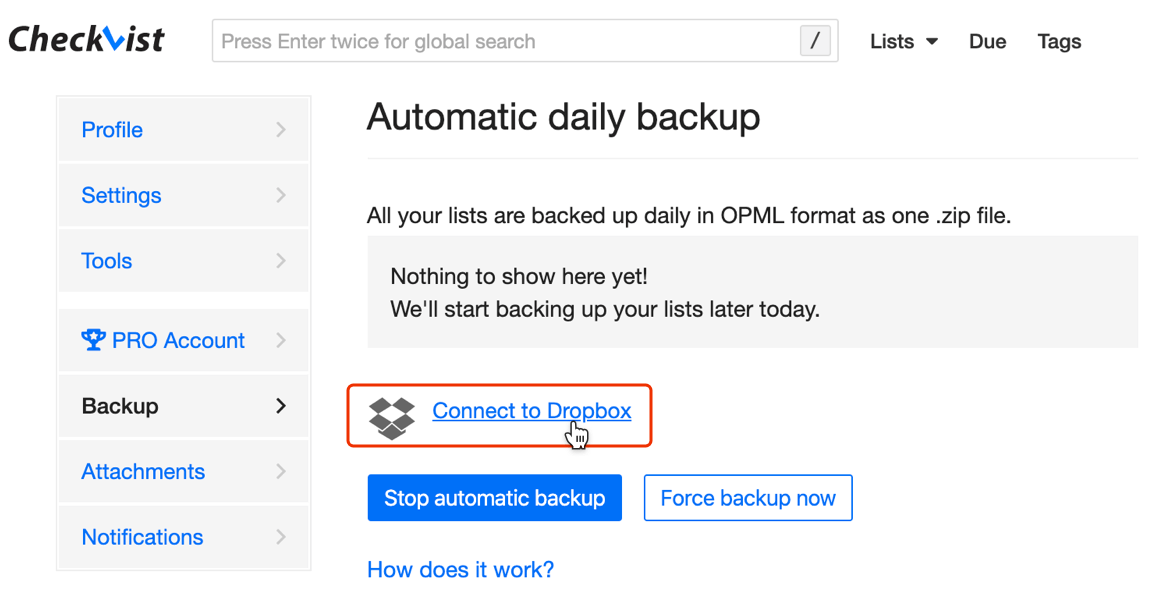
Dropbox integration
With Dropbox integration, you save the latest backup as zipped OPML files to your Dropbox folder. If you need an older backup file, you can always get it from the Dropbox history.
Collaboration
Better teamwork support
- Common design scheme
- Instant team-wide sharing
- Common space for attachments
- Synchronised payments for all people in the account
Secure public sharing
Set expiry time when you want to make the list public for a short time. No need to be afraid you'll forget to disable public sharing. The list will become private again automatically.
You can also password protect the public link. You can password protect the public link. In this case, all people will need the password to access the list. When you use this feature, it's better to share the password and the public link via different media.
Search engine indexing
PRO customers can make their public lists visible for search engines. After that, people will be able to find public content on the web themselves.
Assign tasks
Assign tasks to other people with the ae shortcut or @-mention people in the task's text.
Assignees receive email notifications right after a task was assigned to them, and each time the task or its sub-tasks are changed.
Search all lists by the assignee's name to see what is assigned to that person.
Tags: extra options
Press tt on a tagged list item to pen the Manage tags dialog window. Here you can
- Change the tag color
- Make a tag private (so only you can see it)
- Rename or merge a tag
- Delete a tag from all your lists.
Color (priority) customization
PRO customers can customize priority colors bound to 9 number keys.
You can do it on your Profile→Settings page, or right in the Colors dialog window. Customized color palette works for all lists and users in your account.
Due dates
Repeating tasks
Press the Repeat... button in the Due dialog window or type dr to set a repeating due pattern:
You can pause or delete repeating tasks, import and export them.
You can even control whether a task becomes 'overdue' after you've missed the due date. More on how to work with repeating tasks »
Calendar integration
Integrate Checkvist with a calendar and see all your scheduled tasks Google Calendar, Apple Calendar, MS Outlook Calendar, or any other calendar that can get updates with a iCal feed.
☝ 2-way synchronization is now available only for Google Calendar. All other calendars will only sync one way, that is receive updates from Checkvist.
️To connect your Calendar with your Checkvist account, use the Connect to Calendar button on the Due page, or open the Due date dialog box (use the dd shortcut) and Click the Connect to Calendar link.
Right now all Checkvist's tasks have the same due time. You can set it on the Profile → Notifications page.
Google Calendar integration
When you integrate Checkvist with your Google Calendar, you grant Checkvist rights to create a new calendar called 'Checkvist' there.
All your scheduled tasks from Checkvist will sync with that Calendar. The tasks will sync both ways - when you update them in Checkvist, and when you update them in Google Calendar.
When you delete an event in the Calendar, Checkvist keeps the task but removes the due date.
When you create a new event in the Calendar, a new task with a due date will appear on top of the list you select in the Calendar integration dialog window.
️ More details and troubleshooting of Google Calendar integration
iCalendar feed
Use the iCalendar feed link to integrate Checkvist with your favourite calendar app. The link works with any calendar app that supports the iCalendar feed format: MS Outlook Calendar, iCal, and many others.
Copy the feed URL from the Calendar integration dialog window, and use it to subscribe your calendar app to this feed.
Notifications
Due email notifications
Configure due date alerts and receive daily due dates email notifications. The notification will include tasks which are overdue, due today, tomorrow or ASAP.
Notifications about changes
Watch a list and track all changes made by others. Click the 'bell' icon in the top bar of a list you want to watch, or select several lists on the Profile → Notifications. Select notification options.
Now you will receive emails with all changes made in the "watched" lists. Use this feature regardless of your list editing permissions. You can get list updates via email even as a reader on a public list.
How to configure notifications
Open notifications page to set email dispatch time or select a list you want to get notified about.
You can pause all or some notifications. That comes in handy when you are going on vacation, or stop actively working on a project, for example.
To see how the email looks, send yourself a test notification from the profile page.
Multi-selection (bulk operations)
You can work faster and save time on repetitive operations.
1. Select several list items at once
- Adjacent list items with Shift-arrow
- Sparse list items with Ctrl+ click or st (permanent or 'sticky' selection you can set with keyboard)
2. Apply the same action to all
- Re-order, indent, un-indent with Ctrl+↑/↓, Tab and Shift-Tab
- Copy, cut, paste with Ctrl+c, Ctrl+x, Ctrl+v
- Move to another list with mm
- Set colors (priorities) 1, 2, 3, 4, 5, 6, 7, 8, 9
- Remove color (priority 0
- Markdown formatting with mh (headings) and Ctrl+B, Ctrl+I
- Tags tt (tag), ct (clear tags)
- Due dates dd (set due date), cd (clear due date), as (ASAP), td (today), tm (tomorrow).
- Assign ae (assign), ca (clear assignee)
- Export a part of the list ex
Some actions are not supported for obvious reasons. You can't sort, edit, or add new items on the different level of hierarchy at the same time.
3. Select all
Press Ctrl-a and select all list items in the list.
When a list has an active filter or focus, Ctrl-a will select only all the matching items. Which you can then copy, or export, or add a tag or a due date to.
Attachments and images
Attach files and embed images with a couple of keystrokes. Press at on a selected task, or type img: when adding/editing a task to embed an image into the text.
One user can upload up to 2GB disc space.
See how it works in a 1 min video -
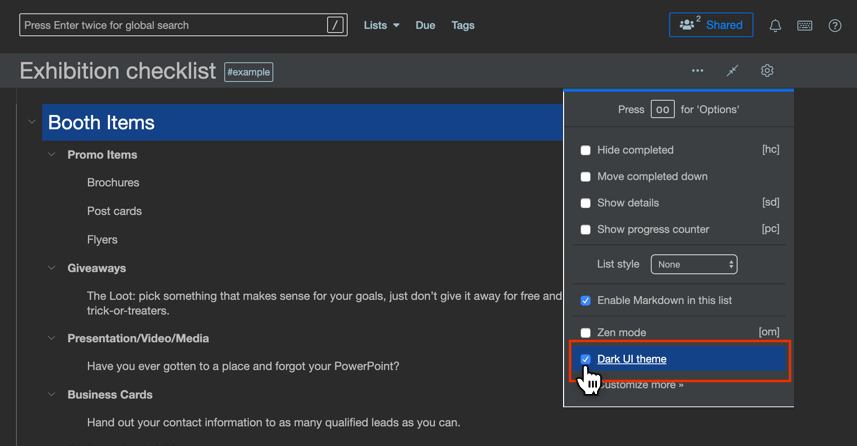
Darcula UI
Switch to the dark UI theme in the Settings menu, or press oo and navigate down the list of options:
Customization
The Checkvist's UI is rather minimalistic, but with a PRO account, you can customize it.
Change tag colors
PRO customers can customize how they see tags. You can change tag color in the Manage tag dialog box.
You can even associate tags with icons, but you will need a bit of CSS code for that.
Customize priority colors
Open the 'Settings' tab of your profile page. Select different colors for priorities, associated with numbers. Or restore defaults, if you don't like what you've customized.
Logo, navigation, UI colors
Open the 'Settings' tab of your profile page. You can either select the UI colors or customize the UI with CSS. Want to make text bigger or smaller, add icons to the tags, customize notes or user pics? These code snippets will help Checkvist CSS customization
Start a free trial—or subscribe
If you subscribe, there won't be any 'upgrade' fees. Your price is fixed forever, no matter how many new features appear in the PRO plan.
Plus, you get a warm feeling of supporting a bootstrapped project ;)